1.41 FAQ-157 How do I add a date time stamp to my graph?
Last Update: 10/7/2022
Add-DateTime-Stamp-to-Graph
- To add the current date and time to the top of your graph window, click the Date & Time button
 (docked, by default, to the lower-left side of your Origin workspace). If you don't see this button, choose (View:Toolbars) and enable the Add Object to Graph toolbar. (docked, by default, to the lower-left side of your Origin workspace). If you don't see this button, choose (View:Toolbars) and enable the Add Object to Graph toolbar.
- To delete the stamp, click on the stamp to select it and press DELETE.
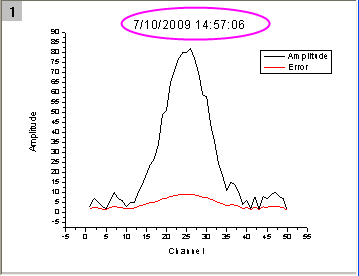
The Date & Time stamp is a static text object. It registers the date and time at which the toolbar button is clicked. It is saved with the graph and will only be modified if you click the Date & Time button again, while the window is active. Note that only one timestamp object can be added to a given window.
To modify the date-time format of the stamp:
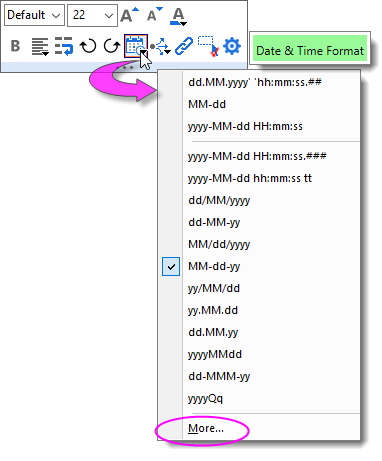
- Click on the stamp to select it.
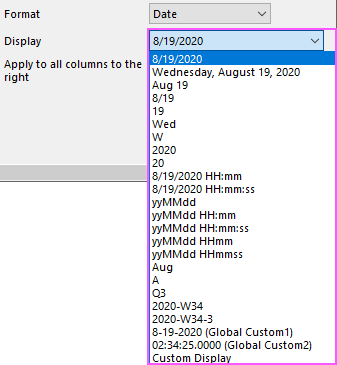
- Use the Mini Toolbar Date & Time Format button to choose your format; or click More... and enter a date-time string using these Date and Time Format Specifiers.
- Optionally, click Set as Default.
If you modified your Date & Time stamp format in an earlier version of Origin, you would have saved it to a file called Standard.ogs in User Files (UFF). You can either (a) continue to edit that file (see the next section) or (b) if you are sure you don't need any other custom scripts in that Standard.ogs file, you can delete it and use the newer method of timestamp customization.
 | This method of adding a "time stamp" does not work well if you want to save a "dynamic" stamp that works with a custom graph template. In such a case, you could use one of the methods described in the Origin Help file.
|
Modifying the stamp in Origin 2021 and earlier
By default, the Date & Time stamp adds date-time in the following format:
M/d/yyyy HH:mm:ss // e.g. 3/4/2021 15:19:58
When clicked on, the Date & Time button runs a line of script in the [DateTime] section of the STANDARD.OGS file located in your Origin folder. That line of script reads like one of the following:
label -s -sa -dc (dXFactor*page.width) (dYFactor*page.height) -n timestamp $(@D,D10); // 2019b and earlier
label -mg -s -sa -dc (dXFactor*page.width) (dYFactor*page.height) -n timestamp $(@D,D10); // changed v2020
The $(@D,D10) portion of this script specifies date/time format. This corresponds to the 11th format in the Origin Date Display list (count starts at zero so (D10) = 11th in list). To see the list, open the Properties dialog for any worksheet column, set Format to Date, then click on the Display drop-down. Remember to count down the list starting with zero (0).
When you know the index number of the date format that you want:
- Open the file STANDARD.OGS in a text editor.
- Locate the [DateTime] section.
- Locate the line of script mentioned above.
- Change D10 to Dn where n is the nth item in Display drop-down list, starting with n = 0.
- Save the modified OGS file to \User Files (UFF).
- Click the Date & Time button to display your modified format.
If you need a format that is not in the standard list, you can define two Custom Date Formats on the Miscellaneous tab of your Options dialog (Tools: Options or Preferences: Options) and they will show at the bottom of the Display list.
Keywords:date, time, stamp, timestamp, customize graph, add date and time, time stamp, add stamp, Standard.ogs
|