8.3.1.4 The Graph Template LibraryGraph-Template-Gallery
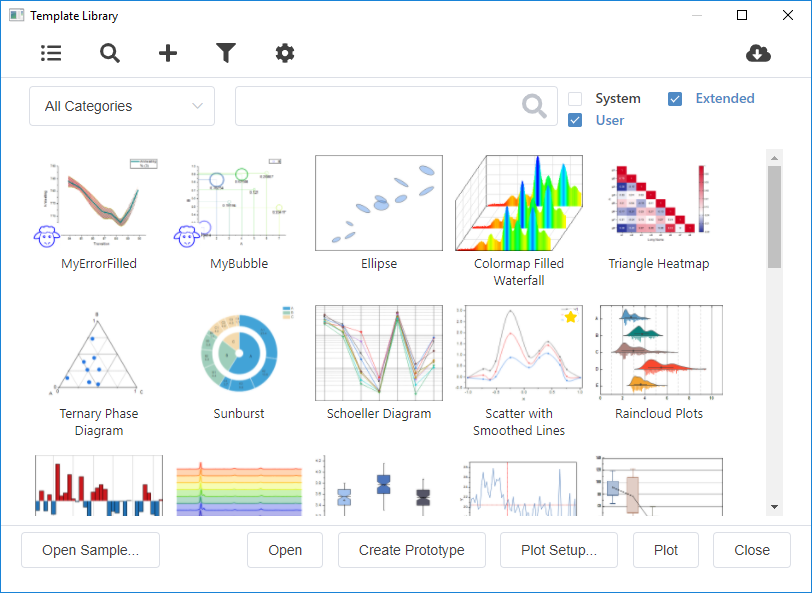
Template Library can be used for organizing your custom graph templates, pre-shipped/downloaded extended templates and system templates, and for plotting to those templates.
- Choose Plot: Template Library menu
Or
- Click the Template Library button
 on the 2D Graphs Extended toolbar. on the 2D Graphs Extended toolbar.
 | Although all system templates can be listed in Template Library, you can simply view and plot from these system graph templates by selecting the plot type you desired under the Plot menu which is the definitive list of 200+ built-in plot types.
And, you can also plot a graph from a system template by clicking the buttons in 2D Graphs or 3D and Contour Graphs toolbar.
|
What You Can Do with Template Library
Toolbar and General Controls on Dialog
Switch to List Mode
Click the Switch List Mode button  to switch between preview mode and list mode. On List mode, all templates will be listed in the list table. to switch between preview mode and list mode. On List mode, all templates will be listed in the list table.
Scan User Templates
If you have added existing graph templates to your User Files Folder or Group Folder, you can click the Scan Template button  on the Library toolbar to scan them automatically. on the Library toolbar to scan them automatically.
Add Templates
To (a) add templates from a folder other than User Files, or (b) re-add templates that you've previously removed from the Template Library, click the Add Template button  on the Library toolbar. If a preview image of the template exists, it will be added. Note, however, that templates and preview images are not automatically copied to the User Files Folder. on the Library toolbar. If a preview image of the template exists, it will be added. Note, however, that templates and preview images are not automatically copied to the User Files Folder.
List Cloneable Templates
To limit display of templates in the Library to those cloneable templates that are applicable to the active book, click the List Cloneable Template button  . .
Switch to Manage Mode
Click the Manage Mode button  on the toolbar to switch to the management list. on the toolbar to switch to the management list.
Open Template Center
Click Open Template Center button  to open the Template Center to download the online templates. to open the Template Center to download the online templates.
Search a Template
Select a category and type keywords in the Search Template bar on the top-right corner of Library to search the keywords in the Name or Description part of the templates in specified category. Clear keywords to show all templates back.
Filter the Templates
Check the check box System, Extended, User or Group beside the Search text box, to filter the templates you want to list.
- System means those built-in templates which match to the plot types in the Plot menu;
- Extended means those templates pre-shipped or downloaded later;
- User means those templates user customized and saved.
- Group means those templates saved in the Group Folder. Note: The Group check box only appears when you have set a Group Folder, and added any workbook/matrix book to it.
Open Samples
Click Open Sample... button at the left-bottom to open a pre-shipped graph sample associated with selected template or search and download a online sample project in Learning Center.
Open a User template without selecting any data
Select a user template and then click Open button to open this template file directly. System templates can't be opened in this way.
Check the Required Data Structure of a Specific Cloneable Template
Click to select a cloneable template and click the Create Prototype button to create a prototype workbook. Sheets or Columns with Short Name Not Used indicates that current worksheet/column is not used to create the cloneable template.
Plot a Graph from the selected Template
If the selected template is appropriate for the selected data, double-click on the template or click the Plot button to plot the graph on the template. The plot is created; meanwhile the Template Library closes.
If the selected template is not appropriate for the selected data, clicking the Plot button or the Plot Setup button will open the Plot Setup dialog box. The Template Library dialog box will stay open while you create your graph using Plot Setup.
If you started from wrong source data window type(workbook or Matrix book), click Plot button will open the template file directly.
Operations on the Template List
Template Library supports two modes to list all templates that meet the conditions. Within the list, you are allowed to perform multiple operations on the listed templates.
On Preview Mode
View the Information of the Template
Hover on the template preview icon to display the description and file path of the template as a tooltip.
Add or Remove a User/Extended Template into or from Plot > My Template
Click the star button  on the template preview icon to add or remove this template from the Plot > My Template menu. on the template preview icon to add or remove this template from the Plot > My Template menu.
Modify a User Template
Click the Edit button  in the upper-right corner of the template preview open the template_modify dialog. You can edit the Template Name, Description, window Short Name/Long Name, etc. Please note, you are not allowed to modify the system/extended templates, unless you save them again as user templates. in the upper-right corner of the template preview open the template_modify dialog. You can edit the Template Name, Description, window Short Name/Long Name, etc. Please note, you are not allowed to modify the system/extended templates, unless you save them again as user templates.
On List View Mode
Click the Switch List Mode button to switch to List View mode.
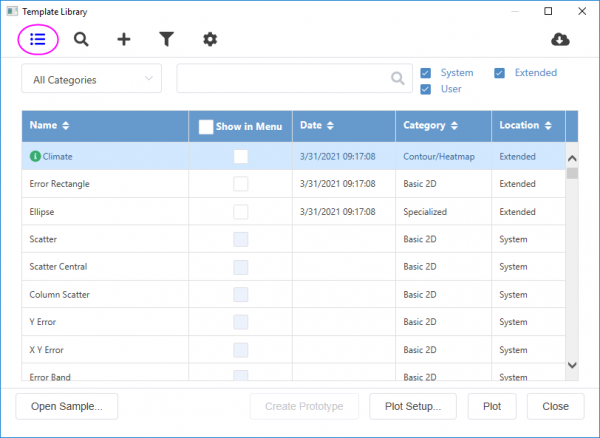
Sort Templates
Click the column's header to sort the templates.
Add or Remove a User/Extended Template into or from Plot > My Template
Check the check boxes in the Show in Menu column to control which templates show up in the Plot > My Template menu.
Modify a User Template
Right-click on the selected user template row, you can select Edit to open the template_modify dialog to modify it.
Manage the User and Extended Templates
Click the Manage Mode button on the toolbar to switch to the management list.
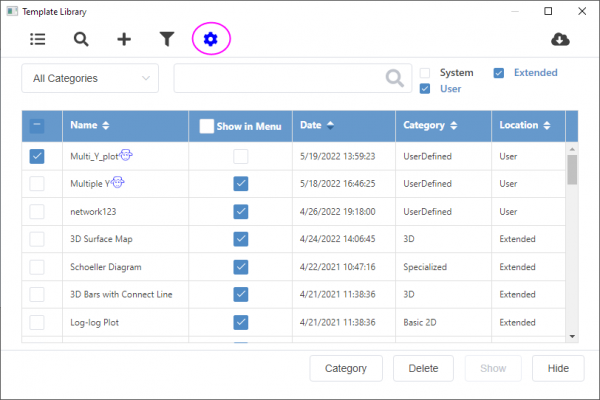
In Manage mode, similar with List View mode above, you are also allowed to sort the templates, decide which templates show up in the Plot > My Template menu.
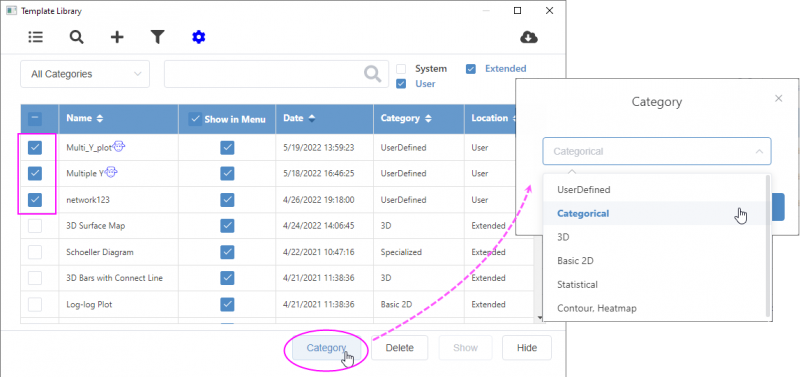
Change Category in the Template Library
Check the check box ahead of the Name column to select one or multiple templates, click the Category button, and then choose target Category in the drop-down list.
Note: Change Category only apply to user defined templates.
Arrange the template order in the menu
For the User and Extended Templates in the Manage Mode, you can sort the templates according to Name/ Date/ Category/ Location by ascending/descending.
- Click the header of column (Name, Date, Category, Location) to sort by ascending/descending
- Apply Order to Menu button to apply new order to the menu.
 | - If uncheck the Show in Menu check-box for a specified template, it will hided in the menu.
- If the Extended and User checkbox are both selected, the order setting will be applied to both tab, other wise it will only be applied to the selected tab.
|

Remove or Hide Templates from the Template Library
Select the target template to click the Delete or Hide button. To select multiple templates, you can check the check box in the selection column(ahead of the Name column).
- The template deleted is removed from the Template Library but is not removed from the UFF.
- The template hidden is hidden on the Preview mode and show gray in the management list.
To show the template(s) back, you just need to select the grayed template(s) and click Show button at the bottom.
Note:
- If you are upgrading your Origin software, you may be prompted to transfer the contents of your old User Files Folder to your new User Files Folder (since Origin 2018, each new release has shared a common UFF). If you did not transfer files on initial startup, you can do so by choosing Preferences: Transfer User Files.
- User-defined templates added to the Template Library are categorized to "UserDefined" by default. But the extended templates pre-installed has been categorized to an appropriate category, you can use the drop-down list under the Library Toolbar to filter all the templates.
|
Examples: Plotting with Template Library
Plotting Origin or Excel Data to a Standard (Non-cloneable) Template
You can continue to use graph templates made with previous versions of Origin, much as you did with previous versions:
- Select your Origin or Excel data.
- If you know which graph template you want to use, choose it directly from the Plot menu (Plot: My Templates <yourTemplate>). If the template you choose is not appropriate for the active book, the Plot Setup dialog box will open.
- If you are not sure which template you want, or you want to plot using the Plot Setup dialog box, then choose Plot: Template Library or click the Template Library button on the 2D Graphs Extended toolbar.
- In the Template Library tool that opens, browse and select your template from the list.
- If the selected template is appropriate for the selected data, double-click on the selected template or click the Plot button to plot the graph on the template. The plot is created and the Template Library closes.
- If the selected template is appropriate for the selected data, click the Plot button or the Plot Setup button to open the Plot Setup dialog box. The Template Library dialog box will stay open while you create your graph using Plot Setup.
Plotting Origin Data to a Cloneable Template
Cloneable templates are intended for "smart plotting" of data sheets that always display some common structure. Note: To clone a graph using cloneable template, first you have to make sure new data has same structure as stored in template.
Check Data Structure of a Cloneable Template
- To check the data structure stored in a cloneable template, with any workbook/matrixbook window active, you can choose Plot: Template Library or click the Template Library button on the 2D Graphs Extended toolbar to open it.
- In the dialog opens, all user templates and extended templates will be listed, but only the cloneable templates stored with same data structure with active workbook/matrix will show a blue Dolly icon
 at left-bottom corner. You can select any cloneable template and click Create Prototype button to output the prototype workbook, which contains necessary header information and data structure. at left-bottom corner. You can select any cloneable template and click Create Prototype button to output the prototype workbook, which contains necessary header information and data structure.
- You can compare your data with it and adjust contents as needed.
Clone a Graph Using a Cloneable Template
- If you know which cloneable template you want to use, choose it directly from the Plot menu (Plot: My Templates: <yourTemplate>). The Dolly icon in front of a template indicates this template is cloneable and its color shows if it is available for current book(Blue = Available; Gray = Not Available). If the chose cloneable template with gray Dolly icon
 , a warning will appear to ask you whether to create the prototype workbook of selected cloneable template or open Plot Setup dialog. , a warning will appear to ask you whether to create the prototype workbook of selected cloneable template or open Plot Setup dialog.
- If you are not sure which cloneable template you want, or you want to plot using the Plot Setup dialog box, then choose Plot: Template Library or click the Template Library button on the 2D Graphs Extended toolbar.
- In the Template Library tool that opens, browse and select the cloneable template you want from the list.
- If the cloneable template you choose is not appropriate for the active book(the Dolly icon appears gray), clicking on it will bring up a warning to tell you this cloneable template is not available for the active workbook/matrix. You can click Create Prototype button to create the prototype workbook of selected cloneable template or click Plot Setup button to open the Plot Setup dialog to assign the datasets from difference workbook/matrix.
- If the the data structure stored with cloneable template matches the structure in active workbook/matrix, the Dolly icon of the available cloneable templates will show as blue. Double-click on the desired template, or click once on the template and click the Plot button. A graph will be cloned using the selected template.
More information
|