6.5.3 Connecting to WebConnect-to-Web
Connect to Web builds connection between Origin worksheet and data file from an online path or a table on a webpage. Once the data source is changed, you can simply reimport the data to get everything update.
 | For Node-Locked and Concurrent users, Connect to Web, Connect to Cloud and Open From Cloud menus cannot be used before you activate your Origin properly. Refer to this FAQ for details.
|
- With a worksheet/matrix active, select menu Data: Connect to Web and further choose the desired file type. Many data types, including CSV, JSON, HTML table, Origin project, etc., are supported. You can also install the data connector App of new type from ‘’’Add New’’’ menu.
The Connect to Web dialog will open.
 | Data imported by Connect to Web is cached for a time period equal to @CFDT seconds per 100kB of file size (e.g connected data in a 10MB file is cached for 900 * 100 = 90,000 sec or ~24 hr). Thus, re-import of connected data into the project will use cached data if the time period has not been exceeded. Once the time period is exceeded, the cached data are deleted thus allowing for the data to be refreshed on import. To manually clear this cached data, see delete -web
|
Basic operation
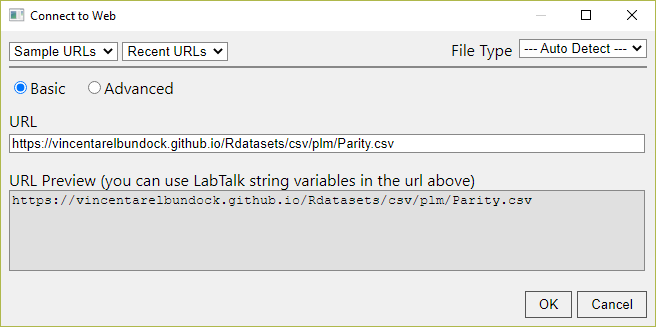
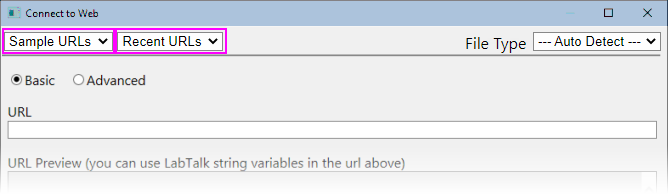
- In Basic mode, enter or paste a URL link in the URL edit box. To load a previously-accessed URL, click on Recent URLs.
| - The Recent URLs will continue to list your connections, while Sample URLs will list some example connections in formats such as CSV, HTML, JSON, and MATLAB.
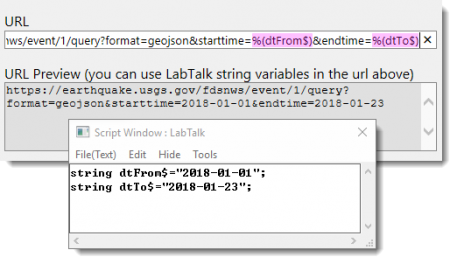
- If desired, you can predefine LabTalk variables and then use the use them for substitutions in the URL link. The LabTalk variables must be percent encoded, for instance
https://.....%(var$)... . You can see the actual URL string in the URL Preview.
-
|
- Click OK to connect to the web server.
- In the Selection dialog, select the desired table and click down-arrow button to add it to the bottom panel. Click OK to import. Note that you can use Data Navigator to import other tables later.
Notes:
- Connect to Web supports HTTP, HTTPS, and FTP (site must allow Anonymous login for both username and password).
- To share data from DropBox. you can create a shared link and then get the link text to use for the Data Connector URL. In addition, you'll need to:
- Modify the last part of the share link from
?dl=0 to ?dl=1 or the link won't work;
- Set system variable
@HTTPMR=1; before importing data.
- To import Google sheet, click Google Sheet app icon
 in the App Gallery > Connectors tab. A message dialog will open asking whether to open from a Google sheet URL or not. Click Yes to open the Connect to Web dialog and enter a Google sheet share link. in the App Gallery > Connectors tab. A message dialog will open asking whether to open from a Google sheet URL or not. Click Yes to open the Connect to Web dialog and enter a Google sheet share link.
|
HTML Connector Options
After import, click the Connector icon  and select Options from the menu to open the HTML Connector Options dialog. and select Options from the menu to open the HTML Connector Options dialog.
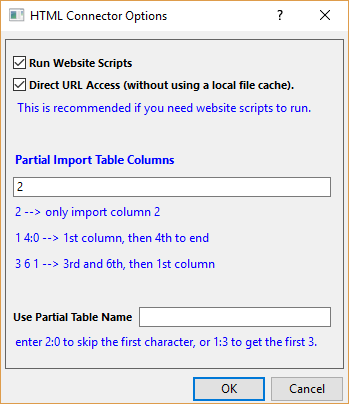
Run Website Scripts
Direct URL Access
|
If the imported HTML table has website scripts (CSS, for example) and you want the imported data to look the same as what is on the website, you will need to check both boxes.
Direct URL Access (without using a local file cache) will connect to the URL link directly, otherwise a local file cache will be used.
|
| Partial Import Table Columns
|
Partial import table columns using the same syntax as CSV Connector.
See description of "Custom" option item in the table for syntax can be used in partial import.
|
| Use Partial Table Name
|
Use partial table name as sheet name by following syntax.
- space ( ) = "and".
- colon(:) separates From and To.
For example, suppose the table name is "The eight metropolitan statistical areas of the Commonwealth"
1 3 5 7 9 rename sheet as Teegt5:22 rename sheet as eight metropolitan
|
Advanced operation
Some Data Connector web requests may be more complex and will require specifying Advanced settings in the Connect to Web dialog.
URL Parts
In another example, the following URL consists or a series of variables in the form of path components or parts.
https://pubchem.ncbi.nlm.nih.gov/rest/pug/compound/cid/2244
In this case the path components can be broken down into:
https://pubchem.ncbi.nlm.nih.gov/rest/pug
/compound
/cid
/2244
While it is not always strictly necessary to break down the URL into different parts, there may be times when it is appropriate to do so for clarity such as in the case above. In the Connect to Web dialog, those parts would be specified as illustrated below:

Observe that the Add Part button will add a new group of controls for specifying URL Parts. Also observe that, for each part, there are up and down arrows for changing the order of the parts along with a × button for removing the part.
Note: LabTalk substitution is supported for URL parts.
The optional Command timeout in minutes control allows the user to specify the number of minutes after which the request for data will abort. If left blank (which is generally recommended), the request will take as long as necessary to complete or until the server decides to abort the request itself.
The optional HTTP request header parameters control section is most likely the reason for using the Advanced settings. In addition to a URL, some web service APIs may require one or more arbitrary HTTP request headers be provided with the request. This is highly dependent on the requirements of the web service- there are no set rules in this regard.
Selecting from a drop down list of common request header names and then clicking the Add button generates two text box controls, one for the header name and one for the header value. Custom headers may also be added by choosing --- Custom --- from the drop down or simply overwriting the name of a header already added.
For the URL provided in this particular example, an Accept header is required and it's value must be set to the media type for the type of data to be return. In this case, it is application/json.
| Note: A request header named Authorization is included in the list. Do not assume that this header is automatically a password! Not all web services require this header and it is up to the web service itself to define what the value should be. There are no set rules with regard to what constitutes a proper value.
|
POST Data
Some web services expect a POST request with various parameters in the request body. They do this so that some parameters are not part of a easily visible URL; or if more info needs to be provided than can be put into a GET request.
Enable this option by clicking the box. Added text becomes the "request body." There is no checking so the user is responsible for making sure the text is properly formatted for a POST request.
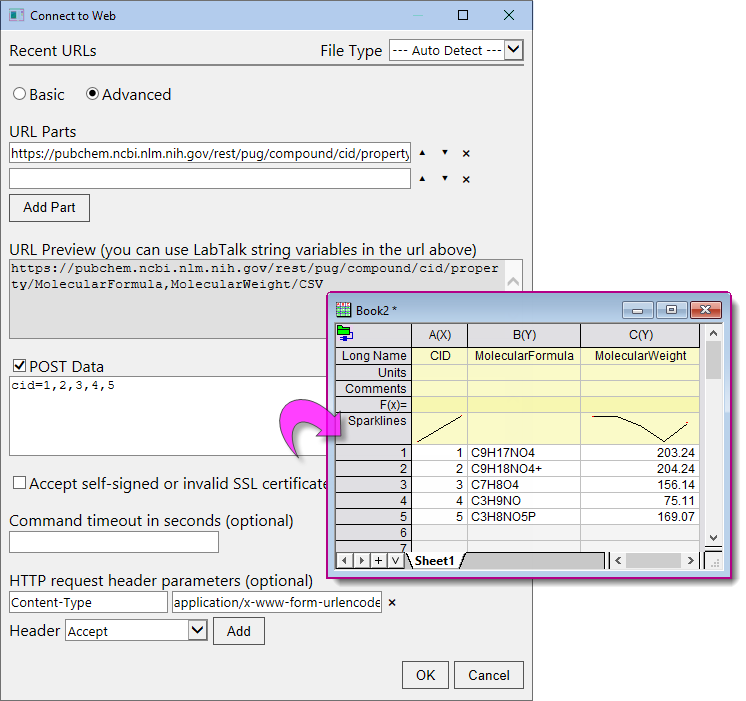
Example of a POST request:
URL: https://pubchem.ncbi.nlm.nih.gov/rest/pug/compound/cid/property/MolecularFormula,MolecularWeight/CSV
Request Body: cid=1,2,3,4,5
HTTP Request Header Parameters: Content-Type - application/x-www-form-urlencoded
Header: Accept
Expected response will be something like:
ResponseBody: "CID","MolecularFormula","MolecularWeight"
1,"C9H17NO4",203.238000
2,"C9H18NO4+",204.246000
3,"C7H8O4",156.137000
4,"C3H9NO",75.111000
5,"C3H8NO5P",169.073000
Examples
Tutorial of Origin Web Data Connector
Open Signal Processing - FFT Gadget with Data Connector.opju to see an example of connecting web file for sunspot data:
- Select Help: Learning Center.
- In the dialog, activate Analysis Samples tab. Select Signal Processing from Samples in drop down list.
- Double click on FFT Gadget with Data Connector to open it.
|