6.5 Data ConnectorData-Connector
Connect, or Data Connector, is a new import framework introduced in OriginPro 2019b. This new framework offers speed, simplicity and data integrity advantages over Origin's older file import methods. For differences between Connectors and older import methods, see:
Data Integrity
Data Connectors offer a higher degree of data protection than older import methods:
- Data are not editable in books that contain Data Connectors, by default. This protects against accidental modification and deletion.
- Data imported using Text/CSV or Excel Connector can be sorted, by default (select column, the Worksheet: Sort Worksheet), but is otherwise not editable.
While data imported via Connector types other than Text/CSV and Excel, are not sortable by default (not editable, not sortable).
- You can change both editing and sorting behaviors of Connector-imported data by manipulating the value of LabTalk system variable @IPDC, BEFORE you import data via Connector.
- Routine post-processing of connected data can be set up by embedding script in the worksheet. Post-processing may overcome any need to remove edit protections from connected data, thus helping to secure data.
 | Note that "protection" does not prevent you from adding columns to the end of the worksheet for the purpose of transforming the imported data (e.g. via Set Values). Protection merely prevents you from altering the original data.
Further, if you decide AFTER importing that you need to freely-edit imported data, you can remove Data Connectors by clicking the Connector icon  and (a) disconnecting the sheet (Disconnect Sheet), (b) removing the Data Connector altogether (Remove Data Connector) -- see Connector menu:, below, for an explanation of the difference -- or (c) unlocking the data (Unlock Imported Data -- available in Origin 2021b and later). and (a) disconnecting the sheet (Disconnect Sheet), (b) removing the Data Connector altogether (Remove Data Connector) -- see Connector menu:, below, for an explanation of the difference -- or (c) unlocking the data (Unlock Imported Data -- available in Origin 2021b and later).
|
Adding a Connector to the Sheet
Adding a Connector to a worksheet or matrix adds a Connector object to the top-left corner of the sheet. This object stores information used to maintain the connection to the data source.
To add a Connector to the active worksheet or matrix, do one of the following:
- Click Data: Connect to File, Connect to Web or Connect to Database.
- Click the Connectors tab in the Apps Gallery and choose a Connector.
- Drag-and-drop a Connector-supported file onto an Origin worksheet or matrix.
Different connection states show different icons:
| Icon
|
Connection State
|
|
|
the sheet is used as the destination of a data connector.
|

|
the Auto Refresh is turned on. See this section for details.
|
 - -
|
the sheet is not yet used by a data connector.
|

|
there is updates in the data source.
|

|
the data source is from a file and the file does not exist.
|
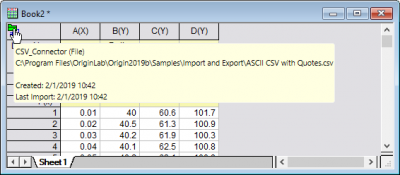
 | When you mouse over a Connector icon, a tooltip displays the basic Connector information. Right-click inside the tooltip and Copy the information to the Clipboard.
|
Dialogs and Menus
For Connector-specific dialog settings, please see the following topics:
Once a Connector is added, click the sheet's Connector icon to manage the connection.
Connector menu:
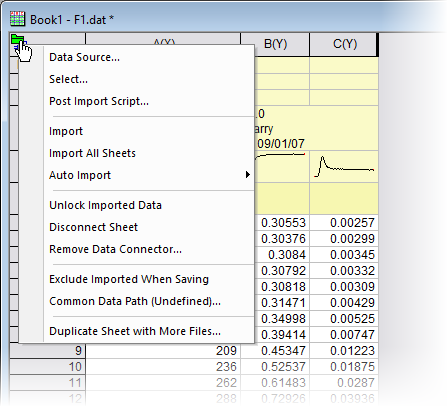
| Data Source
|
Open dialog to select or change data source
For data source from a disk file, the Data Source File Path dialog is opened.
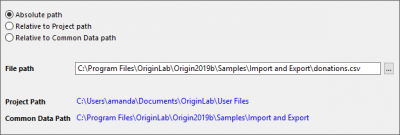
You can choose to browse and then save the data source path as
- an absolute path
- a relative path to the project saved folder. The current project must be saved before.
- a relative path to the common data path you have set by Common Data Path context menu.
|
Import Options/
Select(Options)
|
Reopen dialog to adjust the import settings or select the branch to import.
|
| Options
|
Available only for HTML Table Connector (Connect to File/Web) and NetCDF Connector. Open dialog to change the import settings.
|
| Post Import Scripts
|
Enter LabTalk scripts to run after import. See "Run Script After Import" section below for more of running post import scripts.
|
Import
Import All Books
|
Import the source data into
- the active data-connected sheet (Import)
- all data-connected sheets in the project file (Import All Books)
|
Auto Refresh
Pause Periodic Refresh
|
Trigger re-importing data on project opens, source changes, or in period. If "Refresh Periodically" turns on, you can specify the refresh interval and temporarily pause the refresh process.
See next section for details.
|
| Unlock Imported Data
|
Check this to enable editting imported data. If you click the Connector icon and choose Import to reimport data, the unlokced status will still be kept. To restore the edit protections, select Import Options.../Select(Options)... to reimport data.
|
| Reset Post Import Actions
|
After importing, if you have some actions on imported data, e.g. delete some imported columns, you will need to select this menu to reset the actions before you can re-import data.
|
| Disconnect Sheet
|
Remove the connection between the worksheet/matrix and the data source. Also remove edit protections. The connector icon remains allowing you to reconnect to your data source (at which time, edit protections will be restored).
|
Remove Data Connector
Remove Connectors from All Books
|
Permanently remove Data Connectors from
- all sheets in the active book (Remove Data Connector)
- all books in the project file (Remove Connectors from All Books).
Edit protections are removed from all sheets. In addition, remove Exclude Imported When Saving check mark.
|
| Exclude Imported When Saving†
|
Check it to clear the imported data but keep the connection when saving the workbook or project, which helps to decrease the project size, and allows to simply re-import the data when needed. If a graph is plotted from the imported data, there is also a download button appearing on the graph after the imported data has been cleared.

|
For an example, open sample project Statistics-Multivariate Analysis - Discriminant Analysis (Pro) by Help: Learning Center and set Samples in = Statistics-Multivariate Analysis in Analysis Samples tab. Try menu "Data: Re-Import Directly" to reimport the data. And then try to check and uncheck Exclude Imported When Saving and see the difference of the project size.
|
|
| Common Data Path
|
Set a common data path which can be used to quickly access source files by Data Source menu. This path shares between all books in the project and will be saved with the project.
It is typical to set the parent folder as Common Data Path. The advantage is even greater if you set the Common Data Path to a shared folder accessed by your group members and then share the project with them.
|
| Pause Check File
|
If the source file is found not existed after checking a few times, data connector will not check anymore, and this menu Pause Check File will show as checked. You will need to actively uncheck this menu to start the idle checking again.
|
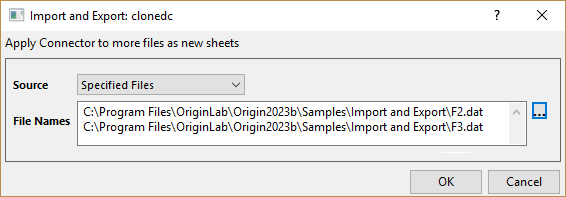
| Duplicate Sheet with More Files
|
Clone the current worksheet, e.g. import settings (including Post Import Scripts) and any analysis actions, and import new files selected in the pop-up dialog.
See also Clone Import in the next section.
|
Other sub-menus under Data menu:
| Connect Multiple Files
|
Currently some Connector types support import multiple files at a time, for example, CSV and Excel Connectors for workbook, Matlab, MetroPro, and WDF Connectors for matrix.
Refer to this document for dialog details.
|
| Clone Import
|
Available for data imported by Data: Import from File menu. After you import a data file by Import from File menu, Clone Import will use the active workbook (including import settings) as template to import new file into a duplicate of current workbook. If the current workbook contains analysis, recalculation in the duplicate is triggered automatically regardless of the analysis tool's Recalculate mode. If the current workbook contains N import sheets, Clone Import will group every N data files in order of selection and import the same group in one book accordingly.
|
|
For an example, open sample project Batch Processing - Clone Import by Help: Learning Center and set Samples in = Batch Processing in Analysis Samples tab. Activate workbook and try menu "Data: Clone Import" and choose another data. See how the active workbook is cloned with the new data.
|
|
Refresh imported data
Click on Connector icon /  (for Database Connector) and select Auto Refresh...: (for Database Connector) and select Auto Refresh...:
Data Connector supports re-importing data from source:
- On Open: automatically import data when open the project
- On File Change: automatically re-import data when source has changes. Not available for Databse Connecotr.
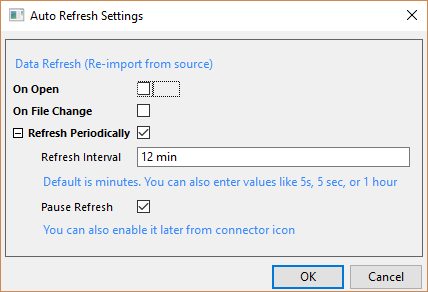
- Refresh Periodically: automatically re-import data periodically. You can specify the Refresh Interval and temporarily pause the refresh process.
- Refresh Interval: the interval can be range from 5 seconds to 3 days and is in the unit of 5 seconds. So you will need to enter a multiple of 5 seconds, e.g. "10s", "1 min", or "1 hour".
- Pause Refresh: You can always stop refreshing by clicking on the Connector icon and checking Pause Periodic Refresh.
Connector icon will become when “Refresh Periodically” is enable. Tooltips popped-up when mouse over on the icon shows the auto-refresh information such as refresh interval and the remaining time to next update.
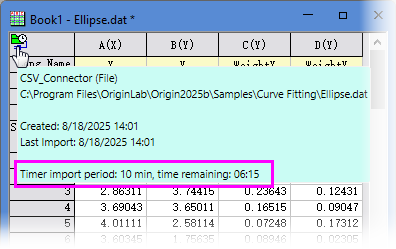
And the countdown to the next re-import shows on the right-side corner of the status bar. Note that you can right-click on the status bar and uncheck/check Theme item to hide/show the countdown.

Excluding or Saving Imported Data
By default, when connecting to files of less than 500kB in size, data are saved with the project; data of larger files are not saved with the project.
Modify default data exclusion behaviors using these LabTalk system variables:
- @DNS: Controls whether data are excluded.
- @FSE: Controls threshold file size in kilobytes, for excluding data when saving the project.
- @FSEW: Controls threshold size in number of Origin worksheet cells x 100 for excluding Web, JSON, Origin, MATLAB data upon save.
To manually override default data excluding behaviors for a given window:
Regardless of import file size or the state of @DNS, @FSE or @FSEW, you can save data with the project in these ways:
- Click on the Connector icon and clear the check mark beside Exclude Imported When Saving.
- Right-click on the window title bar, open Properties and clear the check box beside Exclude imported data when saving project.
Run Script After Import
You can post-process data upon import, regardless of the current value of @IPDC, and without breaking the connection to source data. This can be done by following 2 ways.
Post Import Script Dialog
- After import, click the connector icon and select Post Import Script.
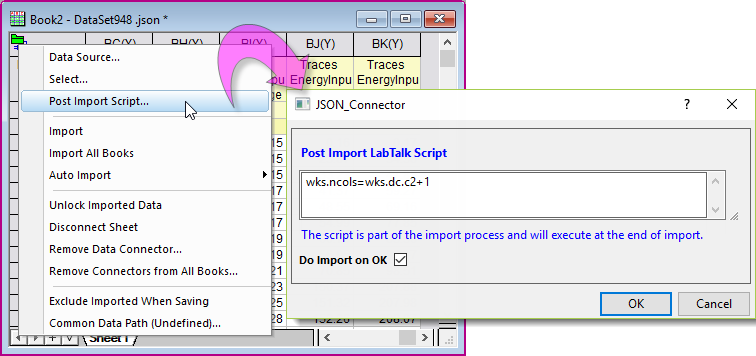 - Do Import on OK is checked by default to reimport the data and execute the scripts right after you click OK button.
|
|
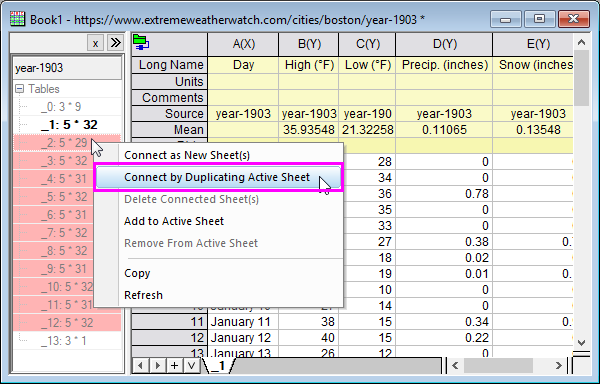
For example, after import table January 1903 Boston Weather from web page-Boston Weather in 1903, we would like to add a user-defined parameter row "Mean" to show the mean value of each column.
wks.userparam(++Mean);
loop(i,2,wks.dc.c2) { wcol(i)[Mean]$="=Mean(this)";}
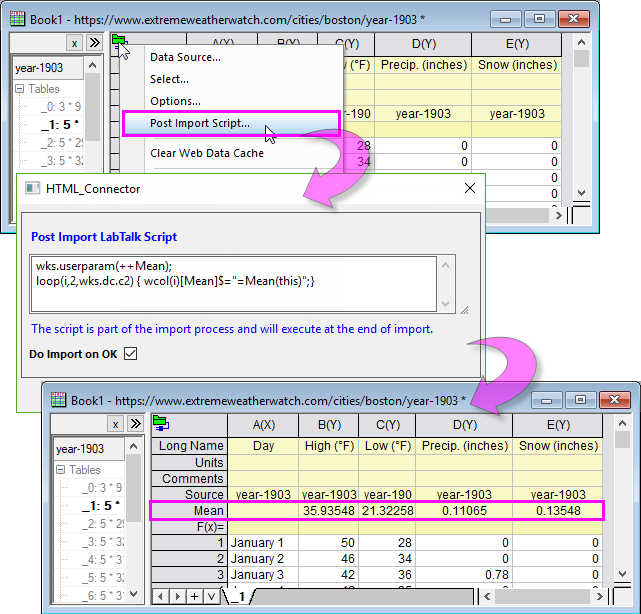
Then we can select multiple tables in the navigate panel (by dragging) and use Connect by Duplicating Active Sheet context menu to import all 12 months tables using the settings of the active sheet.
|
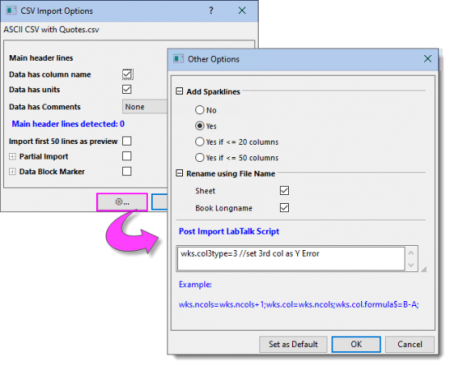
- Specially, for CSV Connector, click the Other Options button (to the left of OK). In the Other Options dialog that opens, enter LabTalk scripts in the Post Import Script edit box. Note that the scripts will also be saved as default settings if you click Set as Default button.
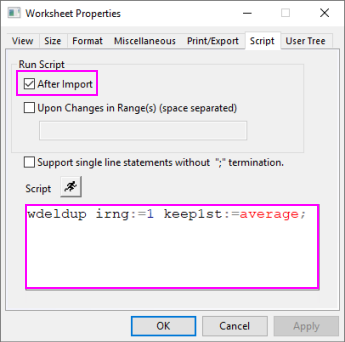
Embed LabTalk script using Worksheet Properties dialog
You can also embed LabTalk script using the worksheet's Properties dialog box (Worksheet: Worksheet Script).
- Prior to importing data, activate the workbook and choose Worksheet: Worksheet Script.
- Enter your script into the Script box and check the After Import box under Run Script. Connected data will not be locked to editing until your script is run.
|
|
The following example shows calling the wdeldup X-Function to remove duplicate values in a reference column (column 1) by averaging associated values in other columns.
See more examples in this OriginLab blog post.
|
Other things to note:
- There are methods of running Python script from LabTalk, as outlined here.
- The workbook and embedded script can be saved as a template file for processing of similar data.
- For an overview of post-processing of connected data, see this OriginLab blog post.
Other Manipulation
Besides those supporting Connect Multiple Files, most Connector kinds can import one file/table at a time. If you want to import multiple table on the same webpage, or multiple files in the same path, you can use Add Worksheet menu to quickly import them to the same workbook.
To import multiple files/tables into one book:
- Import a file/table by Data Connector.
- Right clicking on the worksheet tab and choosing Add.
- A new worksheet with data connector is added. The data source is prefilled with the data source in the book but doesn't connect. You can change to import a new table.
Note that each workbook can have different data sources, but only one particular connector type (such as Text/CSV, JSON or OPJU). That is, each worksheet in it can have its own data source that is supported by that connector type.
To import data types not in the default menu:
- Select Data: Connect From File/Web: Add New.
- This will open App Center with category set to Data Connector. Browse and find the file type you want to connect, and download it. Once downloaded, it will be added to the Data menu automatically for you to use. You can also find the App in Data Connector tab of App Gallery.
|