6.7 Partial Importing and Re-ImportingPartialImport-ReImport
Partial Import
When you need to import only part of a data file -- for example, the file contains data that is of no interest or the file is large and slow to import -- you can opt for a partial file import. Note that only select routines support partial import. If a file format is not discussed here, it does not support partial import.
- When importing via Data: Import from File, Origin supports partial import for ASCII, binary (using Import Wizard), comma-separated (CSV), MS Excel and third-party files of types pCLAMP (ABF, DAT) and Sound (WAV).
- The pCLAMP (ABF, DAT) and Sound (WAV) importing tools have their own controls for partial import of pCLAMP and WAV files. To learn more details, please refer to Import pClamp and Import WAV.
- When importing with the CSV or Excel Connectors (Data: Connect to File:), you can opt for partial import. The CSV Connector shows only Column and Row controls (no From, To, Read, Skip, etc as, for instance, Import ASCII does). Therefore, follow the syntax and examples described under Partial Import Controls > Custom, for Column and Row boxes.
- Origin's NetCDF and TDMS Connectors (Data: Connect to File:) also support partial import. However, neither uses standard GUI controls and therefore, both will be discussed in separate sections, below.
Partial Import Controls used by Import From File
Partial Import controls for the X-Function routines ASCII, binary (Import Wizard), CSV and MS Excel look like those shown in the following image and described in the table below.
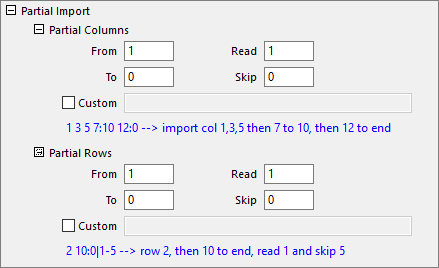
| From and To
|
Specify the start and end column index which will be imported.
|
| Read and Skip
|
When you specify a number l for Read and a number k for Skip, l columns are imported and k columns are skipped for every l+k columns.
|
| Custom
|
Use the following characters in building your import string:
- space ( ) = "and".
- colon(:) separates From and To.
- vertical bar(|) = "read n cols/rows".
- dash(-) = "skip".
- tilde(~) = "except".
- Examples
- 1 3 7 import cols/rows 1,3 and 7.
- 1:100 ~50:60 import cols/rows from 1 to 100, except 50 to 60.
- 1:200|3-2 import cols/rows from 1 to 200 by reading 3 then skipping 2.
- 1:1000 ~200:300 250:260 import cols/rows 1 to 1000, skipping 200 to 300 with the exception of 250 to 260.
- 1:100|3-7 5:100|2-8 imports cols/rows 1 to 100, read 3 then skip 7 and import cols/rows 5 to 100, read 2 then skip 8. The "and" (space) combination generates a repeating pattern of read 3, skip 1, read 2, skip 4 for every 10 cols/rows.
|
Partial Import by NetCDF Connector
Origin's NetCDF Connector has its own GUI controls for specifying partial import. If you are scripting, you can usually save yourself some time by using GUI controls to construct your connection string (see below).
- When importing data via the GUI, the user selects Data: Connect to File: NetCDF. This opens the Data Connector Browser.
- The user will then typically pick a multi-dimensional variable and click Select Data to Import, adding the variable to the bottom panel.
- The user then clicks the Import Options button and specifies partial import either by From and To, Time Axis Skipping or Averaging, then clicks OK to close Options.
- From & To: data-time range to import.
- Time Axis Skipping: Read m records and skip n records and repeat. For example, if data is monthly, Read = 1 and Skip = 11 would repeat the pattern of "read one month and skip 11" for the entire date-time range.
- Averaging: Perform an average based on an Interval and either Sampling by Across Years or Consecutive. For example, Across Years and Interval = m would calculate an aggregate average for each month for the date-time range.
Once you've set import options and closed the dialog, note that your connection string displays beside the variable in the bottom panel. Note, also, that this string is editable (and for those who are scripting, can be copied) by double-clicking on the string.
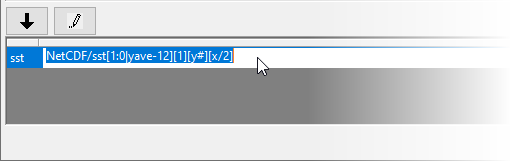
While the connection string syntax can be complex, it follows the basic form of ...
NetCDF/variable[z][y][x]
... where "variable" is the variable that you are importing, and [z],[y] and [x] specify handling, including partial import, of z, y and x dimension data.
Note that while specifying partial import of z-dimension data starts with the basic Custom syntax described above, there are some NetCDF Connector-specific modifiers that are best understood by going through the GUI, setting Import Options, then reading or copying the connection string in the Browser dialog.
For most GUI users, the connection string will be of no importance. For those who are scripting, once you obtain the connection string from the GUI, see documentation of the LabTalk wks.dc object for an Example of usage.
Ultimate partial-import control for NetCDF
For GUI users or scripters who need the highest level of control over partial import, you can edit the connection string manually by doubling-clicking on it in the Data Connector Browser. Refer to the Custom table, above, for syntax.
Example 1
Let's say, for instance, that you have a dataset of monthly readings that spans Jan 1948 to Jun 2018. You know that in the calendar year of 1958, instrumentation was not reliable and therefore, you want to exclude just those 12 readings. Your connection string must, therefore, exclude 12 months from month 121 to month 132.
precip[1:0~121:132][y#][x]
precip[1:846~121:132][y#][x] // alternate syntax for "From" and "To" months
Example 2
There is no particular user-story with this example but what it does is to begin importing at matrix 1, skips 11, imports another, skips 11 etc. for 120 matrices. At matrix 121 it begins to import 2 and skip 10 until it reaches matrix 241. From matrix 241 until the last matrix (represented by "0"), it imports 3 matrices and skips 9. While the example is trivial, it demonstrates that complex connection strings can be built if one has the desire and the patience.
precip[1:120|1-11 121:240|2-10 241:0|3-9][y#][x]
Partial Import by TDMS Connector
When specifying partial import for TDMS files using Origin's TDMS Connector, you can follow a similar (though simplified) strategy as laid out above for NetCDF files:
- Activate a workbook and choose Data: Connect to File: TDMS.
- Browse to your file and click Open.
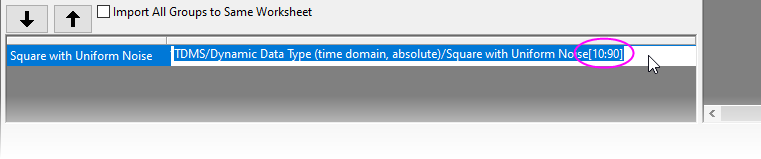
- In the Data Connector Browser, click a node and click Select data to Import at the bottom of the dialog.
- To perform partial import, double-click on the connection string and modify the string by specifying range using the syntax described in Custom, in the above table. Note that partial ranges must be specified at the end of the string (e.g TDMS/Dynamic Data Type (time domain, absolute)/Square with Uniform Noise[10:90]).
Re-Import
Re-importing, as the name suggests, allows you to repeat the import of a file that has been imported previously. You may want to use this feature when the imported file has been updated -- direct import with no change of options -- or you want to use different import options. Both are performed via menu commands on the File: Import menu. The re-importing feature is available for ASCII and some third-party files.
If you are using a Data Connector for import, data can be refreshed as needed; on import or at any time during the session by clicking the Connector icon and choosing Import or by clicking on the download icon in one of the project's graph windows (for information, see FAQ-1080 I used a Data Connector to import data but when I reopen my project, the data is missing).
|