6.4.5 Importing Simple Binary Files with the Import WizardImpWiz-Simple-Binary-Files
In this topic, we will import a sample file that begins with 280 bytes of header information. This header is text information and can be viewed in the preview window on the Header Bytes page of the Import Wizard.
 | For Origin 2019b, a bit value was added to system variable @DENG to control how the Import Wizard creates the file preview. Now, by default, Origin will first try treating the file as binary to check for byte order marks or to try "guessing" at file encoding. If that fails, the file be treated as a text file.
|
The data that follows the header has 100 records of this structure:
- 1 string of length 9 chars
- 2 integers (4 bytes each)
To begin the tutorial:
- 1. With the worksheet active, choose File: Import: Import Wizard or click the Import Wizard button
 on the Standard toolbar. This opens the Import Wizard Source page. on the Standard toolbar. This opens the Import Wizard Source page.
- 2. Set Data Type to Binary.
- 3. Click the Browse button
 to the right of the File text box, browse to the \Samples\Import and Export\ folder (in your Origin program folder) and select the file Binary Simple.dat. to the right of the File text box, browse to the \Samples\Import and Export\ folder (in your Origin program folder) and select the file Binary Simple.dat.
- 4. Click the Next button.
This brings you to the Header Bytes page. We must now identify the header portion of the sample file. We have been told that the file begins with 280 bytes of header information.
- 5. Enter 280 in the Number of Header Bytes text box and click the Next button at the bottom of the page.
This brings us to the Data Pattern page. We must now enter the data structure information that tells the Import Wizard how to parse the sample binary file.
- 6. Click somewhere in the Type column and a drop-down button will appear. Click the drop-down button and choose String from the list.
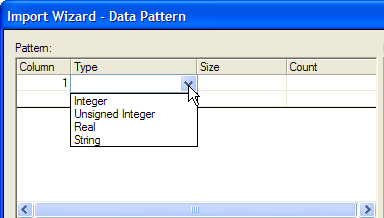
- 7. Click in the Size column and enter 9 (string is 9 characters in length).
- 8. Click in the Count column and enter 1 (there is 1 string).
- 9. Return to the Type column and choose Integer from the drop-down list. Size is automatically set to 4 (which is correct).
- 10. In the Count column enter 2.
Repeat the process using the remaining information that you have been given. When you've finished, your Pattern should look like this:
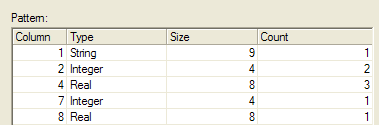
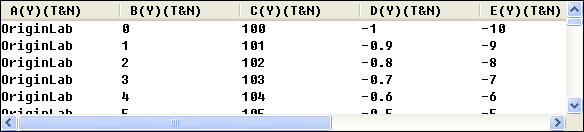
You should also now see an orderly representation of your data in the preview window at the bottom of the Data Pattern page.
- 12. Click the Next button three times. This brings you to the Save Filters page.
- 13. Check the Save Filter check-box.
- 14. Select the In the Data File Folder radio button.
- 15. Enter a Filter Description (e.g. "Sample binary Origin import filter file").
- 16.In the Filter File Name text box enter BIWtest.
- 17. In the Specify Data File Names... text box enter B*.dat (the .dat extension is common, so specifying a file name and a file type ensures that this filter file will be applied only to this or similarly named .dat files).
- 18. Click the Finish button.
The binary data are imported into the Origin worksheet. Simultaneously, an Origin Import Filter file with the .OIF extension is created and saved to the \Samples\Import and Export folder in your Origin program folder. This filter file can now be used to re-import this or similarly-structured binary files with the .DAT extension.
- 19. To verify this, open a clean worksheet and repeat steps 1 - 3 above. Note that because we saved the filter file to the data file folder, the filter is automatically detected by the Import Wizard (1st or Data Source page).

- 20. This time, instead of clicking the Next button (step 4), click the Finish button. The file is imported correctly into the new worksheet without further intervention on your part.
To learn more about creating Origin Import Filter files, see
"Save Filters page of Import Wizard," in Origin Help file.
|