6.4.3 Using the Import Wizard to Import Clipboard DataImpWiz-ClipboardData
Summary
You can use the Import Wizard to import clipboard data with flexible customization abilities. You can directly paste the clipboard data into a worksheet, but the data in the worksheet will be messy if the clipboard data is not well organized.
For example, suppose the clipboard contains two columns of data, each row of which is separated by a comma. If you directly paste the data into a worksheet, the two column data sets will appear in a single column of the worksheet, rather than in two different columns.
Fortunately, you can use the Import Wizard to customize the importing options and facilitate the importing process. The following are some highlights of the features that may be used when importing clipboard data:
- Set the column separators to keep the data from becoming disorganized in the worksheet.
- Specify the columns' designations and customize the data formats, such as specifying date format.
- Other customization options are available, such as assigning column names, or saving an import filter for importing similar data in the future.
Please note that you may visit Import Wizard to gain a better understanding of this tool.
What will you learn
The following section shows how to:
- Import clipboard data into Origin by using the Import Wizard
- Assign a short name for the worksheet to which the data will be imported
- Specify the column separators
- Customize the format of the date data
Steps
- Select all rows, including the heading rows, in this table.
- Create a new project in Origin and click the Import Wizard button
 on the Standard toolbar (or select Data: Import from File: Import Wizard) to open the dialog. on the Standard toolbar (or select Data: Import from File: Import Wizard) to open the dialog.
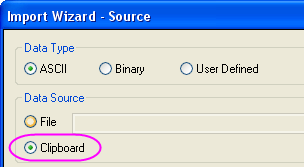
- On the first (Source) page of the wizard, select Clipboard from the Data Source group.
- Then click Next to go to the Header Lines page, where you can set the Short Name for the worksheet to which the data will be imported. Select 1 from the Short Name drop-down list and select <None> from the Long Name drop-down list.
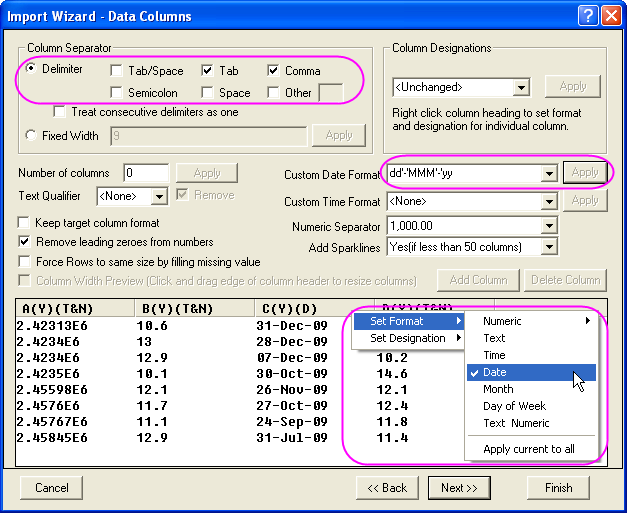
- Click the Next button twice to go to the Data Columns page, where you can specify the column separators and customize the format for date data. Please do the following things in this page:
- Enable the Tab and Comma check boxes in the Column Separator group to use tabs and commas as separators.
- Input the user-defined date format dd'-'MMM'-'yy in the Custom Data Format edit box and click the Apply button to apply it.
- Right-click on the heading of the Date column and select Set Format: Date.
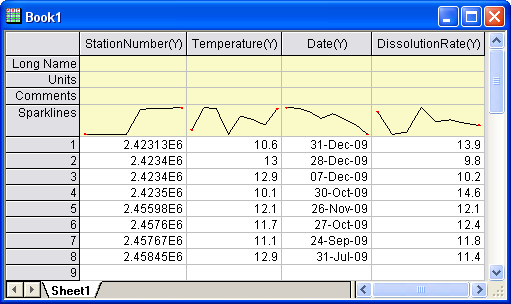
- Click Finish to import the clipboard data into a worksheet. The data in the worksheet should look like this:
| Note:
There are many more things the Import Wizard can do. For more details, please refer to Import Wizard.
|
The Testing Data
| StationNumber,Temperature
|
Date
|
DissolutionRate
|
| 2.42313E6,10.6
|
31-Dec-09
|
13.9
|
| 2.4234E6,13
|
28-Dec-09
|
9.8
|
| 2.4234E6,12.9
|
7-Dec-09
|
10.2
|
| 2.4235E6,10.1
|
30-Oct-09
|
14.6
|
| 2.45598E6,12.1
|
26-Nov-09
|
12.1
|
| 2.4576E6,11.7
|
27-Oct-09
|
12.4
|
| 2.45767E6,11.1
|
24-Sep-09
|
11.8
|
| 2.45845E6,12.9
|
31-Jul-09
|
11.4
|
|