19.1.10.12 Peak Fit Parameters DialogPeakAnalyzer-FitPara-Dialog
The Peak Fit Parameters dialog can be opened by clicking the Fit Control button in the Fit Peaks page of the Peak Analyzer.
It contains two panels: the upper panel and the lower panel. In addition, there are some buttons and a drop-down list in the middle. This dialog allows you to control and monitor the peak fitting.
The Upper Panel
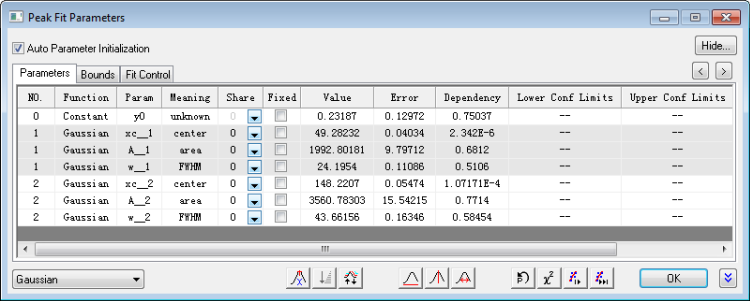
The Parameters Tab
The Parameters tab lists all the parameters of all the functions selected to perform the fitting. The columns that are shown in the tab can be customized. By default, it contains check boxes to control whether a parameter value should be varied or fixed during the iterative fitting process. You can also use this tab to specify which parameters should be shared. During fitting, keeping this tab active allows you to monitor the fitting procedure. In addition, you can add/remove the columns by right-clicking on any column title and check/uncheck the column names in the context menu. More details are available in the Customizing the Tabs in the Upper Panel topic below.
Note: If you want to go back one iteration to check the parameters, you can click the Previous button  , or likewise, you can click the Next button , or likewise, you can click the Next button  to go forward one iteration. to go forward one iteration.
|
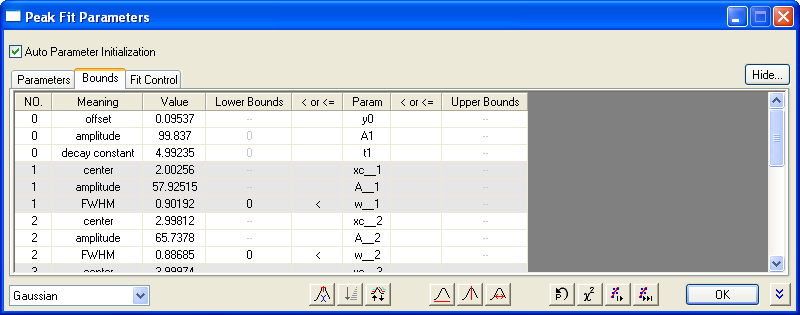
The Bounds Tab
This tab is used to set lower and upper bounds for parameters. For each parameter, you can enter bound values in the LB Value and UB Value columns, and select a condition from the LB and UB columns to define the lower and upper bounds. (Note that the conditions "<", "<=" will appear in turn, you can switch among them by double-clicking on the LB or UB column.).
The columns that are shown in this tab can be customized. You can add/remove the columns by right-clicking on any column title and check/uncheck the column names in the context menu. More details are available in the Customizing the Tabs in the Upper Panel topic below.
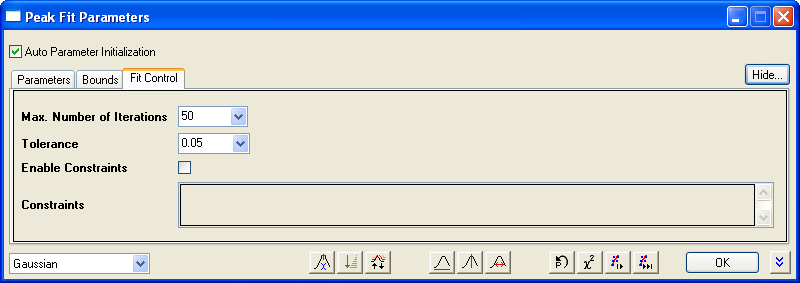
The Fit Control tab
| Max Number of Iterations
|
Specifies the max number of iterations performed when the Fit button is clicked.
|
| Tolerance
|
Specifies the tolerance in this combo-box. Fitting will be viewed as success if the reduced chi-square between two successive iterations is less than this tolerance value.
|
| Invalid Weight Data Treatment
|
- Treat as Invalid: If there is invalid value in weight data, Origin will throw an error.
- Replace with Custom Value: Replace the Invalid Weight data with Custom Value.
|
| Custom Weight
|
Set the value of Custom Weight. This option is available when Replace with Custom Value is selected.
|
| Enable Constraints
|
Specifies whether to enable the constraints during peak fitting.
Note that this setting and Constraints (see next) are NOT saved with the other fit parameters UNLESS the user enables Enable Linear Constraints Status and Constraints, in the Peak Analyzer Theme Setting dialog box (Beginning with Origin 2021, these two are enabled by default).
|
| Constraints
|
Specifies linear constraints for the fit parameters. The syntax for specifying constraints is same as with replica fitting in the NLFit dialog. To refer to the parameters in the nth peak, the "ParaName__n" notation (two underscores) should be used. Please see this topic for details.
|
Customizing the Tabs in the Upper Panel
The context menu that appears when you click on any column title
By right-clicking on any column title, you can see a context menu which lists all of the items or columns that can be shown in the current tab. Among them, any column name with a check mark in front of it is a column that has been shown. To add/remove a column, you can select its name in the context menu to change the display status. To show all the items in the tab, you can check Show All Columns on the fly-out menu.
The following table lists all the columns that can be displayed in the tabs of the upper panel:
| Column
|
Meaning
|
Shown in Parameters Tab by default?
|
Shown in Bounds Tab by default?
|
| No.
|
The index of the peak.
|
Yes
|
Yes
|
| Peak Type
|
The function selected for the peak. If you click in this column, a drop-down list appears, allowing you to change the function.
|
Yes
|
Yes
|
| Param
|
The parameter name.
|
Yes
|
Yes
|
| Meaning
|
The meaning of the parameter.
|
Yes
|
Yes
|
| Share
|
This specifies whether the parameter is shared. If a parameter should not be shared, enter 0 in this column. Otherwise, assign a non-zero value as a group number. All parameters with the same group number will share the same value during the fitting process.
|
Yes
|
No
|
| Fixed
|
This specifies whether to fix the parameter. If a parameter is fixed, its value will stay unchanged during the fitting process.
|
Yes
|
No
|
| Value
|
Parameter value. You can double-click in this column and then edit the parameter value.
|
Yes
|
Yes
|
| Error
|
Parameter error.
|
Yes
|
No
|
| Dependency
|
Dependency value.
|
Yes
|
No
|
| Lower Conf Limits
|
Lower confidence limit.
|
Yes
|
No
|
| Upper Conf Limits
|
Upper confidence limit.
|
Yes
|
No
|
| Significant Digits
|
This specifies the significant digits of the numbers in the Value column. The default option is free, which means there is no limits of significant digits. You can set the significant digits by selecting from the drop-down list. Available options range from 1 to 15.
|
Yes
|
No
|
| Lower Bounds
|
The lower bounds value.
|
No
|
Yes
|
| < or <=
|
The lower/upper bound control.
|
No
|
Yes
|
| Upper Bounds
|
The upper bound value.
|
No
|
Yes
|
| Data Range
|
Data range to be fitted
|
No
|
No
|
| Show All Columns
|
Specifies whether to show all the columns.
|
|
|
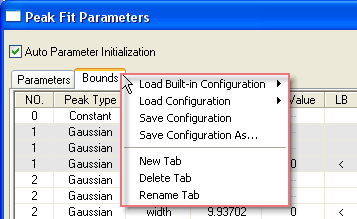
The context menu that appears when you click on any tab title
By right-clicking on any tab title, you can get a context menu as shown in the following screenshot. With the menu, you can customize the tabs, such as renaming the current tab or adding a new tab.
The meanings of the menu commands are as follows:
| Load Built-in Configuration
|
Allow you to load the built-in configuration for the Parameters tab and the Bounds tab. It contains two submenus:
- Bounds: Load the built-in configuration for the Bounds tab .
- Parameters: Load the built-in configuration for the Parameters tab.
|
| Load Configuration
|
This menu command allows you to load a saved configuration for the current tab.
|
| Save Configuration
|
Save the current configuration.
|
| Save Configuration As...
|
Save the current setting as another configuration.
|
| New Tab
|
Create a new tab.
|
| Delete Tab
|
Delete the current tab.
|
| Rename Tab
|
Rename the current tab.
|
Apply the Same settings to the parameters which have the same prefix name
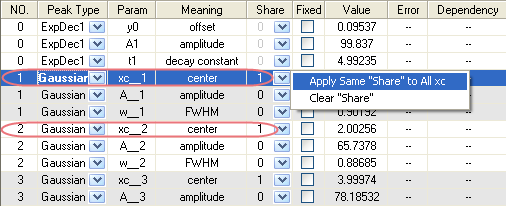
Set Share status
By right-clicking click the rows in Share column, you can get a context menu as shown in the following screenshot.
The meanings of the menu commands are as follows:
| Apply Same "Share" to All ...
|
Specifies the same Share status to the parameters which have the same prefix name (for example, "xc_1" and "xc_2" have the same prefix name of "xc").
|
| Clear "Share"
|
Clears the Share status for all parameters.
|
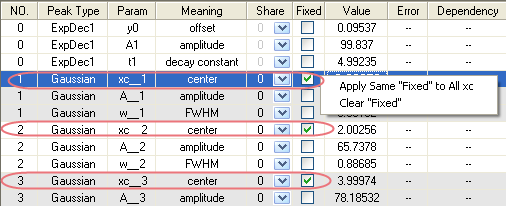
Set Fixed status
By right-clicking click the rows in Fixed column, you can get a context menu as shown in the following screenshot.
The meanings of the menu commands are as follows:
| Apply Same "Fixed" to All ...
|
Specifies the same Fixed status to the parameters which have the same prefix name (for example, "xc_1" and "xc_2" have the same prefix name of "xc").
|
| Clear "Fixed"
|
Clears the Fixed status for all parameters.
|
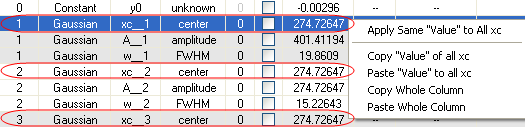
Set Value status
By right-clicking the rows in Value column, you can get a context menu as shown in the following screenshot.
The meanings of the menu commands are as follows:
| Apply Same "Value" to All ...
|
Specifies the same Value to the parameters which have the same prefix name (for example, "xc_1" and "xc_2" have the same prefix name of "xc").
|
| Copy "Value" of all ...
|
Copies the Value values of all the parameters which have the same prefix name.
|
| Paste "Value" to all ...
|
Pastes a set of data to the Value of all the parameters which have the same prefix name.
|
| Copy Whole Column
|
Copies the whole Value column.
|
| Paste Whole Column
|
Pastes a set of data to the Value column.
|
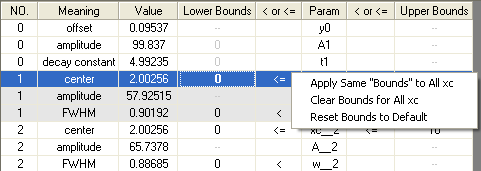
Set Bounds status
By right-clicking the rows in < or <= columns, you can get the following context menu to share the "bounds status":
If you have set Bounds for a parameter, you can also get a context menu by right-clicking the rows in LB Value column, UB Value column to get a similar context menu as shown in the following screen shot.
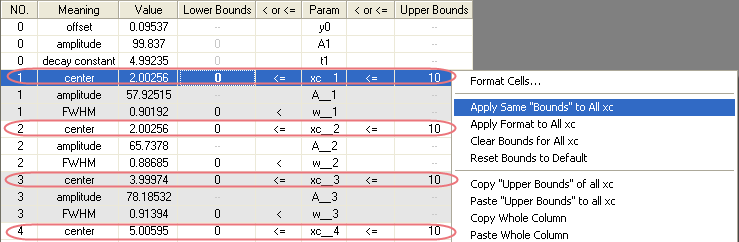
The meanings of the menu commands are as follows:
| Format Cell
|
Specifies the format of selected cell. currently, only three formats are available, Numeric, Date, Time.
|
| Apply Same "Bounds" to All ...
|
Specifies the same Bounds status to the parameters which have the same prefix name (for example, "xc_1" and "xc_2" have the same prefix name of "xc").
|
| Apply Format to All ...
|
Apply the format of current cell to the parameters which have the same prefix name (for example, "xc_1" and "xc_2" have the same prefix name of "xc").
|
| Clear "Bounds" for All ...
|
Clears the Bounds status for the parameters which have the same prefix name.
|
| Reset "Bounds" to Default
|
Resets Bounds status to default.
|
| Copy "Lower Bounds/Upper Bounds" of all ...
|
This menu item is accessible only when you right-click on Bounds/Upper Bounds column. It copies the "Bounds/Upper Bounds" of all the parameters which have the same prefix name.
|
| Paste "Lower Bounds/Upper Bounds" to all ...
|
This menu item is accessible only when you right-click on Bounds/Upper Bounds column. It pastes a set of data to the "Bounds/Upper Bounds" of all the parameters which have the same prefix name.
|
| Copy Whole Column
|
Copies the whole Lower Bounds/Upper Bounds column values.
|
| Paste Whole Column
|
Pastes a set of data to the Lower Bounds/Upper Bounds column.
|
Other Controls in the Upper Panel
| Auto Parameter Initialization
|
Specify whether to enable auto parameter initialization. If you wish to use the parameter values saved in a theme by applying such a theme, please make sure to uncheck this check box.
|
| Hide
|
Click this button to open the Hide Parameters dialog, which allows you to select a few parameters to be hidden from the Peak Fit Parameters dialog. It offers two methods Hide Parameters with Following prefixes and Hide Parameters Except Shared in to hide the parameters. When both methods are selected, the former method has a higher priority over the latter.
- Hide Parameters with Following prefixes
- Using this method can hide the parameters with the same prefixes. Available prefixes are as follows:
- y...: Select this check box to hide the parameters with prefix y.
- xc...: Select this check box to hide the parameters with prefix xc.
- a...: Select this check box to hide the parameters with prefix a.
- w...: Select this check box to hide the parameters with prefix w.
- Hide Parameters Except Shared in...
- Using this method can hide all the parameters except the parameters shared in a specified group. It is available only when there are parameters that have been shared in the Peak Fit Parameters dialog. A drop-down list which contains the indices of the shared groups will be shown if this check box enabled. You can choose a group of shared parameters to be shown even they should be hidden.
|
The Lower Panel
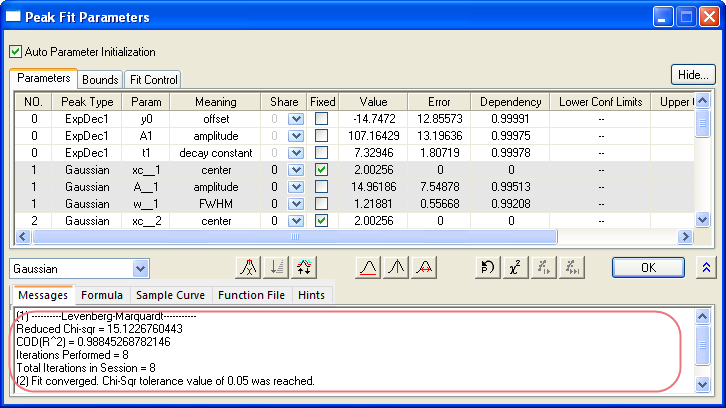
This panel is used to monitor the fitting procedures and results. For example, you can see whether or not the fit has converged, the iterations performed and the current chi-square value.
Controls between the Two Panels

| The Function drop-down list
|
Choose a function from this list. Then the peak type for all peaks will be set to this function. Please refer to the Peak Analyzer Function Reference to learn details on each function.
|
| Switch Peak Label
 / / / / / /
|
Specify the peak label type. It can use the peak indices, the x values, the y values or the x values and the y values together as the peaks' labels.
|
| Reorder Peaks

|
This button is enabled only when the Sort Peaks button has been used. It is used to restore the default order of the peaks.
|
| Sort Peaks

|
Open the Sort Peaks dialog to sort the peaks. The peaks can be sorted by Centers, Widths, Amplitudes, which can be in Ascending or Descending order.
|
| Fix or release baseline parameters
 / /
|
Specify whether to fix the baseline parameters. When the baseline parameters are fixed, a lock appears on this button.
|
| Fix or release peaks center
 / /
|
Specify whether to fix the parameters that stand for the peak centers. When the peak centers are fixed, a lock appears on this button.
|
| Fix or release peaks width
 / /
|
Specifies whether to fix the parameters that stand for the peak widths. When the peak widths are fixed, a lock appears on this button.
|
| Initialize Parameters

|
Initialize the parameters with the parameter initialization codes (or initial values).
|
| Calculate Chi-Sqr

|
Calculate the current reduced Chi-Square value and output to the lower panel.
|
| 1 Iteration

|
Click this button to perform a single iteration. The peak centers can be varied (This is different from the Fit until Converge behavior stated below, which fixes the peak centers for the first few iterations). The result will be displayed in the lower panel.
|
| Fit until converged

|
Click this button to perform iterations until fitting is converged. The result will be displayed in the lower panel.
In contrast to 1 Iteration, when you click the Fit until converged button, Origin will fix the peak centers for the first 20 iterations (default) and then release them. For a greater or fewer number of iterations, modify the value of system variable @FCI.
Also, see this FAQ.
|
Show More  /Show Less /Show Less 
|
Toggle the lower panel on/off.
|
|