8.9.2 Inserting Image into GraphInsert-Image
You can insert an image into Graph window, no matter the image is in an Image window or outside of Origin. You can also copy an image outside of Origin and paste in a Graph window, or copy a Graph page as image inside of Origin and paste it in other Graph window.
Insert an Image
Insert an Image File Outside of Origin
- Active a Graph window. Select menu Insert: Image from file....
- Select an image file from the File Browser to insert it to the active graph layer. Multiple image types are supported, including png, svg, jpg, tif, bmp, etc.
This will insert the image as image object by default. You can convert it to the layer background later.
Things to Know about inserted image:
- Prior to Origin 2021b, images inserted to the graph window (not as layer background) were inserted as type = BMP, with interpolation enabled by default. In Origin 2021b, the same image was inserted as type = OIMAGE, which did not support interpolation and which, in rare cases, resulted in a poorer quality image. If you experience degradation of inserted images, you can try setting @IMGB = 1 BEFORE inserting the image. To confirm interpolation, right-click on the BMP image, choose Properties, click on the Image tab and verify that Enable interpolation is checked. For information on setting the value of a system variable, see this FAQ). Does NOT apply to images inserted as background.
- To reduce project file size, if an image file is larger than 800kb (determined by system variable @IML), it will be auto-set to Link File when inseting to graph by default. Once linked, it will be auto-updated when the source image file has a change. If you want to manually set a smaller size image as linked,
- Right click on the inserted image and check Link File.
- Double click on the insert image to open it in a separated Image window, and then right click on the image to check Linked File.
- If an image object is linked to an external file, you can always right click on it and select Source File Path to check or change the source.
If you insert the image as image object
- You can resize (aspect ratio is kept) and reposition the image by mouse-dragging.
- The image object is attached to Layer Frame by default.
- Double click on the image will open it in an Image window. You can further customize the image in the Image window such as crop or clip the image to an interested region, or rotate the image. Once done, click
 button to return to the Graph window. button to return to the Graph window.
 | Crop vs. Clip
- Crop does not keep the original image,
- Clip keeps the original image so you can later move or resize ROI to clip the image again. The graph window will update accordinglly.
- If delete the ROI after clipping, you can right click inside Image window and select Remove Clipping to restore the image to full range in the Graph window.
Learn more about ROI on Image, please refer to this page.
|
| Learn more about what you can do in the separated Image window, see below section.
|
Insert SVG
Scalable Vector Graphics (SVG) is a widely-used vector format and we keep improving SVG’s utility in Origin since it is introduced. If you want to insert an image into Origin Graph window and freely place, resize, stretch, rotate it without quality loss, it is highly commanded using SVG format.
- Besides the general menu Insert: Image From File..., you can drag and drop a SVG image to Graph window or Layout window to insert it directly.
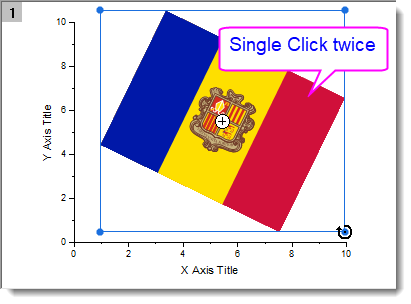
- Single click twice on the image to enter rotation mode, move cursor to one of the four anchor points when cursor becomes a circle, drag the anchor to rotate the image freely.
OR,
- Double click on the image to open the Object Properties dialog. On the Dimensions tab, enter or select an angular degree from the Angle option to rotate it precisely.
From Origin 2025, SVG inserted as an image object can be set as graph background.
- Right click on the SVG object and select Set as Layer Background.
If you want to insert the image as layer background
- Double click on the image object to open it in an Image window.
- Right click inside the Image window and choose Set as Layer Background.
- The background image cannot be selected by mouse-clicking. But you can still open it in a seperated Image window by one of the following ways:
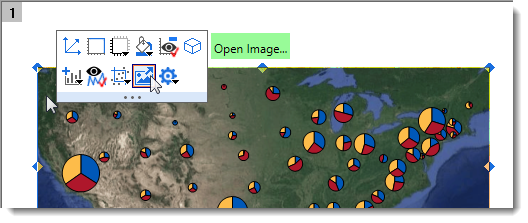
- Single click on the edge of the graph layer. A mini toolbar appears.
- Click Open Image button
 to open the background image in an Image window. to open the background image in an Image window.
- OR,
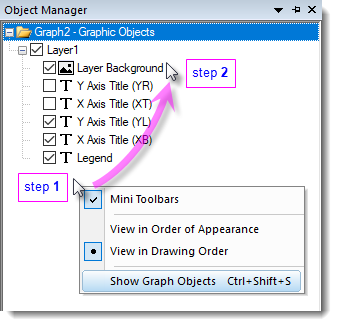
- Open the Object Manager. Right click inside it and select Show Graph Objects from the context menu.
- Double click the Layer Background icon to open the background image in an Image window.
No matter the image is inserted as background or object
- The inserted image is embeded to the graph.
- You can double click on the image node in the Object Manager to open it in a separated Image window.
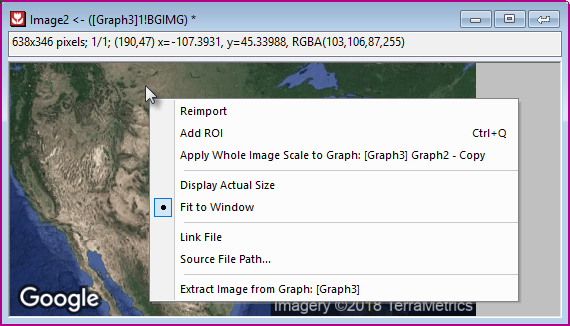
- Right click inside the Image window you will get a list of menus.
| Add ROI
|
Add a ROI box on the image. Learn about what you can do with image ROI on this page.
|
| Apply Whole Image Scale to Graph
|
Available only when image is inserted as background. Rescale the graph according to coordinates set in Image window.
|
Display Actual Size/
Fit to Window
|
Display the image in 1:1 pixel, or fit the image to window size.
|
| Link File
|
You can choose to save the image with project or not. Check this item will link the inserted image to the source image file outside of Origin. The image will be excluded when saving the project. Only keep the connection between the source image file and the Origin project. Next time you open the project, the image will be reloaded automatically.
This featrue is help to reduce the project size especially when the inserted image is very large.
|
| Source File Path
|
Check or change the path of the source image file in the open dialog. If the current project has been saved, you can check Relative to Project to save the path relative to project.
|
| Extract Image from Graph
|
Extract the embeded image into a "real" Image window which serves as the container. That means, the image will be saved in the Image window and thus saved along with the project.
This feature integrates everything in the project and makes it easier to share your work with others.
|

|
Below shows you how to insert an image that was first inserted as layer background in another graph.
- In the graph with image background, right click in the Object Manager and choose Show Graphic Objects.
- Double click Layer Background entry to open it in an Image Window.
- Right click inside the Image Window and choose Extract Image From Graph.
- Activate another graph without background and choose Insert: Image from Image Window to insert it.
|
Insert an Image Inside of Origin
- Active a Graph window.
- Select Insert: Image from Image Window.... This will open the following dialog.
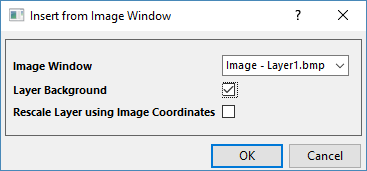
| Layer Background
|
- Check this check box to insert image as layer background, which cannot be selected nor moved manually. In this case, the insert position and size are determined by the XY coordinates of the image. Refer to shis page of how to set XY coordinates of an image.
- Uncheck this check box to insert image as graph object. You can drag to reposition and resize the object.
|
| Rescale Layer using Image Coordinates
|
Available only when insert image as background. Check this check box to rescale graph's XY axes according to XY coordinates of the inserted image.
|
Advantages of Inserting Image from Image Window
- Inserting image by Insert: Image From File will build up the project file size dramatically. To reduce the project size, we recommand importing the image file into Origin's Image window and then inserting it to graph.
- Image window allows you to set XY coordinates of the image and then insert it to the graph of the exact position, or rescale the graph according to the image coordinates.
Refer to shis page of how to set XY coordinates of an image.
Below is a quick example of how to set XY coordinates of an image and insert it to the graph as background.
|
|
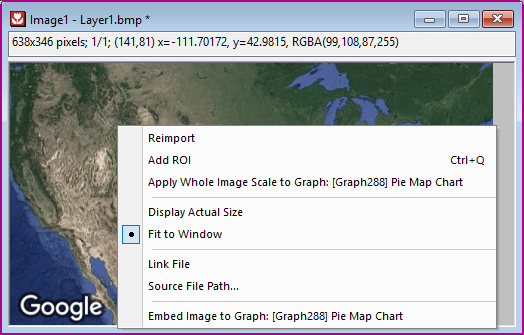
Suppose we have a screenshot from Google Map. We want to insert it to the Bubble graph as background.
- Import the molecule image file into Origin Image window by File: New: Image: Image/Videos...
- With the Image window active, select Image: Set Coordinates... to set XY coordinates of the image.
Note: The Unit doesn't take effect when inserting the image to graph. The inserted position only determines by the values of XY coordinates. Unit set in this dialog is used to determine the actual scale of the image and will save to the Image window.
- With the Graph window active, select Inssert: Image from Image Window to insert the molacule image to the graph according to the specified coordinates. Make sure Layer Background checkbox is checked.
|
- You can auto-rescale the graph according to the image coordinates: Check Auto Rescale Background Image button
 on the layer level mini-toolbar. It is useful in case when the Image is a linked image created from a ROI box on another Image and you move the ROI to another place. on the layer level mini-toolbar. It is useful in case when the Image is a linked image created from a ROI box on another Image and you move the ROI to another place.
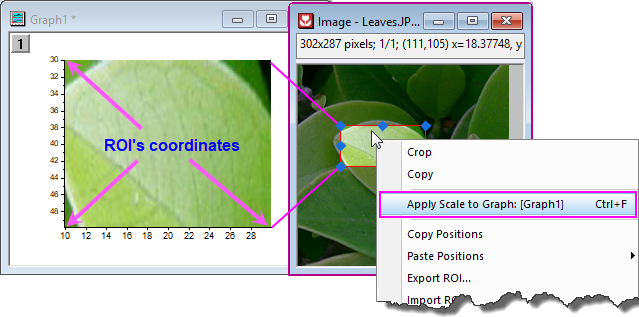
- If you insert the image as background, after setting XY coordinates to the image, you can further add a ROI on the image to clip the graph background to that region and update the graph axes accordingly.
- Insert an image as background by Insert: Image from Image window.
- Activate the Image window. Add a ROI.
- Spcify the ROI coordinates.
- Right click on ROI and choose Apply Scale To: Graph1.
- More options support by right clicking inside the Image window.
| Add ROI
|
Add a ROI box on the image. Learn about what you can do with image ROI on this page.
|
| Apply Whole Image Scale to Graph
|
Available only when image is inserted as background. Rescale the graph according to coordinates set in Image window.
|
Display Actual Size/
Fit to Window
|
Display the image in 1:1 pixel, or fit the image to window size.
|
| Link File
|
You can choose to save the image with project or not. Check this item will link the inserted image to the source image file outside of Origin. The image will be excluded when saving the project. Only keep the connection between the source image file and the Origin project. Next time you open the project, you will see a down arrow on the graph. Click it to reload the image.
This featrue is help to reduce the project size especially when the inserted image is very large.
|
| Source File Path
|
Check or change the path of the source image file in the open dialog. If the current project has been saved, you can check Relative to Project to save the path relative to project.
|
| Embed Image to Graph
|
This will save the image to the Graph window as an embeded object.
|
Insert Image from Web
- Select Insert: Image from Web
- See details here.
Paste Image into Graph page
- Copy an image out of Origin
or
Copy the graph page in Origin as an image
- Go to Graph window, and right-click on the blank space to select Paste: Paste, or press Ctrl + V, or select Edit: Paste in the main menu.
- Double-clicking on the pasted image will open the image in an Image window. Learn more about the Image Window and how to customize it on this page.
|