8.6.1 Creating Text LabelsCreate-TextLabel
The easiest way to add text labels in your Origin windows is to use Origin's WYSIWYG text creation and editing tools:
- Use the Text tool on the Tools toolbar to create your labels.
- Use the Format and Style toolbars, Mini Toolbars and the text object's Properties dialog to set format and style options, link objects to LabTalk variables and scripts, control object attachment method and object location, etc.
- Use the Symbol Map -- available by right-clicking while in internal-edit mode -- to add special symbols to your labels.
- Use Insert Info. Variables -- available by right-clicking while in internal-edit mode – to add metadata and column labels to your label.
Creating and customizing a label
- Click the Text Tool
 button. button.
- Click at the desired text entry point on your Origin window (graph, worksheet, etc.).
or
- Right-click at the desired location in your Origin window.
- Select Add Text from the shortcut menu.
type your text and customize it using some combination of the following:
- Select your options using buttons on the Format and Style toolbars.

- When a text object is selected, you can use buttons on the object's Mini Toolbar (e.g. Alignment of text).

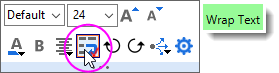
- To toggle text-wrapping on and off, click the Wrap Text button on the object's Mini Toolbar; or check the Wrap Text, Adjust Height box on the Frame tab in the Properties dialog (see next bullet).
- For acess to all text object properties, right-click on the object and choose the Properties.
|
Note: When creating text labels, if you click inside the layer frame and create your text label, the label is automatically attached to the layer frame (see this discussion of Object Attachment and Scaling). When text labels are attached to the layer frame, moving or resizing the layer will force the text object to move/resize with respect to the layer frame's size and position. If you click outside of the layer and create your text label, the label is automatically attached to the page, in which case the label does not move or resize with the layer.
|
Shortcut keyboard combinations for general editing of text labels
If you prefer using shortcut keys over setting style and format options using toolbar buttons and drop-down lists, you can use the following keyboard combinations:
| Control
|
Key Combination
|
| Bold
|
CNTRL + B, CNTRL + SHIFT + B
|
| Italic
|
CNTRL + I, CNTRL + SHIFT + I
|
| Underline
|
CNTRL + U, CNTRL + SHIFT + U
|
| Greek
|
CNTRL + G, CNTRL + SHIFT + G
|
| Supercript
|
CNTRL + SHIFT + =
|
| Subscript
|
CNTRL + =
|
| Supersubscript
|
CNTRL + -
|
| Increase Font Size
|
CNTRL + SHIFT + >
|
| Decrease Font Size
|
CNTRL + SHIFT + <
|
| Select All
|
CNTRL + A, CNTRL + 5 (numpad)
|
Resizing a text label
To resize a label object:
- Click once on the label.
- Select the desired font size from the Font Size box on the Format toolbar.
or
2.Click the Increase Font or Decrease Font buttons   on the Format toolbar. on the Format toolbar.
|
Note: For quick adjustments to the size of the text object, select the object and drag a control handle.
|
Rotating a text label
To rotate a label:
- Click twice (pause long enough between clicks to avoid a double-click). A locus of rotation symbol
 displays in the middle of the label and round rotation handles display at the corners of the label. displays in the middle of the label and round rotation handles display at the corners of the label.
- Grab a rotation handle and rotate the label to the desired angle.
|
Note: You can specify a precise rotation angle in the Object Properties dialog box (Format: Object Properties).
|
To disable second-click access to label rotation mode:
- Select Preferences: Options to open the Options dialog box.
- Select the Text Fonts tab and then select the Simple Selection Mode check box.
In-place (WYSIWYG) editing of text labels
Length of text string limitation
By default, when you double click the Text object, it will open in-place editing mode. But the there is limitation for the length of text string for this situation.
For wrap text, if the length of text string is more than 80 (this value is controlled by system variable @TLIP ), the in-place editing mode is disabled. When you double click a text object, it will open Text Object properties dialog.
For wrap not enable text, if the length of text string is more than 60 (this value is controlled by system variable @TLIPN ), the in-place editing mode is disabled. When you double click a text object, it will open Text Object properties dialog.
Turning off in-place (WYSIWYG) editing of text labels
This information is provided primarily for long-time Origin users who prefer the older (prior to version 7) text editing methods.
To turn off in-place text editing:
- Select Preference: Options to open the Options dialog box.
- Select the Text Fonts tab and then select the Disable In-place Editing check box.
- Click OK. When asked to save as a startup Option, say Yes to make this the default behavior (say No to apply it to the current session only).
When the in-place editing mode is disabled, double-clicking the label opens the Object Properties dialog box. This dialog box predates Origin's WYSIWYG methods. Most would consider its functionality to be less intuitive than newer WYSIWYG methods.
Insert Links and Variables
The most basic text label is a simple, static object but Origin labels can be dynamically linked to variable values via the text object's Properties dialog box. There are two ways to link labels to variables:
Object Properties, advanced control of text labels
In addition to label-variable linking, other controls available from a text objects's Properties dialog including controls specific to Legend and Annotation objects:
- The Text tab allows editing and styling of text objects.
- The Symbol tab (Legend objects only) allows customization of legend symbols.
- The Frame tab allows customization of object frame, fill, padding, etc.
- The Position tab provides control of object position, movement, etc.
- The Leader Line tab (Annotation objects only) provides control over annotation leader lines.
- The Programming tab includes controls for linking the object to variables and scripts.
Using LabTalk for custom formatting of text labels
When creating templates, etc. you can incorporate LabTalk script to format a text label using Origin Formats.
The procedure is:
- Create the text label and enable LabTalk substitution, as demonstrated below.
- Right-click on the label and choose Properties, click on the Programming tab and set Link to (%, $), Substitution Level to 1.
Examples:
Begin by selecting the Text tool and clicking on the graph or worksheet:
- Starting from the number 37.34255, you could format this as $(37.34255, D MS), yielding 37° 20' 33.
- Starting from the (Julian day) number 2458421, you could format this as $(2458421, D1), yielding Tuesday, October 30, 2018.
- Starting from the number 203465987, you could format this as $(203465987, S*3), yielding 2.03E + 08.
For more information on custom formatting of text labels, see Origin Formats.
For more information on custom formatting of numeric data, see Custom Numeric Formats.
Using the Symbol Map to add special characters to your labels
To add special characters to your text labels:
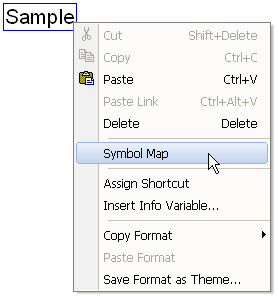
- While in in-place text editing mode, right-click and select Symbol Map from the shortcut menu. This opens the Symbol Map dialog box.
 . .
- Choose the Font that contains the necessary special character from the drop-down list.
- Highlight the special character in the gallery and either double-click or click Insert to insert the special character into your text label.
|
Note:
The Symbol Map dialog used for inserting characters in text labels supports Unicode characters. You can enter a rich repertoire of mathematical/special symbols and variety of language characters (e.g., Cyrillic, Hebrew, Arabic, Korean, Chinese, Japanese, etc.) using Unicode-enabled fonts such as Arial Unicode MS.
To insert a Unicode character, check the Unicode check box next to Font and then select the special character in the symbol gallery. If you know the corresponding Unicode code point, you can type the digits that follow "U+" in the Go To Unicode text box and go to that character directly. For more information, see adding special characters in a text label.
|
Creating a shortcut key combination to insert special characters
If you frequently use certain characters in your text labels, you can create shortcut keys to insert those characters and bypass the Symbol Map.
The easiest way to do this is to have already inserted the desired character into a text label. Then:
- Double-click on the text object to enter in-place editing mode and select the text that you want to insert when you use your shortcut key combination.
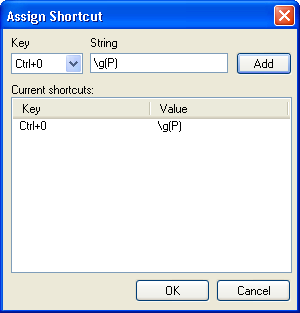
- Right-click on the selected text and select Assign Shortcut. This opens the Assign Shortcut dialog box. The text that you selected is entered into the String box.
- Select a shortcut from the Key list.
- Click the Add button.
|
Note that you could enter text into the String box manually. However, if you do, any formatting syntax (i.e. \b(text) etc.) must also be entered manually. For instance, to create a shortcut for the Greek character  : :
- Click the Text tool and then click in your graph window. This starts the in-place editing mode.
- Right-click and select Symbol Map.
- Select and click Insert.
- Click Close.
- Now highlight and right-click on the character.
- Select Assign Shortcut.
- Select a shortcut from the Key drop-down list.
- Click Add.
- Click OK to close the dialog box.
You can now use CTRL+0 (in this example) as a shortcut for when in-place editing.
For more information, see Escape Sequences.
|
To remove a shortcut:
- Re-open the Assign Shortcut dialog box.
- Select the shortcut you want to remove from the Current list box.
- Press DELETE.
| Topics covered in this section:
|
|