2.1.4 Basic Child Window OperationsOperate-ChildWindow-Basic
This topic covers basic operations common to all Origin child windows.
Moving and Resizing Windows
- To move a window, drag the window title bar.
- To manually resize a window, drag a corner of the window with your mouse.
- To maximize a window, click the maximize button in the upper-right corner of the window.
- To minimize a window, click the minimize button in the upper-right corner of the window.
 | OPJU files saved in Origin 2023b will scale workspace and child windows better when opened on a screen with different resolutions and DPI, no matter the OPJU is saved in maximized or unmaximized workspace. Functionality is controlled/tuned using system variable @MFRLA and @SRWS.
|
Snapping Windows
Windows that are arranged in rows and columns can be "snapped"; that is, dragged and resized along a common edge. The visual cue for engaging the snap is a green bar.
- Toggle this feature off or on using Window: Snap Windows (Ctrl+F12); or control using system variable @MDI. This setting is remembered between sessions.
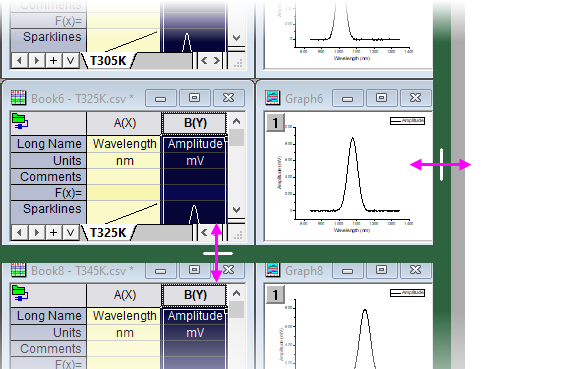
- To resize a single window without snapping, press SHIFT while dragging window border.
- When tiled windows cover the workspace, swap two window positions by pressing ALT while dragging the window title bar.
- To snap a window into an empty space, press SHIFT while dragging.
Arranging Windows
In addition to the familiar Cascade (Window: Cascade) and Tile (Window: Tile Horizontally/Tile Vertically) window operations, there is a an Arrange Windows dialog (X-Function = winarrange) for systematically arranging child windows in a user-specified sequence.
See Arrange Windows for information.
Hiding and Deleting Windows
- Click Close
 in the upper-right corner of the window. Click Hide to remove the window from the workspace but NOT delete it from the Origin project. Click Delete to permanently remove the window from the Origin project. in the upper-right corner of the window. Click Hide to remove the window from the workspace but NOT delete it from the Origin project. Click Delete to permanently remove the window from the Origin project.
| Beginning with Origin 2022b, you can undo deleting a workbook window by menu Edit: Undo or hotkey Ctrl+Z. The related data plots will also be restored.
|
- Beginning with Origin 2020, you can use LabTalk system variable @PEN to control the number of shown windows when swtiching between Project Explorer folders. By default, Origin will display the five most-recently active windows.
- Right-click on a window icon in Project Explorer and choose Hide Window or Delete Window from the shortcut menu.
- Toggle between Show Window and Hide Window by double-clicking the window icon in Project Explorer.
| When you click the window's Close button, Origin asks if you want to hide or delete the window. To change this behavior (and skip the prompt):
- Select Preferences: Options.
- In the Options dialog box, select the Open/Close tab and in the Window Closing Options group, then specify how you want Origin to respond when you click a particular window type's Close button.
|
Active Window Indicator
Beginning with Origin 2018b, the active child window -- the window that will be acted upon by graphing and analysis operations -- will display a colored frame to make the active window more obvious. You can customize the active window indicator properties with "@ System Variables" @AWC (color) and @AWI (style).

| System variables @AWC and @AWI are persistent system variables (they are written to the registry) and thus, you do NOT need to do any more than set a value using the Script Window and the value will be remembered across sessions. Simply choose Window: Script Window, enter a value at the command line and press Enter (e.g. @AWC=color(255,0,0)).
|
Returning to Last Activated Window
- Choose Window: Return to Last Window from Origin menu.
- Press the hot key Ctrl + Alt + Z.
All Origin Windows, including Graph, Matrix, Worksheet, Layout, Notes, Excel sheet window, support this operation which is also known as Ping Pong.
Duplicating Windows
- Choose Window: Duplicate from the Origin menu.
- Click the Duplicate
 on the Standard toolbar. on the Standard toolbar.
Origin names duplicated windows using this default naming syntax:
DefaultNameN
where N is assigned the lowest available number not used by other project window names of the same type.
| Window
|
Default Name
|
|
Workbook
|
BookN
|
|
Graph
|
GraphN
|
|
Matrix
|
MBookN
|
|
Layout Page
|
LayoutN
|
For more information, see Origin Child Window Naming Conventions.
- To duplicate Windows in Project Explorer, pressing CTRL key and drag the selected windows.
| You can duplicate workbooks or matrixbooks, with or without data, by right-clicking on the window title bar and choosing an option from the shortcut menu.
Please note, since Origin 2020, when you select Duplicate Without Data to duplicate the window, only the raw data will be deleted but the cell links(such as cell references, cell formula etc.) will be kept to further uses. You can use the system variable @DkL to roll back to the older behavior which will delete the cell links too.
|
Refreshing a window
Whenever you change the contents of a graph window or a worksheet, or expose a part of a window that was hidden, Origin automatically redraws the affected portion of the window. To manually refresh the active window, click the Refresh button  on the Standard toolbar. on the Standard toolbar.
Note: If a graph contains large dataset, redrawing is time-consuming. When you expose a part of a hidden window or resize the window and it takes more than 500ms to redraw, Origin 2018 uses bitmap buffering to escape the redrawing process and improve the speed. In this case, when resizing the window you should see that the graph content is not updated "in real time" and the quality may be "bad" because the bitmap is used to stretch/compress. The quality will be updated when resizing is completed.
Saving a window to a file
A template is saved without data; A window file is saved with data.
- Choose from the Origin menu (For Notes Window and Excel Window, choose and , respectively); or right-click on the window icon in Project Explorer and choose from the shortcut menu to open the Save Windows As dialog.
- Right-click on the window title bar and choose from the shortcut menu (For Notes Window and Excel Windows, choose and , respectively) to open the Save Windows As dialog.
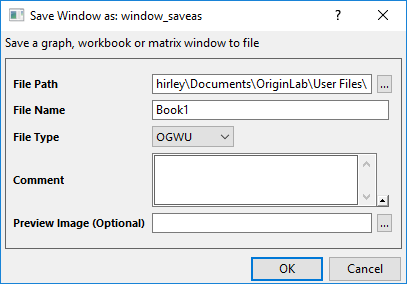
Origin will save the window as a Origin child window file, with the appropriate file extension: workbooks (.ogw(u)), graph (.ogg(u)), matrix(.ogm(u)) and notes (.txt).
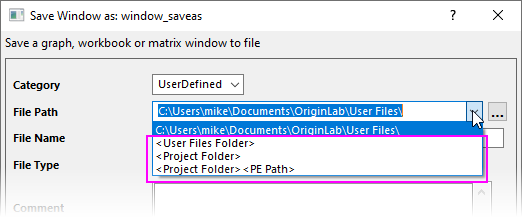
| Origin applys some useful path options to the Save Window as File Path drop-down.
|
- Activate the workbook window you desired, choose File: Save Workbook as Analysis Template... or right-click on the window title bar to select Save as Analysis Template shortcut menu to open the Save Windows As dialog to save the window as an }Analysis Template(*.ogw(u) file) without data.
| Since Origin 2019b, Origin supports to save a workbook without any operation as an analysis template too. Once you choose the File: Save Workbook as Analysis Template... main menu or File: Save Workbook as Analysis Template... shortcut menu, a dialog will pop up firstly to let you decide how to clear the data.
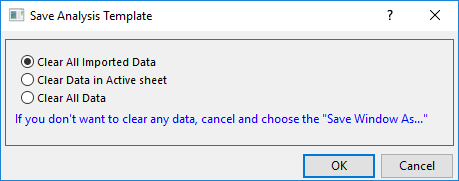
Choose the radio box and then click OK button to open the the Save Windows As dialog to save the analysis template.
If you don't want clear any data, just cancel and choose Save Window As menu instead to save the workbook as a window file.
For earlier versions, you are not allowed to save a workbook without any operation as an Analysis Template, but you can always save the workbook as a window file and then also use it in the Batch Processing dialog to do repetitive tasks.
|
See Also:
Opening window files in the Origin Project
To open a window from a file:
- Select File: Open from Origin menu.
- Click the Open
 button on the Standard toolbar. button on the Standard toolbar.
- Right-click on an empty portion of the Origin workspace and choose File: Open from the short-cut menu.
Select the type of the window to be opened, then choose a file. The window becomes a part of the current project.
| Under the Files of type item, there is an Opens as read-only check box. This check box is available only when an OPJ or an Excel file is selected. Attempting to save a read-only file will produce an error message.
|
| The Show Info check box near the bottom of the Open dialog box can determine whether to show comments, which can be saved with OPJ files.
|
Opening Files by Drag-and-Drop
| File Type
|
What happens when the file is dropped onto Origin
|
| OPJ
|
If current project has been saved and there were no changes made after saving, append the dropped opj to current project. Otherwise, close the current project and open the dropped project.
|
| OGG, OGW, OGM
|
Open the ogg, ogw, ogm files in Origin.
|
| OTP, OTW, OTM
|
Open the template files in Origin.
|
| OIS
|
Install the dialog theme so it becomes available in the menus, the related dialog, LabTalk scripts and the theme organizer. The theme file will be saved to \Themes\AnalysisAndReportTable subfolder under your User Files Folder.
|
| FDF
|
Install the fitting function.
If the function file is saved in Origin 2017 or earlier versions, during installation, a dialog pops up, asking which category the file should be put into. For files saved in Origin 2018 and further versions, as they have already included the category information during their creations or saving, the function file will be copied to the same category.
And, for all versions, another dialog will pop up to ask whether to copy the file to the \FitFunc subfolder under your User Files Folder.
|
| OXF
|
Install the X-Function.
|
| OPX, OPK
|
Install the package. It will be shown in the installed opx list in the Package Manager .
|
| OTH
|
Install the Worksheet or graph theme. The file will be saved to \Themes\Worksheet or \Themes\Graph subfolders under your user files folder and will be shown in the Theme Organizer.
|
| C, CPP, H, OGS
|
Open the file in the Code Builder.
|
Pin Windows
The pinned Window can skip from arrange windows.
- Right click on the window header and select Pin Window in the context menu.
- Active the window, and click the Pin Active Window
 button in the Folders and Windows toolbar button in the Folders and Windows toolbar
- Active the window, and run @LWP=1 in the Script Window to pin it.
- Active the pinned window, and click the Pin Active Window button in the Folders and Windows toolbar again.
- Click the Remove Window Pin button
 in the header of the window to unpin it. in the header of the window to unpin it.
Keep pinned window when switching folders
From 2023b, the pinned window will remain in workspace when switching folders. Set the system variable @pws=0 to roll back to old behvior so that pinned window will only show in its own folder.
When the pinned window isn't in its own folder:
- Its folder information show in pinned window title.
- Unpin will make the pinned window disappear in current folder.
- To go back to the pinned window own folder, click the Go to Original Folder
 button in the Folders and Windows toolbar, or select Go to Original Folder in the context menu of window header. button in the Folders and Windows toolbar, or select Go to Original Folder in the context menu of window header.
Page Notes
Origin supports Page Notes for Workbook, Matrix, Graph, Layout and Image windows,.
- Right-click on the window header, and choose Notes.
or
- Right-click on the window on the list of Project Explorer, and choose Notes.
or
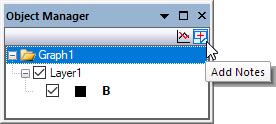
- Active a window and click the Add Notes button
 on the right-top corner of Object Manager. on the right-top corner of Object Manager.
- Click the Close button

or
- Click the Hide Notes
 on the right-top corner of Object Manager. on the right-top corner of Object Manager.
- Right-click on the window header, and choose Notes.
or
- Right-click on the window on the list of Project Explorer, and choose Notes.
or
- Click the Show Notes
 on the right-top corner of Object Manager. on the right-top corner of Object Manager.
| Note: For more information on page notes, Notes windows and Notes window syntax, see the following topics:
|
Switch Windows by Hotkey
To switch windows in the same folder:
- Press Ctrl key and then click Tab key to display the Window Switcher. Click the Tab key can switch window until Ctrl is released.
or
- Run doc -nav; in the Script Window to display the Window Switcher, then click the Tab key can switch window. Click the Ctrl key to close the Window Switcher.
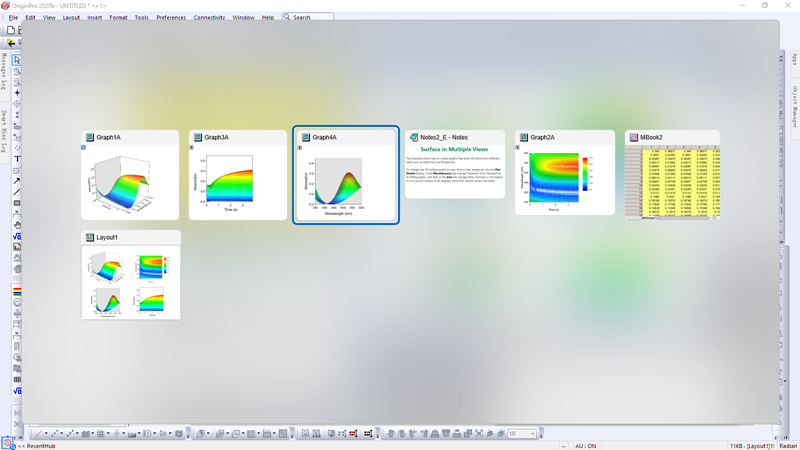
The Window Switcher displays thumbnails of all windows in the same folder including the floating windows and hide windows. The window is switched with a blue frame.
| - When the Window Switcher is displaying, you also can use RIGHT/LEFT Arrow to switch between windows or use mouse to select the window.
|
|