4.6.8.1 Quick StartWks-SetColVal-QuickStart
Set Values Dialog Box Key Features
The Set Values dialog box takes a one-line, user-defined expression and fills one or multiple worksheet columns (or portions of columns) with values generated by the expression. The expression -- entered directly in the Column Formula box -- can incorporate arithmetic operators, column and cell references, functions, user-defined variables, constants, etc. (see below). The Set Values Dialog features syntax-coloring.

Optional Scripting Tabs:

- The Before Formula Scripts tab takes one or more lines of LabTalk script and runs the script before the expression in the Column Formula box is executed. This makes possible such things as pre-processing of input data, defining functions, variables and constants for use in the Column Formula box, etc. For more information on the use of Before Formula Scripts, see Entering Expressions in the Set Column Values Dialog. For help with Set Values dialog box controls, see Menu Options and Dialog Controls.
- The Python Function tab allows you to define Python functions to be called in your column formulas. While you could save functions to an external file, using the Python Function tab allows you to save your code to an Origin template file for repeat use. Further, your Python functions can be called directly from the Column Formula box; or from LabTalk script on the neighboring Before Formula Scripts tab. For a quick example/tutorial demonstrating the use of the Python Function tab, see below. For more in depth discussion of Python and Origin, see Origin's Python documentation.
 | To load examples:
- in the Set Values dialog box, click Formula, Load Sample > and choose from the list of sample formulas.
- if you open Code Builder from Set Values dialog box, you can click File: Open LabTalk Samples to load LabTalk samples.
|
Spreadsheet Cell Notation
Beginning with Origin 2017 SR0, Spreadsheet Cell Notation (SCN) is enabled by default. When SCN is ON, you can use the simplified SCN notation or you can use the pre-2017 notation in either the Set Values Column Formula box or in the the F(x)= column label row. Note, however, that when using the older "col" or "wcol" syntax, some limitations apply.
When opening Origin files (OPJ, OGW, etc.) saved prior to Origin 2017, SCN will be OFF in the workbook. However, even in older files, SCN can be enabled via the Window Properties dialog box. If you do not enable SCN (you leave the Spreadsheet Cell Notation box unchecked), you must use the older column and cell notation in the Set Values and F(x)= formulas throughout the affected workbook.
Note that the new spreadsheet cell notation can only be used in the Column Formula box and in the F(x)= label row. It cannot be used in the Before Formula Scripts box of Set Values or in LabTalk scripts elsewhere in Origin.
References to Columns and Cells
Within a given worksheet, column and cell references are now made in the following way:
A; // reference to column A in the same sheet
A1; // reference to column A, row 1, in the same sheet
See Column Formula Examples, below.
Note: To refer to a column or cell of Text format, add "$" at the end.
|
References to Other Sheets and Books
Prior to Origin 2017, you had to define a range variable to use data in other sheets and books, in your Set Values formulas. As noted in the table above, using spreadsheet cell notation you can make direct references to data in other sheets and books. This is supported in both the F(x)= label row and the Set Values Column Formula box. Spreadsheet cell notation must be enabled in the target book(s).
Use the following syntax:
1!A; // reference to column A in first sheet in the same book
Sheet1!A; // reference to column A in a named sheet ([Sheet1]) in the same book
[Book1]1!A; // reference to column A in the first sheet in another book ([Book1])
[Book2]Sheet1!B2; // reference to row 2 of column B, in a named sheet ([Sheet1]) in another book ([Book2])
See Column Formula Examples, below.
What Can I Enter in the Column Formula or Before Formula Scripts Boxes?
Expressions can include any of the following. Note that range variables must be predefined (e.g. in Before Formula Scripts) before you can use them in the Column Formula expression:
| Data References
|
Variables
|
Operators
|
Functions
|
Constants
|
|
|
|
|
|
|
†Must be predefined in Before Formula Scripts panel, Script Window, etc.
| Note that the Set Values menu commands wcol(1), Col(A), Functions and Variables are useful for browsing and inserting data references, functions, variables and constants into your Column Formula or Before Formula Scripts. Selected elements are inserted at the cursor. As of Origin 2017 SR0, these menu functions only support the older column and cell notation (not spreadsheet cell notation).
|
| There is a quick way to load a conditional control or loop script when you are doing script in Before Formula Script box. Right click on Before Formula Script box to select Conditional/Loop at the bottom of the context menu, and then select a conditional structure or loop you desired in the flyout. The syntax will be added at cursor with simple comments.
|
For help with Set Values dialog box controls, see Menu Options and Dialog Controls.
Column Formula Examples
These are examples of "stand alone" expressions that can be used in the Column Formula box.
| New Spreadsheet Cell Notation
|
Older Notation
|
Description
|
| B - C
|
col(B)-col(C)
|
Returns the difference between col(B)[i] and col(C)[i].
|
| 2!B - 3!C
|
N/A
|
Returns the difference between sheet index 2, col(B)[i] and sheet index 3, col(C)[i].
|
| [Book2]Sheet1!A - [Book3]Sheet1!A
|
N/A
|
Returns difference between [Book2]Sheet1!A[i] and [Book3]Sheet1!A[i]
|
| [Book2]Sheet1!A - [Book3]Sheet1!A2
|
N/A
|
Returns difference between [Book2]Sheet1!A[i] and [Book3]Sheet1!, cell A2
|
| sin(pi*B)
|
sin(pi*col(B))
|
Returns the sine of col(B)[i] times pi.
|
| today()
|
no change
|
Returns the current date.
|
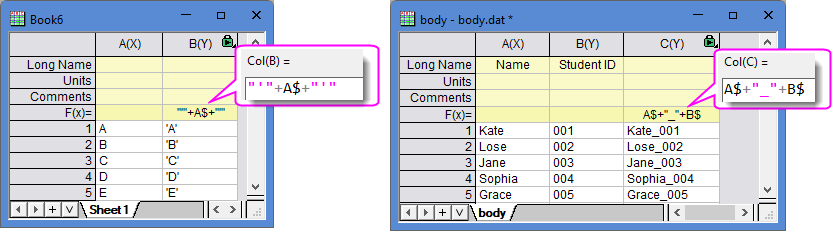
| A$ + B$
|
col(A)$ + col(B)$
|
Internally converts column A and B into strings and concatenates them.
|
| A>0? A: Na()
|
col(A)>0? col(A): Na()
|
If col(A)>0, returns value in col(A), otherwise returns missing value (see LabTalk Utility Function, Na()).
|
| B-B1
|
col(B)-col(B)[1]
|
Subtracts the first point in column B from all other values in column B.
|
| A + StartTime
|
N/A
|
Adds the named range "StartTime" value to values in column A.
|
| total(A[i-1:i+3])
|
total(col(A)[i-3:i+3])
|
Returns the sum of a sub-range from i-3 to i+3 in col(A), where i is the row index.
|
| sum(A:C, D:G, F)
|
N/A
|
Returns the row-wise sum of a values in columns A to C, D to G, and F.
|
| (wcol(j)*2)-1
|
no change
|
Can be used to transform the jth column (all selected columns) by multiplying each value by 2 and subtracting 1.
|
| Note: When using i and j in Set Values or in the F(x)= column label row, you must refer to them using lowercase letters. Uppercase I and J will be interpreted as worksheet column short names.
|
| Use "end" or "0" to define the last cell in a column, e.g. total(A[10:end])-B[i] or total(A[10:0])-B[i].
|
Autocomplete
Starting with Origin 2022, the column formula box in Set Values and F(x)= label row get autocompletion support for LabTalk-supported functions and named ranges.
If you do not wish to use the feature, you can disable it for column and/or cell formulas/F(x)=:
- Click Preferences: System Variables.
- In an empty Variable cell, type FAC.
- Enter one of the following in the Value cell (values are additive): 0 = turn off autocomplete, 1 = enable for cell formula and the F(x)= label row, 2 = enable for column formula, 3 (default) = enable for cell formula/F(x)= and column formula.
- Click OK to close the dialog.
Reusing Formulas
If you want to reuse your Set Values formulas, along with Before Formula Scripts and Python Function code, you can:
- Save the formula by (1) clicking Formula: Save As on the Set Values menu bar or (2) by clicking the Save Formula button
 in Set Values. To reload your formula in Set Values, click Formula: Load and choose your formula. With the column label row F(x)= cell selected, choose Column: Fill with User Formula or right-click in the cell and choose Load. in Set Values. To reload your formula in Set Values, click Formula: Load and choose your formula. With the column label row F(x)= cell selected, choose Column: Fill with User Formula or right-click in the cell and choose Load.
- You can save Set Values formulas with a workbook template. When you open an instance of the workbook template, your Set Values formula(s) will be ready for use.
A Note: When Column Formulas do not Automatically Update
When using the new simplified syntax, you can define a column formula in column C that refers to values in column A and column B, then insert a column between column A and B and column references in the formula will update as column short names are reassigned. However, this behavior is not supported under any of the following conditions:
- The column formula uses the col() or wcol() functions.
- Your column formula uses a script entered into the Before Formula Scripts box in Set Values.
- Your column formula contains brackets "{}".
- Your column formula contains sheet index references as opposed to sheet name references (e.g. 1!A vs. Sheet1!A).
When a column formula is affected by any of these conditions, the column formula will not be updated.
Additional Information
Two Quick Examples
Set Values for a Single Column
The following short tutorial will show you how to use this dialog to generate data for a simulated gaussian curve.
- Create a new workbook by clicking the New Workbook button
 on the Standard toolbar. on the Standard toolbar.
- Highlight column A and right-click on it to select Set Column Values from the short-cut menu to open the Set Values dialog.
- Enter {-1:0.03:5} in the Column Formula edit box and then click the Apply button. Column A should be filled with a series of numbers.
- Then we will use the one of the navigation buttons to let you input an expression for the second column without closing the dialog. Click the Next button
 . You will see that column B is highlighted in the worksheet. . You will see that column B is highlighted in the worksheet.
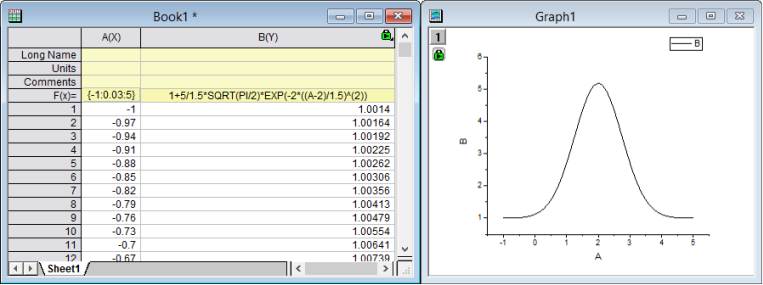
- Now enter 1 + (5/(1.5*sqrt(PI/2)))*exp(-2*((A-2)/1.5)^2) in the Column Formula edit box and choose Auto in the Recalculate drop-down list.
- Click the OK button. The Set Values dialog is closed. You will see the results in the following worksheet.
(If you create a line graph of column B, you will get a graph similar to the one next to the workbook.)
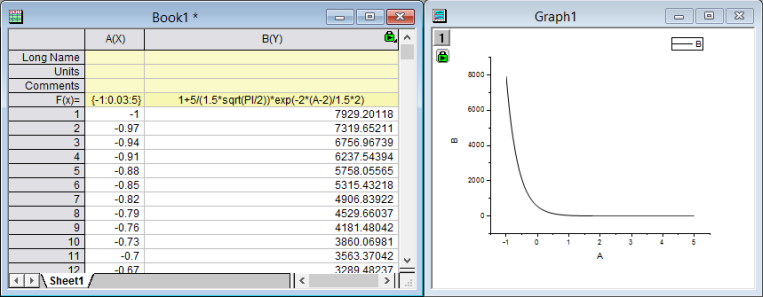
- Double click on the F(X) column label row of column B, and change the formula to 1+5/(1.5*sqrt(PI/2))*exp(-2*(A-2)/1.5*2). You will find the value in the column B is updated automatically.
(Click the Rescale  button, the graph is also updated.) button, the graph is also updated.)
| Origin supports using a sub-range of a column as function argument in the Set Values dialog.
For example: To calculate the sum of a sub-range from i-3 to i+3 in column A (where " i " is the row index), you can enter a formula in the Column Formula edit box.
Total(A[i-3:i+3])
|
Set Values for Multiple Columns
The following short tutorial will show you how to use this dialog to set values for multiple columns simultaneously.
- Create a new project by clicking the New Project button
 on the Standard toolbar. on the Standard toolbar.
- Click the Import Multiple ASCII button
 to import the files F1,dat and F2.dat in the <Origin Folder>\Samples\Import and Export\ path. In the impASC dialog, set Multi-File (except 1st) Import Mode to Start New Books and click OK. to import the files F1,dat and F2.dat in the <Origin Folder>\Samples\Import and Export\ path. In the impASC dialog, set Multi-File (except 1st) Import Mode to Start New Books and click OK.
- Two workbooks will be created, named as F1 and F2. Click the New Workbook button on the Standard toolbar to create another workbook.
- With the 3rd workbook active, click Add New Columns button
 to add a column. Highlight all columns, select Column: Set Multiple Columns Values from the main menu or right-click the columns to select Set Multiple Columns Values in the context menu to open the Set Values dialog. to add a column. Highlight all columns, select Column: Set Multiple Columns Values from the main menu or right-click the columns to select Set Multiple Columns Values in the context menu to open the Set Values dialog.
- Expand the bottom panel by clicking the Show Scripts button
 . Enter below scripts in the Before Formula Scripts edit box, . Enter below scripts in the Before Formula Scripts edit box,
range r1=[F1]F1!wcol(j); //"j" is the column index.
range r2=[F2]F2!wcol(j);
- Enter (r1+r2)/2 in the Column Formula edit box
- Select Options: Direct Edit Formula Cell to uncheck the option.
- Select Options: Formula Text... and enter (F1+F2)/2 in the Formula Text dialog, then click OK button.
- Click the OK button in the Set Values dialog. You will see the results in the worksheet, and (F1+F2)/2 will display in the F(x) column label row instead of the formula.
| When defining variables in Before Formula Scripts, use lower-case letters for variable names (e.g "r1" not "R1"). Use of upper-case letters will generate an error like the following:
Column short name restriction is on. R1 refers to cell and cannot be defined as variable. Failed to create operation for Book1_G due to error in Set Column Value scripts.
|
The Python Function Tab
Python functions can be called from the Column Formula box or from the Before Formula Scripts tab, depending upon your needs. Those functions can be defined in an external file or they can be defined in the Python Function tab of Set Values. The advantage to defining them in the Set Values dialog is that they are saved with the project; or with a template for repeat use.
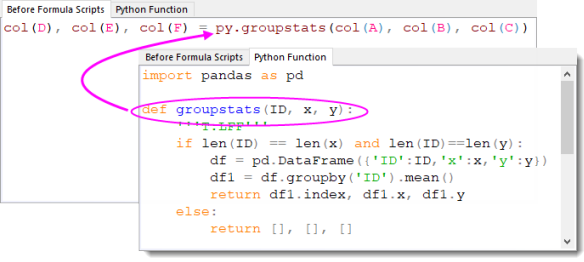
Python functions are defined on the tab in the form of ...
def ff(a)
... and called on the Before Formula Scripts tab or in the Column Formula box as ...
py.ff(a)
For more information on using Python in the Set Values dialog see Using Python in Tools and Dialogs > Set Column Values.
| If the F(x)= cell (1) begins "py." and (2) calls a Python function defined in an external file, you can right-click on the F(x)= cell and choose Open Python File to open the Python function in the Code Builder IDE
|
Example
This simple tutorial will show you how to define a function on the Python Function tab and call it in the Column Formula box:
- Starting with a new workbook, click the Import Single ASCII button
 on the Import toolbar. on the Import toolbar.
- Browse to and open the file <Origin Program Folder>\Samples\Signal Processing\Signal with High Frequency Noise.dat.
- Click the Add New Column button on the Standard toolbar.
- Click on the new column heading to select the column, then right-click and choose Set Column Values.
- If it is not displayed, expand the bottom panel by clicking the Show Scripts button .
- Click the Python Functions tab and copy and paste the following:
import numpy as np
from scipy import signal
def smooth(y,npts, norder):
     """
     F:Fii
     Perform Savitzky-Golay smoothing using scipy signal
     """
     #npts: number of points for smoothing window
     #norder: polynomial order
     y=signal.savgol_filter( np.array(y), npts, norder )
     return y
- Click into the Column Formula box and enter the following:
py.smooth(B,101,3)
- Click OK and the column is filled with smoothed values.
|