4.6.8.4 Create a User-Defined Function for the Set Column Values dialogWks-SetColVal-UserDefFunc
Introduction
This topic describes how to write an Origin C function so that it can be listed in the Function menu of Set Column Values dialog.
For general information on how to add your own OC functions to Origin, please refer to this topic:
Calling OC Functions from LabTalk.
For the OC function to be accessible from the Set Column Values dialog, the following additional conditions should be met:
- The return type of the function cannot be void.
- The function should not have reference or pointer for variable type
Once the function is compiled, it will be available in the Function menu drop-down of the Set Column Values dialog.
Supporting Numeric & String types with data in Columns
String
The following is an example of a string function:
string AddSomethingToStr(string str)
{
  str += " test";
  return str;
}
Once compiled, this function could then be used in the Set Column Values dialog like below:
Col(B) = AddSomethingToStr(Col(A))$;
Numeric
The following is an example of a function that returns an integer:
int CopyNumeric(int nn)
{
	return nn;
}
The function can then be accessed from Set Column Values dialog to copy numeric data from one column to another such as:
Col(B) = CopyNumeric(Col(A));
Controlling Access of OC Functions from LabTalk
Add one of the following #pragma directive to your OC source file to disable, allow, or limit access to your OC functions from LabTalk
- #pragma labtalk(0) // disable running OC functions in LabTalk
- #pragma labtalk(1) // default, allow calling OC functions in LabTalk
- #pragma labtalk(2) // run OC functions by run -oc
Since the default Origin behavior is to allow calling OC functions from LabTalk, #pragma labtalk(1) is not really needed in your OC code. Note that #pragma labtalk(...) affects all functions in that file until another #pragma labtalk(...). Therefore, if you don't want to put some C functions in the Function menu, you can put #pragma labtalk(0) before the function, and you can put #pragma labtalk(1) again to resume putting the functions in the Function menu. By using this method, you can control and manage the function names in the Function menu.
Setting Category for the Function in Function Menu
In order for your OC functions to appear in the Function menu under an appropriate category, you should add a pragma statement such as below:
- #pragma labtalk(1, Date and Time) // set category name to Date and Time
The function(s) will then appear in the Function menu of Set Column Values like below, where the example here represents a function that accepts and returns a string:
Date and Time : FunctionName(str)$
If no category is specified for your OC function, the function will be shown under the User Origin C category.
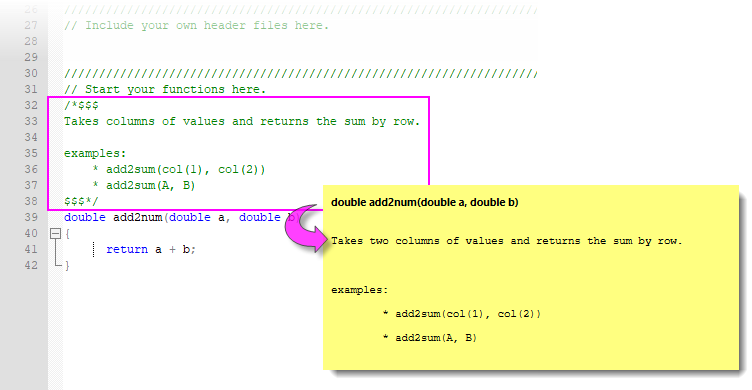
 | Selecting a built-in function from the Function menu displays a "smart-hint" with basic function information (prototype, what is returned, etc.). You can add such hints to your Origin C functions (Tutorial, below) by inserting comments between /*$$$ and $$$*/, as shown:
|
Tutorial
The following procedure is a tutorial to add a user-defined function in the Function menu of the Set Values dialog. You can also find the sample codes in internal.c in the \OriginC\System\ subfolder in your Origin program directory.
Steps:
- [Open CodeBuilder]: Choose View: Code Builder from the main menu to open the Code Builder.
- [Enter the File Name]: Choose File: New from the menu in the Code Builder. The New File dialog opens. Choose C File as the file type in the dialog, and enter test in the File Name field (The extension ".c" will be automatically added.) Note that the default location is <User Files Folder>\OriginC\ . Click OK. The dialog is closed, and you see the "test.c" window appears in the editing box.
- [Enter the Code]: Enter the following Origin C code at the bottom of this editing window:
#pragma labtalk(1,Math)
double add2num(double a, double b)
{
	  return a + b;
}
|
Note: The "pragma" line before the function definition is for placing the function in the Math category in Function menu.
|
- [Make Build]: Choose Build: Build from the Code Builder menu to compile the code. Make sure that no errors occurred. If the code compiled successfully, close Code Builder to return to the Origin main window. If error occurred, correct and compile it again.
- [Open the Set Values dialog]: Go back to the Origin workspace. Create a new workbook. Select Column: Add New Columns from the Origin menu to add a third column to the worksheet in this workbook. Fill the first two columns with any numbers. Highlight the third column by clicking its column header, and choose Column: Set Column Values from the short cut menu to open the Set Values dialog.
- [Enter the New Function from Function Menu]: Click the Function menu in the dialog. Under the Math category, you can see the entry: add2num(d1, d2). Choose the function by clicking it. The text "add2num(a,b)" is inserted into the column formula text box. Edit and modify the inserted text to:
add2num(col(1),col(2))
- [Run the Set Values]: Click OK, and you will see the sum of the first and second columns in each row in the third column as the result.
|
Note: Although this function "add2num" has two (double) scalar arguments, and returns a scalar value, when you run this function in Set Values dialog with two columns (i.e., vectors) as its arguments, the results are filled in the target column because Set Values dialog applies the formula to each element (indexed by i implicitly) automatically.
|
|