5.1 Basic Matrixbook and Matrixsheet OperationsMatBk-Mats-Operation
The matrixbook can contain up to 1024 sheets. If you delete all sheets, the matrixbook is deleted. Sheets may be rearranged or renamed. Sheets can also be "torn out" and added to other matrixbooks or dropped onto an empty portion of the workspace to create a new matrixbook. Each sheet can contain up to 90 million cells. In practical terms, the maximum number will be likely be determined by available system resources.
Opening a new matrixbook
- Click the New Matrix button
 on the Standard toolbar, or select File: New: Matrix: Black Matrixbook menu to add a empty new Matrixbook. on the Standard toolbar, or select File: New: Matrix: Black Matrixbook menu to add a empty new Matrixbook.
- From the menu, click File: New: Matrix: Browse.... This opens the New Book dialog where you can browse available matrixbook templates. Note the Open Template Center button
 in the upper-right corner of the New Book dialog. Click the button to browse and download new book templates to use in your analysis work. in the upper-right corner of the New Book dialog. Click the button to browse and download new book templates to use in your analysis work.
- To create a new matrix window from an existing matrixsheet, point to the matrixsheet tab, hold down the left mouse button and drag the matrixsheet to an empty portion of the Origin workspace.
Adding a sheet to the matrixbook
- Right-click on a sheet tab and choose Insert, Add, or Duplicate Without Data.
- To add an existing sheet to another matrixbook, point to the matrixsheet tab, hold down the left mouse button and drag the sheet to the new matrixbook.
Adding Name and Comments to a sheet
Right-click on any sheet tab, then click Name and Notes... to open the Name and Notes dialog.
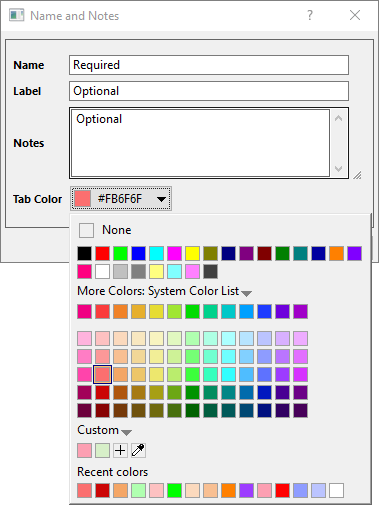
- Each sheet has a Name which is displayed on the sheet tab.
- Optionally, the sheet can have a Label and Notes.
- Tab Color can be set using the drop-down list; or when nothing is selected in the sheet, by clicking on the Fill Color button
 on the Style toolbar. on the Style toolbar.
- For naming information, see Naming Matrixbooks, Matrixsheets and Matrix Objects.
Move Matrixsheet(s) to another Matrixbook
- Drag the matrixsheet tab and drop it to workspace to move it to a new matrixbook, or drop it to another matrixbook to move it there.
- To move multiple matrixsheets, hold down Ctrl/Shift key and click multiple sheet tabs to drag and drop them to workspace or another matrixbook.
- Right click on any one of matrixsheets and choose Navigate...
- In the Navigate Matrixsheets Dialog Box that opens, select the desired sheet(s) (hold down Ctrl/Shift key to select multiple sheets) and right click, choose Move to....
Copying and Pasting a Matrixsheet between Matrixbooks or Origin Sessions
Since Origin 2018b, you are allowed to copy current sheet into the clipboard, and then paste it as a new sheet from the clipboard into a matrix window, by right-clicking on the sheet tab and selecting Copy Sheet and Paste as New Sheet context menu item.
Once you selected the Copy Sheet item, you can
- right-click on Origin's gray work space to select Paste as New Sheet to paste this sheet as a new matrixbook.
- right-click on another sheet(might in another matrixbook window) to select Paste as New Sheet to paste this sheet as a new sheet into current matrixbook window.
- switch to another Origin session and select a sheet tab in the target matrixbook window, right-click it to select Paste as New Sheet to paste this sheet into the selected matrixbook of the Origin session. In this case, you are able to copy and paste a matrixsheet between different Origin sessions.
Adding a matrix object to the matrixsheet
- Use hot keys Ctrl + Shift + N to show thumbnails, then right click on one thumbnail and select Add from the context menu; or click on the object button
 and choose Add from the popup menu. and choose Add from the popup menu.
To insert a new matrix object ahead of the current matrix object:
- Use hot keys Ctrl + Shift + N to show thumbnails, and then right click on one thumbnail and select Insert from the context menu; or click on the object button and choose Insert from the popup menu.
Modifying the appearance of matrices via the Properties dialog box
Some modification of the appearance of a matrix can be done using the Matrix Properties dialog, which can be opened by selecting Matrix: Set Properties from the Origin menu.
In this dialog, you can enter the width for the columns in the dialog and set the display format, digits and data type for the matrix data. Note that these settings are applied only to the active matrix object. To customize another matrix object in the same sheet, you can use the Previous button or the Next button to go to the object and then change the settings for it.
Modifying the appearance of matrices using the Format and Style toolbar buttons
Some matrix customizations can be made using Format and Style toolbar buttons. First, select that portion of the worksheet that you want to modify.
- To modify the font, point size, etc, use the buttons on the Format toolbar.
- To modify the font color, use the Font Color drop-down on the Style toolbar.
- To modify the cell or column color, use the Fill Color button on the Style toolbar.
- To add borders to (or remove borders from) the matrix cells, use the Borders button on the Style toolbar.
Saving matrixbooks
You can save a matrixbook with data and other customizations, to an .ogwu or .ogw file.
- With the matrix active, select File: Save Window As. This action opens the Save As dialog box. Matrix (*.ogmu) is selected (by default) from the Save as type drop-down list.
- Type the file name in the File name text box and select the desired destination folder.
Saving matrixbook templates
Matrixbook customizations can be also be saved as a template (as opposed to a matrixbook). However, when saved as a template, no data are saved.
- With your customized matrixbook active, choose File: Save Template As.
- Assign a Template Name and File Type. Optionally, enter a Template Description, set a File Path (note that the default path of \User Files\ is generally the most desirable) and a Preview Image (useful mostly if you make use of Windows File Explorer Previews -- otherwise Origin will generate a preview for internal use, for instance for the popup-on-hover image that shows in New Book).
To find out how more matrix templates, see What is Saved with a Matrix Template?
Navigating matrixsheet by mouse wheel
When mouse over matrixsheet tab, you can use mouse wheel to scroll the sheet tabs . It is easier to navigate matrixsheet when there are many sheets.
|