27.7.2.2 Adding New Color Palettes to OriginCustomizeOrigin-NewColorPal
Introduction
Origin has several built-in tools for creating and editing palettes.
- The newest tool is part of Origin's new Color Manager dialog. While you must manually pick or type codes for individual colors (no copy and paste as with the Color Editor App), there is an interpolation function for building color lists or palettes. In addition, it integrates well with the Color Manager dialog used to manage available color lists/palettes in the user-interface.
- The Color Editor App allows you to load, edit and save palettes (.pal) and Origin color lists (.oth) files; plus extract image colors.
- The Palette Editor described below offers some of the same functionality as the two previously-mentioned tools. It does offer more granular control when modifying a palette and it includes a graphic editor.
 | Palette Editor is an old tool. For Origin 2023 and later, please try Color Manager instead.
|
Note, too, that this topic is about modifying palettes in Origin. You can also add palettes to Origin by drag-and-drop of many standard palette files. For information, see Import Color Lists or Palettes.
Palette Editor
Palette Editor is Origin's original tool for creating and editing of Microsoft palette files (.PAL). The built-in system palettes are saved to the "<Origin Program Folder>\Palettes\" folder, and the user-customizable palettes are saved to the "<User Files Folder>\Palettes\" folder. You can create new palettes using any external application that writes the palette out in the Microsoft .PAL format. Just copy the saved palette to "<User Files Folder>\Palettes\" folder to use it in Origin.
Run
palEdit -d
in the Command Window.
Dialog box
Switch to Channel group
| Red / Green / Blue
|
Switch to the specified color channel. When this is selected, you can edit division settings in red channel.
|
Segment group
| Red / Green / Blue
|
This is only available when the color's radio button is selected in the Switch to Channel group. It specifies the number of divisions in the specified color channel.
|
Width: Red / Green / Blue group
This control group specifies the width of each division.
| Use Same Width for All Segments
|
If this check box is checked, then all the segments will use the same width, and the Width=32.
|
| #1 from
|
This is used to specify the beginning value of the first division. It always 0 and cannot be modified.
|
| #N to
|
Here, N=1...8. Specify the ending value of the Nth division. The last division is always 255.
|
Gradient Type: Red/Green/Blue group
This control group specifies the line connection type of each color channel's division, and only available when the specified color's radio button is selected in the Switch to Channel group. It use to specify the line type of each division in that channel.
| Use Same Type for All Segments:
|
If this check box is checked, then all the segments will use the same gradient type, and you cannot manually select the line type for each division.
|
| Gradient Type
|
This is only available when Use Same Type for All Segments check box is checked. It specifies the gradient type for all divisions.
- Keep Current: Keep the current gradient setting of palette.
- Constant: Specify whether or not to use a constant as gradient for each division.
- Straight Line: Specify whether or not to use a straight line as gradient between each division.
- Sigmoid: Specify whether or not to use a sigmoid line as gradient between each division.
|
| #N
|
Here, N=1...8. Specify the gradient type of the first division.
See more details about its drop down list in the Gradient Type section above.
|
Buttons
At the bottom of the dialog box are six buttons.
| Save
|
Save the current palette to disk using its current file name. If the palette is new and does not yet have a file name then this button will be unavailable.
|
| Save As...
|
Save the current palette using a new file name.
|
| Open...
|
Open an existing palette file. Only .PAL format files can be recognized.
|
| New
|
Create a new palette.
|
| Close
|
Close the dialog.
|
| >> , <<
|
Open or close the preview panel where you can view or directly manipulate the color curves.
|
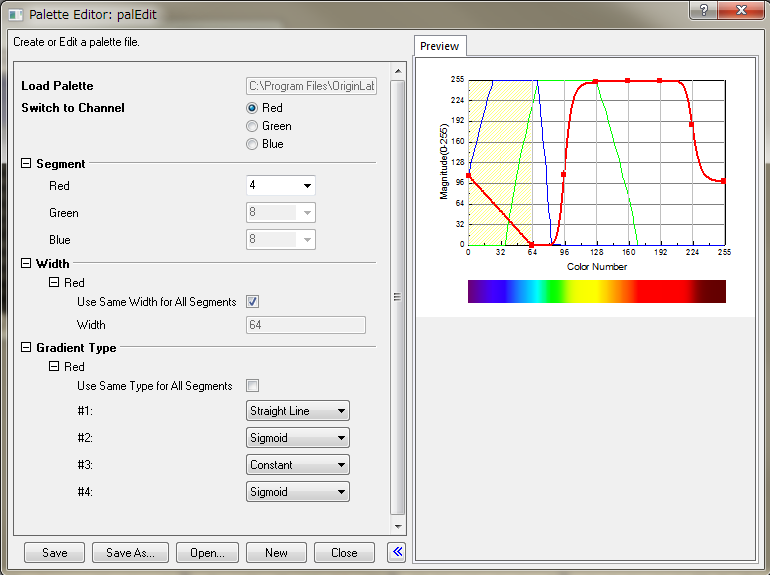
The preview is a XY Graph in the right panel of the PalEdit dialog, The X-axis indicates the color segments from 0 to 255 where 0 is start and 255 is end. The Y-axis indicates the color brightness changes in the palette from 0 to 255 where 0 represents very dim and 255 very bright. And there are three curves (Red, Green and Blue) in the graph which represent red, green, or blue color changes respectively. For example, if three curves have the same equation: y=x, it means that the colors change from black to white gradually. And if the Red line equation is y=255, Blue and Green lines both have equation y=0, it means that only red color appears in the palette and red changes from dark to bright gradually.
There are nodal points at the edge of very segment. When the Gradient Type is not set to Keep Current, you can drag and drop these points to change the color conveniently.
Simple Tutorial
The following tutorial demonstrates how to modify the existing palette, and save as a new palette using the Palette Editor. Here, you expand the black area in the "Fire" palette at the lower range of the RED channel:
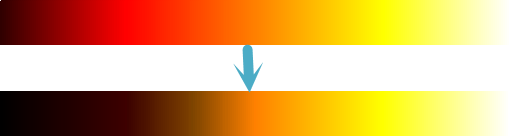
- Press "Open" button at the bottom of the tool, go to "<Origin Program Folder>\Palettes\" folder , select "Fire.PAL". Notice that there are the magnitude lines of Red, Green, and Blue channels in Preview; Also, below the preview graph, the composed color bar of the palette is displayed.
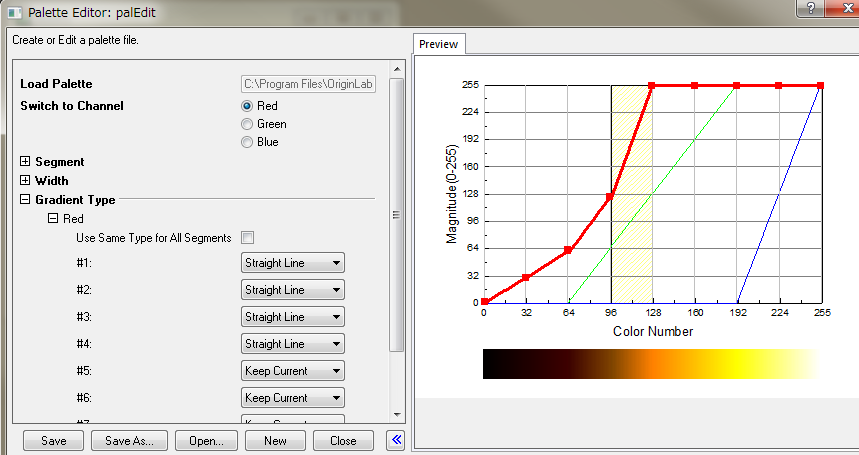
- Select "Red" (if not selected) at the "Switch to Channel" option branch to manipulate channel. Notice that the line of the red magnitude curve becomes thick with anchor points. Suppose you want to lower the red Magnitude values at lower Color Number area, say from 0 to 96.
- Grab the yellow frame in the preview plot, and drag to left to put it [0, 32] area (which is #1) to set the operated area.
- In the left panel, set the "Gradient Type> Red> #1" option to the "Straight Line".
- In the Preview panel, grab the left anchor point (at around 50), and drag it down to 0 position. (A small black dot indicates the destination position.)
- Similarly, grab the right anchor, and drag it to 32 position.
- Move the yellow frame to next right (#2), which spans [32, 64]. Set #2 region's "Gradient Type" to "Straight Line" type, and move UP the left anchor point to place it to 32. (The black dot starts appearing from bottom. Don't miss!) Move the right anchor to 64.
- Similarly, move the yellow frame to #3, set to Straight Line, lower the left anchor to 64 (by dragging UP). Move the right anchor to 128.
- Similarly, move the yellow frame to #4, set to Straight Line, lower the left anchor to 128 (by dragging UP). Now, you get the final red curve increasing from 0 to 255 along the Color Numbers from 0 to 128.
- Press "Save As" button at the bottom of the tool, navigate to "<User Files Folder>\Palette\" folder, and save it as "Fire_New.PAL". Close the Palette Editor tool.
- To test, make a color-mapped contour or 3D surface plot, and apply this new palette.
|