4.2.1 Basic Operations on WorksheetBasic-operations-on-WKS
A workbook window generally has at least one sheet and can have up to 1024 sheets.
- Click the sheet tab to activate the worksheet.
- Double-click on the sheet tab to Name the sheet.
- Color the sheet tab by clicking the Fill Color button
 on the Style toolbar and choose or define a color. on the Style toolbar and choose or define a color.
- Hold down Ctrl/Shift key and select multiple worksheets to drag and drop them to another workbook.
- Right-click on a sheet tab, to show a menu of basic operations for the current worksheet/workbook.

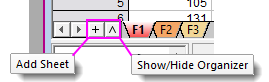
Add Sheet, Show/Hide Organizer
In addition to the back and forward navigation buttons, the workbook has an Add Sheet button and a Show/Hide Organizer button.
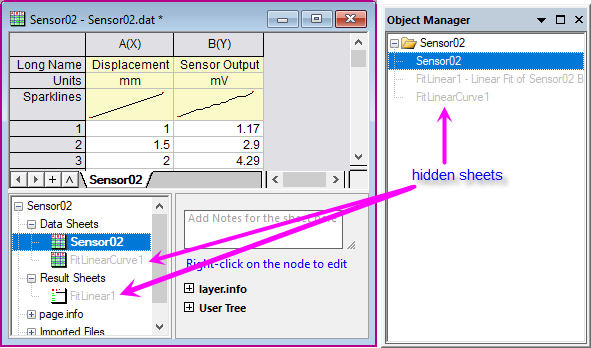
Show/Hide Worksheet
Once hidden, the worksheet is gray out in the Workbook Organizer and Objuect Manager. It is not shown for exporting neither.
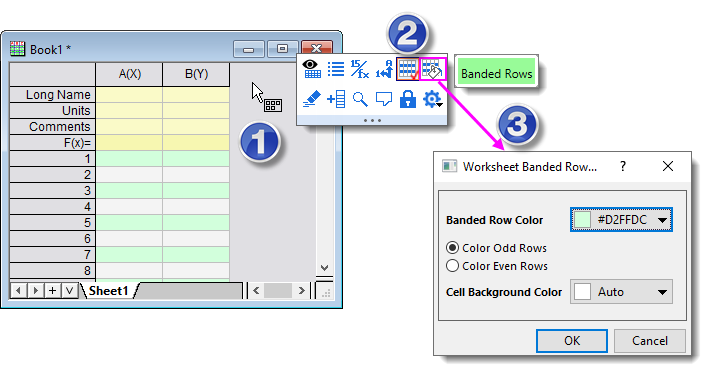
Banded Rows
- Move cursor to the edge of worksheet to bring up the worksheet level mini toolbr, and then check the Banded Rows button
 to (a) shade alternate rows and (b) add a Banded Rows Color button to the Mini Toolbar. to (a) shade alternate rows and (b) add a Banded Rows Color button to the Mini Toolbar.
- Once Banded Rows is checked
 , a Banded Rows Color button , a Banded Rows Color button  next to it is available. Click this button to manage banding (e.g. change the filled colors of the alternate rows, switch the banded rows from odd to even). next to it is available. Click this button to manage banding (e.g. change the filled colors of the alternate rows, switch the banded rows from odd to even).
Note:
- You may have several filled color formats applied to a cell, the priority is
- Conditional matched cell color > Fill color by the Fill Color button on the Style toolbar > Banded Rows
- Banded row also supports in intermediate table inserted into a graph page.
|
Insert, Delete and Add a Sheet
Right-click on the sheet tab to select Insert or Delete or Add item to insert a new sheet in front of current sheet or delete current sheet or add a new sheet as the last sheet.
Right-click on the sheet tab to select Add Graph as Sheet or Add Matrix as Sheet item to open the Hunt dialog(as below), click the window you want to add as a sheet to add the graph or matrix window as a new sheet into current workbook window.

Right-click on the sheet tab to select Add Notes as Sheet item to add a Notes window as a new sheet into the current workbook.
Copy and Paste a Sheet
From Origin 2018b, you are allowed to copy current sheet with all information(including the header lines and structure) into the clipboard, and then paste it as a new sheet from the clipboard into a workbook window, by right-clicking on the sheet tab and selecting Copy Sheet and Paste as New Sheet context menu item.
Once you selected the Copy Sheet item, you can
- right-click on Origin's gray work space to select Paste as New Sheet to paste this sheet as a new workbook.
- right-click on another sheet(might in another workbook window) to select Paste as New Sheet to paste this sheet as a new sheet into current workbook window.
- switch to another Origin session and select a sheet tab in the target workbook window, right-click it to select Paste as New Sheet to paste this sheet into the selected workbook of current Origin session. In this case, you are able to copy and paste a sheet between different Origin sessions.
Duplicate a Sheet
Right-click on the sheet tab, you can select Duplicate Without Data or Duplicate to duplicate the current worksheet with data or without data.
When you select Duplicate Without Data context menu item, a worksheet with same structure and header lines but without data will be created and added to the current workbook as the last worksheet.
Please note, since Origin 2020, when you select Duplicate Without Data to duplicate the sheet, only the raw data will be deleted but the cell links(such as cell references, cell formula etc.) will be kept to further uses. You can use the system variable @DkL to roll back to the older behavior which will delete the cell links too.
When you select Duplicate context menu item, a new worksheet looks exactly alike will be created and added into current window as the last sheet.
Clear Worksheet Data
To remove data from current worksheet:
- Select menu Worksheet: Clear Worksheet.
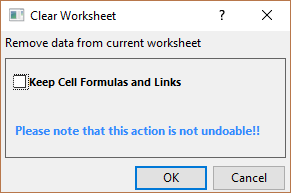
- Analysis operation (with green lock) will be preserved.
- Check Keep Cell Formulas and Links to retain cell formula and cell links.
- Kepp in mind: once cleared, this action cannot be undone!!!
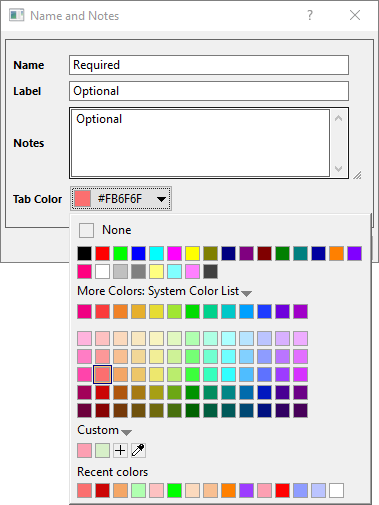
Name and Notes
 | In addition, to the plain-text notes you can add to the worksheet (described here), there are several other places in the Origin Project where you can add notes. Three of them -- Folder Notes, Cell Notes, and standalone Notes windows -- support mixed objects (e.g. text and images) and complex formatting, such as Origin Rich Text.
|
Right-click on any sheet tab, and then click Name and Notes... context menu to open the Name and Notes dialog to manage the name and comments in the current worksheet.
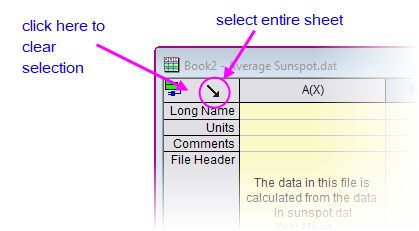
| If you need to unselect the current worksheet selection, click on the cell in the upper-left of the worksheet; or click in the gray area to the right of the worksheet columns. Note that "black arrow" cursor is used to select the entire worksheet.
|
Tag Sheet as Exclude from Plotting Dialogs
Right-click on the sheet tab and select Exclude from Plotting Dialogs context menu to exclude current sheet(s) as from the plotting dialogs, such as Plot Setup, Layer Contents etc..
You can also run the LabTalk command wks.epd = 1; to execute this operation on current active sheet.
Additionally, you are allowed to perform this operation on multiple sheets in one time by
- Press Ctrl key to select multiple sheets, and then right-click to select Exclude from Plotting Dialogs context menu.
Once the sheets have been tagged as exclude, their names will be indicated with a specified color which is controlled by the system variable @TCE.
Tag Sheet as Exclude from Excel Export
Right-click on the sheet tab and select Exclude from Excel Export context menu to exclude current sheet from exporting the whole workbook as an Excel file.
Navigate Worksheets
Right-clicking on the sheet tab to select Navigate... context menu will open the Navigate Worksheets dialog box which can be used to manage the worksheets in current workbook. To learn the details about this dialog, please refer to this page.
| Besides, the Navigate Worksheets dialog, Origin supports to use mouse wheel to scroll the worksheet tabs, when mouse over worksheet tab. It is easier to navigate worksheet when there are many sheets.
|
Zoom and Pan Worksheet
To zoom the Worksheet, press Ctrl key and then scroll the mouse to zoom in and out the current worksheet in the workbook. You can also use the Zoom toolbar to set the percentage to zoom in and out the worksheet columns and rows. to set the percentage to zoom in and out the worksheet columns and rows.
To pan the Worksheet, click the Zoom-Panning Tool button  to enable panning, then press the left button of mouse to drag the horizontal scrollbar or/and vertical scrollbar to view all columns and rows in current worksheet. to enable panning, then press the left button of mouse to drag the horizontal scrollbar or/and vertical scrollbar to view all columns and rows in current worksheet.
Sometimes, if you have embedded a floating graph in current worksheet, and this graph has been moved beyond the worksheet workspace and can not show in full, you can select View: Arrange Graphs menu to get the graph back to the view.
|