15.3.4.1 User-Defined Fitting FunctionsUserDef-FitFunc
In Origin, besides the built-in fitting functions, you also can define your own fitting functions with the tools:
- Simple Fit app
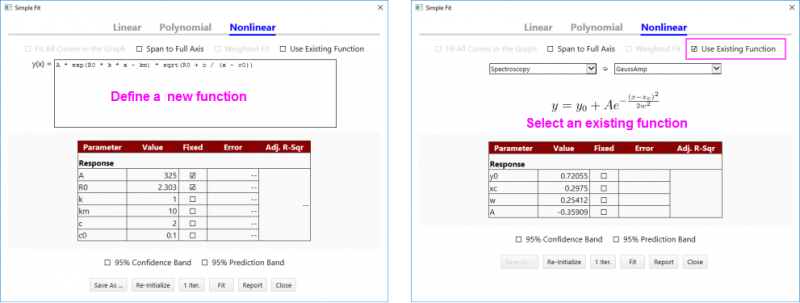
- Simple Fit app is an app pre-installed in Origin, can be called easily from the App Gallery with a graph window activated. This app provides a very convenient way to fit simple functions with the expression y = f(x), you only need to type your formula(or select an existing function), specify the initial values and then generate fitting reports immediately.
- Fitting Function Organizer
- Fitting Function Builder
This page will generally introduce how to use the Fitting Function Builder, a friendly and easily used wizard, to create user-defined fitting functions. The wizard contains 8 different pages: Goal page, Name and Type page, Variables and Parameters page, Function Body page, Parameter Initialization Code page, Bounds and General Linear Constrains page, Derived Parameters page and Script Before or After Fitting page. For the first 4 pages, you must perform some settings in them or you can not go to the next page. After you have performed the settings in the 4th page, the Function Body page, you could directly finish the process of creating function. Or you could continue to set the functions with the last 4 pages.
The Fitting Function Builder is a wizard with very useful hints and examples in the left panel of each page, so it is very easy to learn and use. If you know what you can do in each page of the wizard, then you will clearly know how to create a fitting function with it. In the left page, we will give general steps to create user-defined fitting function and show you what we can do in each page. You can also get a step-by-step tutorial from here. And please note that for each new created function, Origin will create an associated .FDF in the \FitFunc folder of your Origin User Files Folder. Once the function has been created, it can be used in the dialog of the Nonlinear Fitter.
General Steps to Create a New Fitting Function
The following is the general steps to create a fitting function. You can get a step-by-step tutorial from here.
- Open the Fitting Function Builder and select Create a New Function in the first page - the Goal page. And click the Next button to go to the Name and Type page.
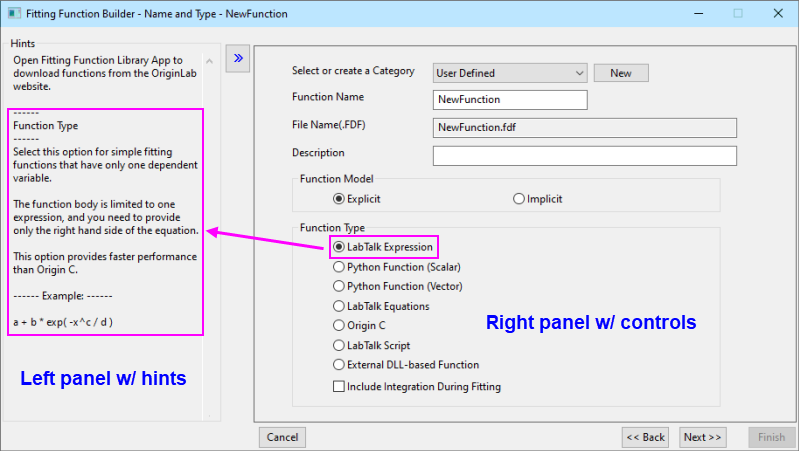
- In the Name and Type page, select/ create a category for the new function and enter the name of your function in the Function Name edit box. Optionally, you can add comments to the Description edit box. You also need to choose an appropriate Function Type according to your real situation. Click the Next button to go to the Variables and Parameters page.
 | If you intend to create an External DLL-based Function, please see Using External DLLs and review the documentation included in FittingWithExternalDLL.opx.
|
- In the Variables and Parameters page, you have to specify the names for the Independent Variables, the Dependent Variables, and the Parameters. And you can optionally choose to define Derived Parameters and the Constants in this page. If you want to use your function for fitting peaks in the Peak Analyzer or for replica fitting in the NLFit tool, you should enable the Peak Function check box. Click the Next button to go to the Function Body page.
- In the Function Body page, you could manually set initial values for the parameters and constants in the Parameter tab and Constant tab. If you have enabled the Peak Function in the previous page, you need to choose the Peak Attributes in the Parameter tab. And you need to input function body in the Function Body edit box. If you have select Origin C as Function Type in the Name and Type page, it may be more convenient to use the Code Builder workspace to define your function. After you have performed settings in this page, you could directly click the Finish button to finish the process of creating function. If not, you could click the Next button to perform other setting in the left pages of the wizard.
- The last four pages, Parameter Initialization Code page, Bounds and General Linear Constrains page, Derived Parameters page and Script Before or After Fitting page are optional pages, so you could choose to perform settings in each of them or directly click Next/ Finish button to ignore them.
- After you have performed settings in the pages, you could click Finish button save the function.
Opening the Fitting Function Builder
The Fitting Function Builder can be opened by:
- Choosing Tools: Fitting Function Builder or pressing F8.
- Clicking the Builder button in the Fitting Function Organizer dialog box.
- Clicking the Create New Fitting button
 in the Nonlinear Curve Fit dialog box. in the Nonlinear Curve Fit dialog box.
What You Can Do in the Goal Page
The Goal page is the first page of the wizard, which allows you to choose a goal from the Goal page: Create a New Function or Edit a User-Defined Function. You should choose Create a New Function in this page if you want to create a user-defined function. For more details about the settings in this page, please refer to the Goal page
What You Can Do in the Name and Type Page
The Name and Type page is the second page,which allows you to select/ create a function category, give a name for the function and choose a function type. For more details about the settings in this page, please refer to The Name and Type Page. You need to pay attention to the following two settings.
Create a Function Category
To create a category, you need to
- Click the New button that next to the Select or Create a Category edit box.
- Enter a category name in the Category Name edit box.
- Click the OK button to save it.
| Note: Since Origin 2018, this category information will also be saved into the FDF file. You can share the FDF file to your friends, and then, when they drag-and-drop this FDF file to install this function to their own Origin program, this function will be copied to the same category as yours.
For earlier versions, as the function category information have not been saved with the FDF file, when you install the function by the drag-and-drop operation, a dialog Select Category to Add Function will pop up to let you specify the category to add this new function.
|
Choose a Function Type
You need to choose an appropriate function type from the Function Type group. The following table lists the differences between them.
| Function Form
|
Example
|
Comments
|
| LabTalk Expression
|
- a + b * exp( -x^c / d )
|
Select this option for simple fitting functions that have only one dependent variable. The function body is limited to one expression, and you need to provide only the right hand side of the equation. This option provides faster performance than Origin C.
|
| Python Function (Scalar)
|
- y = py.pyline(x, a, b);
|
Select this option only when fitting smaller datasets as it is slower than Python Function (Vector). Note that you must prefix "py." to the function name when creating the function body.
|
| Python Function (Vector)
|
- y=pyGaussVectorEq(x,y0,xc,A,w);
|
Select this option to to fit larger datasets. Functions receive an array (in the form of a list) of independent values for each independent variable during a call and return an array (in the form of a list) for each dependent variable. This option uses no LabTalk processing and thus, should be relatively fast.
|
| LabTalk Equations
|
- temp = 10;
- y1 = A + exp( (x1 - xc) / temp^2 );
- y2 = A + temp / (x2 - xc)^2;
|
Select this option if you need multiple lines or you have more than one dependent variable. This option does not support control structures such as loops or if-else statements. You can however use the ternary operator. This option provides faster performance than Origin C.
|
| Origin C
|
- if ( x < -PI )
- y = y0 + exp( -x-a*PI );
- else if ( x > PI )
- y = y0 + exp( x-a*PI );
- else
- y = cos(x);
|
This option is slower than Equations. Select this option if your fitting function requires loops or control structures that cannot be replaced by the ternary operator. Note that you need to follow strict C syntax: parameters are case sensitive, and division by an integer is different than division by a double.
|
| LabTalk Script
|
- range rr = %C;
- int b = %(rr[P1]$);
- y = b + a*x;
|
This option is much slower than Equations or Origin C. Select this option if you need control structures or you are not familiar with C language.
|
| External DLL-based Function
|
|
Select this option to define a fitting function using an external DLL. Using an external DLL can improve fitting time significantly. For more details about this type, please refer to Using External DLLs.
|
Note: When creating Origin C fitting functions, a good practice is including the following statement before your code:
#pragma numlittype(push, TRUE)
Then Origin will treat integer numbers - 3 as float number - 3.0. This is very useful when you are converting other fnction forms into Origin C. In LabTalk, 3/2 = 1.5, while in Standard C, it is 1. The #pragma statement helps avoid inconsistent results when function forms is changed.
|
What You Can Do in the Variables and Parameters Page
The Variables and Parameters page is the third page,which allows you to define independent variables, dependent variables, parameters (including the derived parameters) and constants. For more details about the settings in this page, please refer to the Variables and Parameters page.
| Note: if you want to use your function for fitting peaks in the Peak Analyzer or for replica fitting in the Nonlinear Fitter. You need enable the Peak Function check box in this page.
Parameters for peak function have special Peak Attributes that need to be set on the next page. The first parameter in the parameter list must be named as "y0" and should be assigned the peak attribute "offset". Besides "y0", you need to define at least three more parameters, and set peak attribute as "center", "width" and "amplitude/area". The following is an example of peak fitting function:
- y = y0 + (2*A/PI)(w/(4*(x-xc)^2 + w^2))
|
What You Can Do in the Function Body Page
The Function Body page is the fourth page,which allows you to input the function body, perform some basic setting for the parameters, such as inputting initial values, fix parameters etc. Please note if you want to define a peak fitting function, you should choose special Peak Attributes for the parameters in this page. And you can also evaluate the fitting function in this page. For more details about the settings in this page, please refer to The Function Body Page.
Input Function Body
There are 5 function types we have introduced in the Name and Type page, each of which has its own formats of the function body. To make sure the fitting function could be written correctly, you need to follow the instructions in the Name and Type page or you could get hints from the left panel of the Function Body page.
Note: Users can use nlf_FuncName to quote a built-in fitting function when creating a new one. For example, define a function like:
- y1 = nlf_Expdec1(x, y01, A11, t1);
Where nlf_Expdec1 denotes the built-in function ExpDec1.
|
Editing the Function in Code Builder
You could edit your codes in the Code Builder if Origin C has been selected in the Name and Type page. You can click the button  that on the upper-right corner of the Function Body edit box, a special instance of the Code Builder workspace will open and this window will be named _nlffunctionName.fit (In the following screenshot, the window named as _nlfAsymmetricGaussian.fit). Then you can edit the function body in this window. that on the upper-right corner of the Function Body edit box, a special instance of the Code Builder workspace will open and this window will be named _nlffunctionName.fit (In the following screenshot, the window named as _nlfAsymmetricGaussian.fit). Then you can edit the function body in this window.
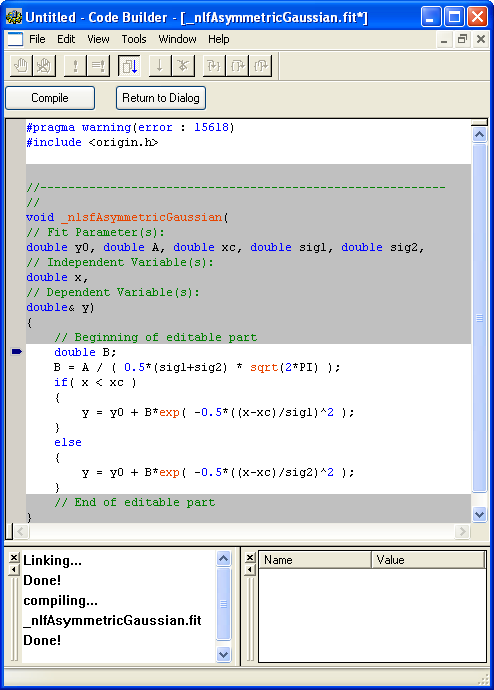
The first few lines of code are #include statements that identify various header files required for compiling the fitting function. In our example, the actual function definition begins with the statement:
void _nlsfAsymmetricGaussian
The parameters, independent variables and dependent variables are declared at the beginning of this function definition. After these declarations, there is an editable section -- the area bounded in white -- that is reserved for entering your function definition.
The above figure shows the definition entry for the asymmetric Gaussian function. Note that the function definition must comply with C programming language syntax. For instance, the parameters and all variable types are case sensitive. Intermediate variables -- such as B in this example -- must be declared first using a statement such as:
double B;
This declaration must occur before the variable is used in the function definition.
Note that the function is of type void, indicating that no values are returned by the function. Instead, the dependent variable value is set inside the function code. In our example, the dependent variable y is assigned a different value, dependent upon whether x is less than or greater than the centroid parameter, xc.
Once the function is defined, you should verify that your syntax is correct. To test, click the Compile button at the top of the Code Builder workspace. Any errors generated in the compiling process are reported in the Code Builder output window at the bottom of the workspace. This window also reports when a file has successfully compiled.
Once the function has been defined and compiled, you can return to the Function Organizer dialog by clicking the Return to NLSF button at the top of the window. This closes the specialized Code Builder window.
Evaluate the Function
At the bottom of the Function Body page, you can find a group of controls called Quick Check which can help to check the validity of the function. You should first enter desired values for parameters in the Initial Value column in the Parameter tab in this page, and then enter value(s) for the independent variable(s) edit box(es) in the Quick Check group. Then press the button  to view output value of dependent variable(s). If there are errors in your function body or if you specified inappropriate input values for parameters or variables, a missing value along with an appropriate error message will be displayed in the output box. to view output value of dependent variable(s). If there are errors in your function body or if you specified inappropriate input values for parameters or variables, a missing value along with an appropriate error message will be displayed in the output box.
What You Can Do in the Parameter Initialization Code Page
The Parameter Initialization Code page is the fifth page,which allows you to input codes to be run to compute initial values for fitting function parameters. Please note this page is optional, so you can directly click the Next button to go to the next page to perform settings. For more details about the settings in this page, please refer to the Parameter Initialization Code page.
The iterative method used in nonlinear fitting requires that initial values be supplied for all parameters. Good initial values result in fast and reliable model/data convergence. There are two ways in which you can control parameter initialization when defining a new function:
- Assign fixed initial values in the Parameter tab in the Function Body page.
- Enter initialization code which estimates initial values in the Initialization Code in the Parameter Initialization Code page.
Please read the Parameter Initialization section for guidance on initializing parameter values. Note that defining initial values or code is not required to define the fitting function. However, if parameter initialization is not handled by the fitting function file, they will need to be initialized manually when fitting with the function in the NLFit dialog box.
What You Can Do in the Bounds and General Linear Constrains Page
The Bounds and General Linear Constrains page is the sixth page,which allows you to input bounds and linear constrains for fitting function parameters. Please note this page is optional, so you can directly click the Next button to go to the next page to perform settings. For more details about the settings in this page, please refer to the Bounds and General Linear Constrains page.
What You Can Do in the Derived Parameters Page
The Derived Parameters page is the seventh page,which allows you to define derived parameters. Please note this page is optional, so you can directly click the Next button to go to the next page to perform settings. For more details about the settings in this page, please refer to the Derived Parameters page.
What You Can Do in the Script Before or After Fitting Page
The Derived Parameters page is the eighth page,also the last page, which allows you to enter LabTalk script to be executed before and/or after the fitting process. Please note this page is optional, so you can directly click the Finish button to end the process to create a fitting function. For more details about the settings in this page, please refer to the Script Before Or After Fitting page.
|