4.4.17.1 Worksheet QueryWks-Query
The Worksheet Query menu command directs Origin to locate data in the active worksheet based on a user-specified conditional expression. The located data values are either (a) extracted (i.e. values are copied and pasted) to another worksheet, or (b) the cells meeting the condition are selected or are filled with a specified color.
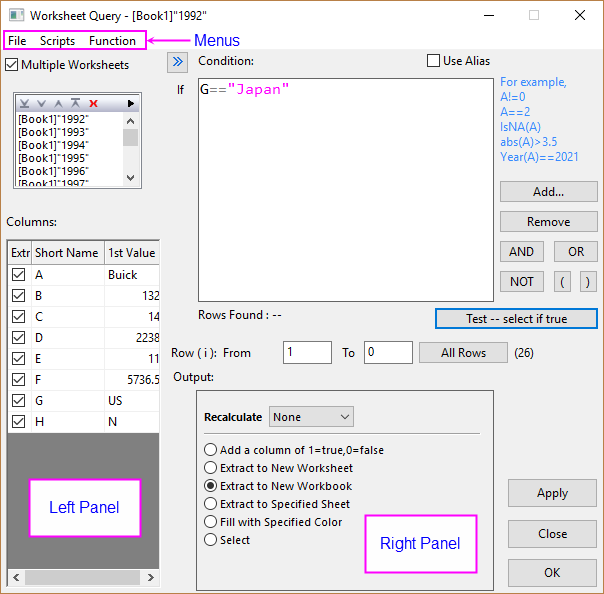
There are two main panels (we will refer to as the "left panel" and "right panel"), plus a menu bar with File (saving and loading queries), Scripts (for pre-processing of data) and Function (for inserting functions into your expression).
Simple Tutorial
- Use the Import Wizard to import the file \Samples\Data Manipulation\US Metropolitan Area Population.dat. The destination worksheet contains four columns: Population, Sq.Mi., Density, and Metropolitan Area.
- Select from the Origin menu to open Worksheet Query dialog box.
- Clear the check box before Sq.Mi. in the left panel so that this column will not be included in the extracted result.
- Enter the following condition formula in the Condition box. Note: You can click the AND button instead of typing out A-N-D):
- C>100 AND D[i]$ == "* CA*"
- This condition looks in column Short Name = "C" for densities above 100, for areas in California ("CA") in column Short Name "D". Note that this tool supports wildcard symbols such as * inside strings.
- Click the Test -- select if true button. Notice that the number of found rows under the Condition box has been updated, and some rows in the worksheet are highlighted.
- Select the Extract to New Worksheet radio button for Output, and then click the OK button. Note that the extracted results are copied in a new worksheet in the source workbook and that the "Sq. Mi." column that we excluded in step 3. was not included in the output.
Opening and Running the Worksheet Query dialog box
To open the Worksheet Query tool:
- Activate the worksheet.
- From the menu, choose .
After entering the condition in the Condition box, click the OK or Apply button to perform the query.
Left Panel
On the left panel, you can specify the worksheet(s) and columns on which the worksheet query is applied.
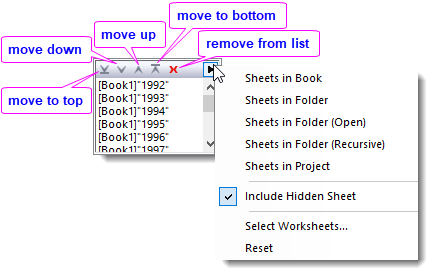
Multiple Worksheets
When you have multiple worksheets of similar structure (arranged in one workbook/folder/project), you can check this checkbox to query all these sheets by the same condition(s), extract the values that satisfy and put them together (in one workbook/sheet).
- Check Multiple Worksheets to show the worksheet box. Select the sheets you want to apply query to.
- If Multiple Worksheets is checked, Match by Long Name checkbox (next to Columns) is available. Check it to scout and match columns by Long Name.

- Uncheck Multiple Worksheets to apply query on current worksheet only.
Columns
For single workhsheet, this box lists all the columns in the active worksheet, with some basic information about them. If Multiple Worksheets is checked, it lists columns in the first sheet.
Check or clear the boxes in Extract column to determine which columns will be extracted.
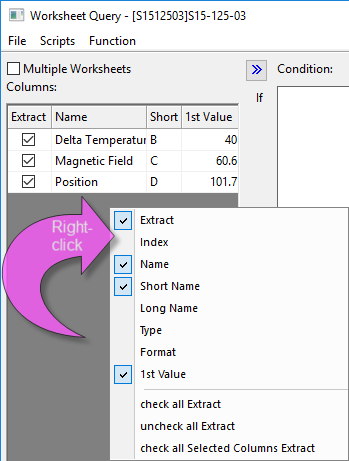
You control which information displays for each column by right-clicking in the box and selecting or enabling components from a shortcut menu.
| Extract
|
Use this menu command to specify whether or not to show the Extract checkbox column. With these checkboxes, you can specify the columns that will be extracted.
|
| Index
|
Use this menu command to specify whether or not to show the column index.
|
| Name
|
Use this menu command to specify whether or not to show the column long name if long name exists. Otherwise, show the column short name.
|
| Short Name
|
Use this menu command to specify whether or not to show the column short name.
|
| Long Name
|
Use this menu command to specify whether or not to show the column long name.
|
| Type
|
Use this menu command to specify whether or not to show the column type.
|
| Format
|
Use this menu command to specify whether or not to show the column format.
|
| 1st Value
|
Use this menu command to specify whether or not to show the first column value.
|
| Check all Extract
|
Use this menu command to check all the checkboxes in the Extract column.
|
| Uncheck all Extract
|
Use this menu command to clear all the checkboxes in the Extract column.
|
| Check all Selected Columns Extract
|
The user may preselect columns in the worksheet (e.g. by Edit:Select) before opening Worksheet Query. Use this menu command to check the Extract checkboxes only for the columns which have been preselected in the source worksheet. This menu is useful when you want to do interactive selection operations between the source worksheet and this Worksheet Query dialog box.
|
Right Panel
The right panel includes the condition edit box, output controls, and other controls.
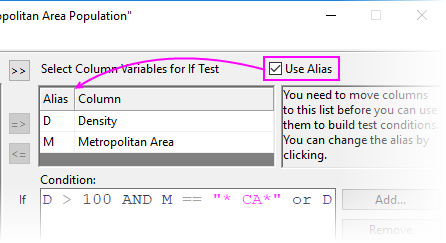
Select Column Variables for If Test
This portion of the dialog box is only shown if either of the following is true (see):
- Spreadsheet Cell Notation is turned OFF in the workbook. When this is the case, you will see this icon
 in the upper-left corner of the workbook. in the upper-left corner of the workbook.
- Spreadsheet Cell Notation is turned ON in the workbook but you have opted to check the Use Alias box in the upper-right corner of the Worksheet Query dialog box.
If using Aliases, select your columns in the left panel then move them into the Select Column Variables for If Test list using the  button. Moving columns over creates an Alias that can be used in place of a column Name or Index, when defining your Condition. button. Moving columns over creates an Alias that can be used in place of a column Name or Index, when defining your Condition.
| Alias
|
This allows you to define an alias for each column. Then you can use this alias to build the condition. You are free to edit the alias: Double-click on the cell, enter the new alias and click outside. The Alias can be multiple alphanumeric characters in length but cannot contain spaces.
|
| Column
|
This is for displaying the column names.
|
Condition
The Worksheet Query tool is used to select, extract or color-mark data in your worksheet according to some conditional expression that you define. Type your conditional expression into the Condition text box.
- When building conditions, you can use a worksheet column alias, column Short Name, or Long Name (Col("Long Name")) when referring to a worksheet column in your expression.
- To indicate a row number, use the variable
i.
- To continue an expression on the next line, press Enter.
For example, to extract rows with values in column A that are greater than 0, you can type:
A>0
or
Col(A)>0
If you have specified an alias, for example "Temperature" for column A, you can also use:
Temperature > 0
To query worksheet data using text criteria, use the following syntax:
Col(ColumnName)[i]$ == "text";
For example:
Col(Station)[i]$ == "Northwest";
|
Note: Origin uses a filter that is not case-sensitive, when it extracts data using text criteria.
|
Allowed Operators
You can use any of the logical and relational operators listed below in building your expression. Additionally, you can use any arithmetic operators (+, -, *, /, ^).
| Operators
|
Meanings
|
|
>
|
Greater than
|
|
>=
|
Greater than or equal to
|
|
<
|
Less than
|
|
<=
|
Less than or equal to
|
|
== (or =)
|
Equal to
|
|
!= (NOT)
|
Not equal to
|
|
&& (AND)
|
And
|
|
 (OR) (OR)
|
Or
|
Buttons
Use of these buttons is optional (you can type elements directly into the Condition box) but using them may save some keystrokes.
Row(i): From - To -
Specify the range of rows to be extracted.
Output
- Recalculate control.
- This drop-down list is used for specifying how to update the results when the source data or conditions are changed: None for no update, Auto for updating automatically and Manual for updating manually. For more information about Recalculate, please refer to Recalculating Analysis Results
- Specify what will be output if the condition holds:
| Add a column indicating True (1) or False (0)
|
Add a new column to the source worksheet to indicate whether the condition is satisfied: 1 for "Yes" and 0 for "No".
|
| Extract to a New Worksheet
|
Extract the data to a new worksheet in the source workbook.
|
| Extract to a New Workbook
|
Extract the data to a new workbook.
|
| Extract to Specified Sheet
|
Extract the data to a specified worksheet. Once you have selected this option, you should specify the worksheet name in the Worksheet Name edit box and Column from edit box (its default is set to 1).
|
| Fill with Specified Color
|
Fill all cells found by the query with a specified color.
|
| Select
|
Select all cells found by the query. Note that if all columns in the sheet are selected as input, whole rows that meet the query instead of block cells are selected here.
|
The Dialog Menus
File
| Load Sample
|
Load the built-in examples.
|
| Load
|
Load a saved condition.
|
| Save
|
Save the current condition.
|
| Save As...
|
Save the condition with a new name.
|
Scripts
Set LabTalk scripts that will be run before the data query. This will help to prepare proper data for the condition. You can set a Script Before Select Data Loop and a Script Before If Condition.
Origin actually runs the data query routine as follows:
- Run the Script Before Select Data Loop.
- Loop over all rows defined by the start and end values provided by user. For each column whose row index is i:
- Run the Script Before If Condition ;
- Test the condition, for data in row i;
- Extract data if the condition is true;
- End query;
- End loop;
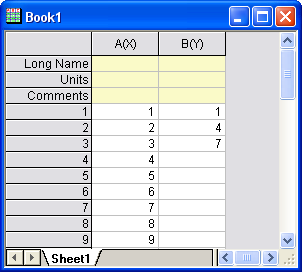
Suppose there are two columns. Col(a) has some data. Col(b) contains three numbers which will be used as row indices of cells which will be extracted from Col(a).
We can set the Script Before Select Data Loop as follows:
j=1;
Then set the Script Before If Condition as:
if( i == col(b)[j] )
{
	temp = col(a)[i];
	j++;
}
Extract data in the worksheet with the following condition:
A == temp
After clicking the Test button, Origin will highlight row 1, 4, and 7.
 | There is a quick way to load a conditional control or loop script, when you are doing script in Script Before Select Data Loop box or Script Before If Condition box. Right click on the edit box to select Conditional/Loop at the bottom of the context menu, and then select a conditional structure or loop you desired in the flyout. The syntax will be added at cursor with simple comments.
|
|
Note: To use the scripts, the minimum version of Origin required is Origin 8.0 SR3.
|
Function
You can insert functions from a number of categorized lists, to build your query condition. Recently used functions are accessible from the sub-menu. This Function menu works in the same way as it does in the Set Values dialog .
These functions include: LabTalk functions and built-in Origin C functions.
To add a user-defined function in the Function selection, please refer to the How to Create a User-Defined Function for Set Column Values.
For more information of these functions, please refer to LabTalk Supported Functions.
You can also use predefined variables or a constant in your query condition, from the Predefined Variables sub-menu. See here for available predefined variables and constant.
|