24.5 Transfer User FilesFileShare-UserFileTransfer
Auto Transfer User Files After Upgrade
Since Origin 2018, we have provide a new behavior to transfer the user files from Origin 2017 automatically.
If you have already installed Origin 2017 and upgraded to a higher version (such as Origin 2018), when you started the higher version at first time and set your User Files Folder(UFF), the pop-up dialog below will appear:

- If you click on Yes, the workspace layout of Origin 2017,such as toolbar customization and dockable windows status, will be copied and applied.
- If you click on No, the default workspace layout will be used.
Next, another pop-up dialog will appear, and let you decide if you want to transfer the user files from the User Files Folder of Origin 2017 to the User Files Folder of current Origin.
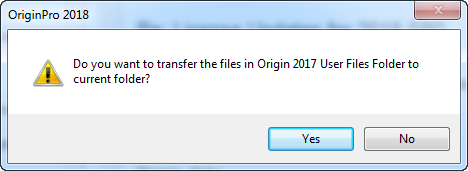
- Once you click Yes, all your customization on Origin 2017 will be transferred to current version automatically.
- Besides transferring the user-saved/user-created files(such as .opj files, new template/theme files, .FDF files and .oif files...) directly, the user-customized sections in the built-in setting files(such as .ini files) will also be delivered to the same setting files in current version. Please note, during the delivery, all the exe/UFF paths in the setting files will be converted to the current version one respectively to make all referred files are correct and up-to-date.
- If you click No, no user file will be transferred automatically. But you can always manually transfer user files using the Transfer User Files dialog below.
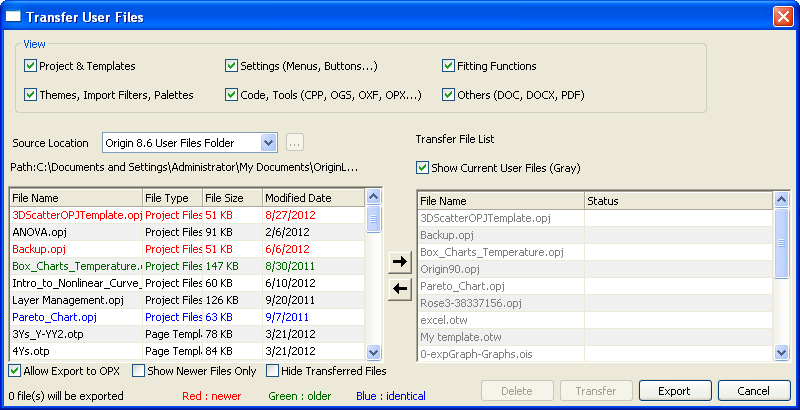
Manually Transfer User Files
The Transfer User Files dialog is designed for users to manually transfer files from the user files folder for Origin's previous versions to the user files folder for the current version.
To open this tool:
Select Preferences: Transfer User Files from the Origin menu.
View files
There are six check boxes in the dialog to specify whether to show certain file types in the lists.
| Projects & Templates
|
OPJ, OGW, OTW, OTP, OTM
|
| Settings (Menu, Buttons...)
|
OMC, XML, INI, TXT
|
| Fitting Functions
|
FDF
|
| Themes, Import Filters, Palettes
|
OIS, ODT, OTH, OIF, ODQ, ODS
|
| Code, Tools
|
OGS, H, C, CPP, OXF, OPK, OPX
|
| Other
|
DOC, DOCX, PDF
|
Source Folder Panel (Left Panel)
Source Location Drop-Down List
In this drop-down list, you can select the User Files folder of each Origin version which you have installed or Specified Folder.
To select a specified folder for the panel,
- Select Specified Folder in the drop-down list
- Click the Browse button
 on the right, and select a desired folder in the opened Browse For Folder dialog. on the right, and select a desired folder in the opened Browse For Folder dialog.
- When Specified Folder is chosen, the Recursive checkbox is available. Select this check box, the files listed below will include the files in all sub-folders of the specified folder.
Path
Show the detailed path of the selected Source Location folder.
Source Files List
This panel lists detailed information (including File Name, File Type, File Size and Modified Date) for the files which meet the current criteria of file type and source location.
The up-to-date status of the listed files comparing to their counterparts in current version is marked by the color of file names.
| Color
|
Means
|
| Green
|
The file is older than its counterpart in the current version's User Files folder.
|
| Red
|
The file is newer than its counterpart in the current version's User Files folder.
Note: If the Show Newer Files Only check box is selected, only the files newer than their counterparts in Current User Files Folder will show.
|
| Blue
|
The file is identical to the one with the same name in the other folder.
|
| Black
|
The file is new. The file only exists in Source folder and Origin fails to find its counterpart in the current version's User Files folder.
|
In this panel, you can select specified files in the source location and click the Add button  to add them to the Transfer File List. to add them to the Transfer File List.
Open Containing Folder
To open the containing folder for a specified file:
- Right click on a file either in the source folder list or current user files folder list,
- Select Open Containing Folder in the context menu.
Transfer File List
When the Show Current User Files (Gray) check box is selected, this list displays the files of current version's User Files Folder in Gray.
There is a temporary list for the files which will be transferred to the current version's user files folder, and it displays the files added from the source files list. You can tell whether the listed files are newer or older than their counterparts in the current version's User Files folder by the color of their file names.
| Color
|
Means
|
| Green
|
The file is older than its counterpart in the current version's User Files folder.
|
| Red
|
The file is newer than its counterpart in the current version's User Files folder.
|
| Blue
|
The file is identical to the one with the same name in the current version's user files folder.
|
| Black
|
The file is new. The file only exists in Source folder and Origin fails to find its counterpart in the current version's User Files folder.
|
Note: The Transfer button  will be available when there are files with status as Newer than current, Older than current or New File. After the files are transferred to the current version's user files folder, the color of the file names becomes Blue both in Source Files List and Transfer File List. will be available when there are files with status as Newer than current, Older than current or New File. After the files are transferred to the current version's user files folder, the color of the file names becomes Blue both in Source Files List and Transfer File List.
|
Once you transferred file(s) to current version by clicking the Transfer button, the Message Log window will be opened automatically and message will be dumped to it to list all transferred files.
The Add/Remove Button
For files selected in the source files list, you can copy them to the Transfer File List by clicking the Add button .
When the files are added to the Transfer File List, they can be removed by clicking the Remove button  , before transferring to the current version's User Files Folder. , before transferring to the current version's User Files Folder.
The Delete Button
For files selected in the Transfer File List panel, you can remove them from the current version's User Files folder by clicking the Delete button  . .
Export to OPX
To export files to OPX:
- Select the Allow Export to OPX check box, and then the hint n file(s) will be exported will show on the left bottom corner.
- Click the Export button
 , then the files will be exported to an OPX file, and you can share it with others. , then the files will be exported to an OPX file, and you can share it with others.
- After the files are exported, the file path will be output to the Message Log.
| Note: The grayed-out files can't be exported.
|
|