2.2.3.51 wextract
Menu Information
Worksheet Query...
Brief Information
Mask or extract data from worksheet using specified condition
Command Line Usage
- wextract iy:=[Book1]Sheet1!col(A) settings.stAlias.Cols:=1 settings.stAlias.AliasNames:=A settings.stCondition.Condition:="A<6" settings.Cols:=1;
- wextract iy:=[USMetropolita]"US Metropolitan Area Population"!(1:end) settings.stAlias.Cols:="2|3" settings.stAlias.AliasNames:="S|D" settings.stCondition.Condition:="D>500&&S>1000" settings.stMethod.Method:=1 settings.Cols:="0|2|3";
- wextract iy:=[Book1]Sheet1!col(A) settings.stAlias.Cols:=1 settings.stAlias.AliasNames:=A settings.stCondition.BeforeLoop:="j=1;" settings.stCondition.BeforeIfCondition:="if (i==col(B)[j]) {temp=col(A)[i];j=j+1;}" settings.stCondition.Condition:="A==temp" settings.Cols:=0;
X-Function Execution Options
Please refer to the page for additional option switches when accessing the x-function from script
Variables
Display
Name
|
Variable
Name
|
I/O
and
Type
|
Default
Value
|
Description
|
| Input
|
iy
|
Input
Range
|
<active>
|
Specify the input range.
|
| Settings
|
settings
|
Input
TreeNode
|
<unassigned>
|
Specify the extract settings. See more details in this page.
|
| Output
|
oy
|
Output
Range
|
<optional>
|
Specify the output range.
See the syntax here.
|
Description
This tool is in fact a script version of the Extract Worksheet Data tool. It directs Origin to locate data in the specified worksheet based on a user-specified conditional expression. The located data values are extracted. In other words, these values can be copied to another worksheet or marked with a specified color.
The settings variable can be used to customize the options for the operation. Please see this page for more details.
Examples
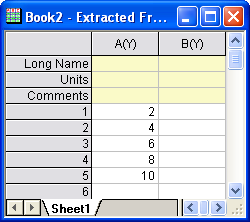
Example 1: To extract the cells from Column B where the corresponding cells in in Column A are less than 6.
Create a new workbook and fill the first column with row numbers and the second column with 2, 4, 6... (twice of the row numbers).
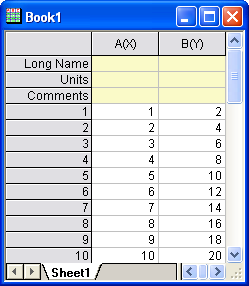
Type the following script in the command window.
wextract iy:=[Book1]Sheet1!col(A) settings.stAlias.Cols:=1
settings.stAlias.AliasNames:=A
settings.stCondition.Condition:="A<6"
settings.Cols:=1;
And the extracted data in Column B are shown in a new workbook.
Example 2:
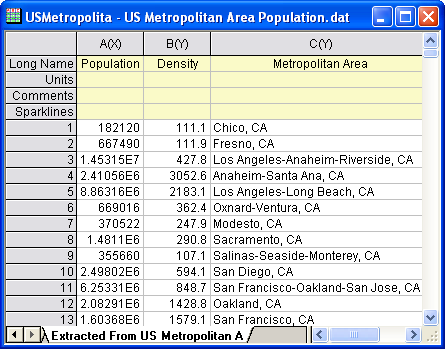
Select Data: Import from File: Single ASCII from the Origin menu. Import the file \Samples\Data Manipulation\Us Metropolitan Area Population.dat. The destination worksheet contains four columns: Population, Sq. Mi., Density, and Metropolitan Area. To select Metropolitan Areas in California where the Density is greater than 100 and output their Population, Density and Metropolitan Area to a new worksheet, you can type the following script in the command window.
str1$="D>100 AND M[i]$=="*, CA*"";

wextract iy:=[USMetropolita]"US Metropolitan Area Population"!(1:end)
settings.stAlias.Cols:="3|4"
settings.stAlias.AliasNames:="D|M"
settings.stCondition.Condition:=str1$
settings.stMethod.Method:=1
settings.Cols:="0|2|3";
The extracted result is shown in a new worksheet of the USMetropolita workbook.
Example 3: To extract the data from Column A whose row indices are contained in Column B.
Create a new workbook. Highlight Column A. Right-click on it and select Fill Column with: Normal Random Numbers from the short-cut menu. And fill column B with 2, 3, 5.
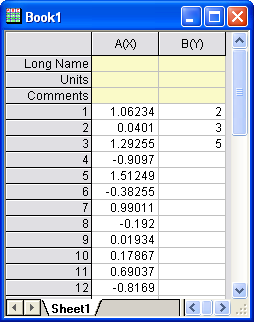
Make sure the workbook is active. Type the following script in the command window.
wextract iy:=col(A)
settings.stAlias.Cols:=1
settings.stAlias.AliasNames:=A
settings.stCondition.BeforeLoop:="j=1;"
settings.stCondition.BeforeIfCondition:="if (i==col(B)[j]) {temp=col(A)[i];j=j+1;}"
settings.stCondition.Condition:="A==temp"
settings.Cols:=0;
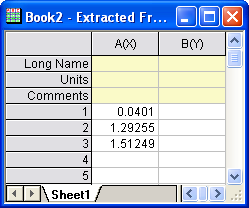
And the 2nd, 3rd, 5th rows in Column A are extracted to a new workbook.
|