11.2.1 Introduction to Origin C and Code BuilderOC-CodeBuilder
Summary
Origin C supports a nearly-complete ANSI C language syntax as well as a subset of C++ features including internal and DLL-extended classes. In addition, Origin C is "Origin aware". This means that Origin objects such as worksheets and graphs are mapped to classes in Origin C, allowing direct manipulation of these objects and their properties from Origin C.
Origin C's integrated development environment (IDE) is called Code Builder. Code Builder provides standard tools for writing, compiling, and debugging your Origin C programs. Once an Origin C function is compiled and linked, the function can be called in various ways from the Origin or Code Builder workspaces.
To open Code Builder, click the  button on the Origin Standard toolbar, or press ALT + 4 from the keyboard. button on the Origin Standard toolbar, or press ALT + 4 from the keyboard.
Minimum Origin Version Required: Origin 9
What you will learn
This tutorial will show you how to:
- Create an Origin C function.
- Debug and Run the Function.
- Run the Function Using the Custom Routine Button.
Steps
Create an Origin C Function
- In Code Builder, start with a new workspace (File: New Workspace...). On the Code Builder Standard toolbar, click the New
 button to open the New File dialog. button to open the New File dialog.
- Select C File to create a .c file. Type Tutorial in the File Name text box. In the Location text box, specify the User Files Folder/OriginC folder to save your source file. Make sure that the Add to Workspace box is checked. Click OK. A file named Tutorial.c is created and opened in the Code Builder workspace.
-
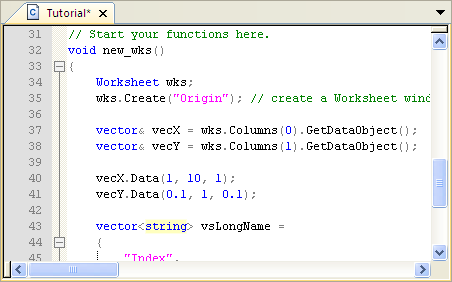
Copy and paste the following code beneath the line that reads "// start your functions here.":
void new_wks()
{
	Worksheet wks;
	wks.Create("Origin"); // create a Worksheet window with template - Origin

	vector& vecX = wks.Columns(0).GetDataObject();
	vector& vecY = wks.Columns(1).GetDataObject();

	vecX.Data(1, 10, 1);
	vecY.Data(0.1, 1, 0.1);

	vector<string> vsLongName =
	{
		"Index",
		"Data"
	};

	for (int nCol = 0; nCol < wks.GetNumCols(); ++nCol)
	{
		Column col (wks, nCol);
		col.SetLongName(vsLongName[nCol]);
	}
}
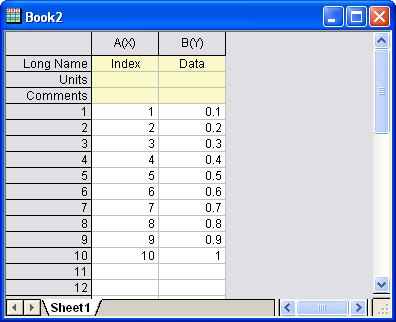
This new_wks function will create a worksheet using the Origin template. It fills the first column with numbers from 1 to 10, incrementing by 1. The second column is filled with numbers from 0.1 to 1, incrementing by 0.1. Lastly, it sets the Long Names of the first and second columns as Index and Data, respectively.
-
Click the Save button
 . .
Origin 2015 provides some useful tools:
- Quick open files
- Prss SHIFT + ALT + O or select Tools: Quick Open Files to open the Quick Open Files dialog.
- Switch between .h and .c/.cpp file
- When open a .h file, press CTRL + ALT + O to open the corresponding .c or .cpp file, and vice versa.
- Find symbols
- Press SHIFT + ALT + S or select Tools: Find Symbols to open the Find Symbols dialog.
|
Debug and Run the Function
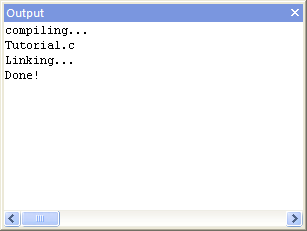
- On the Code Builder Standard toolbar, click the Build button
 . This compiles the new_wks function and performs linking (Please make sure the Tutorial.c file is active). . This compiles the new_wks function and performs linking (Please make sure the Tutorial.c file is active).
- Click the space just to the left of lines 34, 35, 37, 50. A red ball icon will be placed at the beginning of each line, indicating that you added breakpoints to these lines. These breakpoints are listed in the Breakpoints window.
- In the Breakpoints window, clear the box before tutorial.c, line 35 to disable this breakpoint. Note that the breakpoint icon before line 35 becomes a hollow circle icon.
 | To delete a breakpoint, you can click on the breakpoint icon before the corresponding line, or right-click on the breakpoint in the Breakpoints window, and select Delete Breakpoint.
|
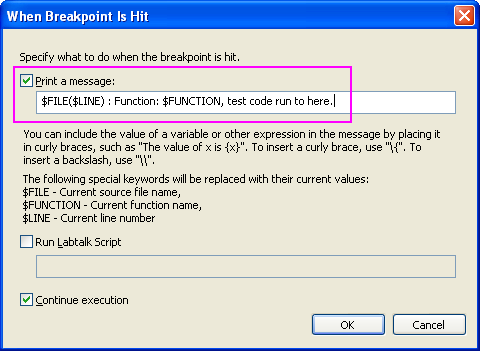
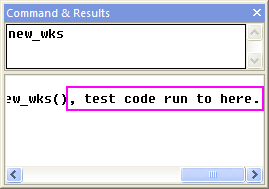
- Right-click on the breakpoint of line 37. Select When Hit... to open a dialog. Check the box before Print a message. In the text box under Print a message:, append the text test code runs to here. . Click OK to finish. Note that this breakpoint's icon is now a diamond.
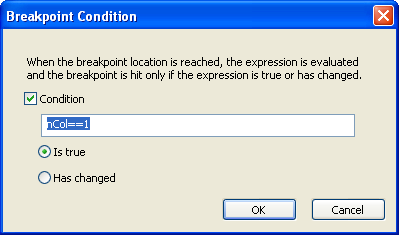
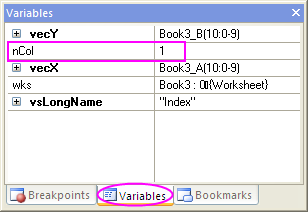
- Right click on the breakpoint at line 50. Select Condition... to open a dialog. Enable Condition and type nCol==1 in the text box. Click OK.
- To run this code, type the function name new_wks in the upper panel of the LabTalk Console window.
- Press ENTER. A yellow arrow will appear upon the first breakpoint icon, indicating which line of code is executed to.
- Press F8 to continue debugging the code. You will see the yellow arrow icon moving to the line 50.
- In the Command & Results window, the message added in the breakpoint of line 37 is printed in the lower panel.
- Activate the Variables window. The variable names are listed in the first column and their values are listed in the second column. Check the value of nCol.
- Press F5 to run over all codes, the yellow arrow will disappear.
- Return to the Origin workspace. You can see that a workbook is created as in the following image.
Run the Function Using the Custom Routine Button
- Hold the CTRL + SHIFT keys and click the Custom Routine button
 . It will open the Custom.ogs file in Code Builder. . It will open the Custom.ogs file in Code Builder.
- With the cursor at line 11, click the Comment button
 to comment out line 11. to comment out line 11.
- Type the following code at lines 12 and 13.
 Run.LoadOC(%YOriginC\Tutorial.c); // %Y is user file folder
 new_wks();
This code will load the Tutorial.c file we added in the previous section and run the new_wks() function.
- Press the Save button.
- Return to the Origin workspace. Click the Custom Routine button. A new worksheet will be created and filled with data as it was in the previous section.

|