1.5 The External Tools DialogThe-External-Tools-Dialog
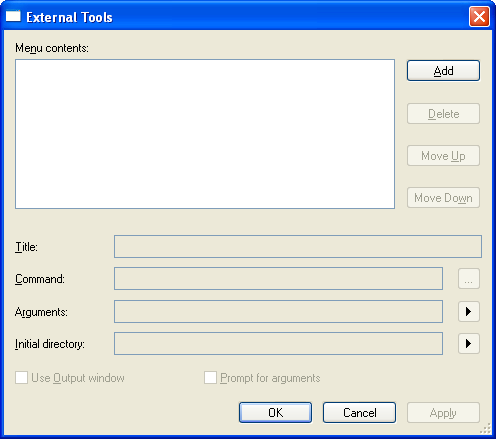
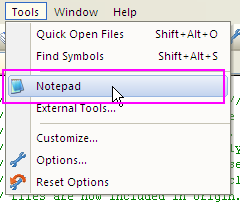
Similar to Visual Studio, Code Builder provides a tool called the External Tools dialog. With this tool, you can call external tools to help you develop and debug your applications. To open this dialog, you can click Tools: External Tools... on the menu bar.
Edit External Tools
To add an external tool to the Tools menu
- On the menu bar, click Tools:External Tools..." to open the External Tools dialog.
- Click the Add button, and you can enter a name for the menu option in the Title box instead of the default.
- Note:Type symbol "&" before one of the letters in the tool name can be used to create an accelerator key for the command when it appears on the Tools menu.
- In the Command box, enter complete file path of the external program you intend to launch, or click the
 button to browse for a file. Files types that you can launch include: .exe, .com, .pif, .bat, and .cmd. button to browse for a file. Files types that you can launch include: .exe, .com, .pif, .bat, and .cmd.
- Click OK to apply the setting and close the dialog. The external tool added will be displayed in the Tools menu similar to the following example.
| Note: The Use output window option is not available for GUID applicationa files.
|
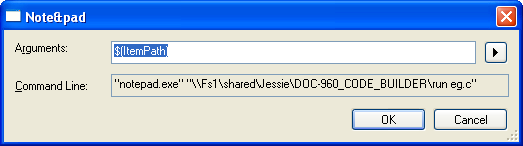
To pass variables to the tool
- Open the External Tools dialog, choose a tool in the Menu content list.
- Enter the arguments you want to pass to the tool in the Arguments box. You can choose the arrow button to the right of the box to select a predefined argument. For more information about argument syntax, see Arguments for External Tools.
- Check the box before Prompt for arguments if you would like to edit the arguments at the time the command is launched.
Start the external tool from the Tools menu, the arguments you selected will be automatically passed to the tool. If you selected Prompt for Arguments, a dialog box will pop up, prompting you to edit the Arguments.
To specify a working directory for the tool
- Open the External Tools dialog, choose a tool in the Menu content list.
- In the Initial directory box, enter the working directory for the tool, or choose the arrow button to select a predefined directory location.
Edit Menu Contents
All external tools you added will appear in the Menu contents box. You can use the buttons to the right of the menu contents box to edit the order of the external tools in the dialog box. As the order of the items in the menu contents changes the order of appearance in the Tools menu is also changed accordingly.
| Add
|
Add an external tool to the Tools menu.
|
| Delete
|
Delete the selected external tool(s) from the Tools menu.
|
| Move Up
|
Move up the position of the selected external tool in the Tools menu by one item.
|
| Move Down
|
Move down the position of the selected external tool in the Tools menu by one item.
|
Arguments for External Tools
The following table shows the argument you could use to pass variables to external tools:
| Name |
Argument |
Description
|
| Item Path |
$(ItemPath) |
The complete file name of the current source (defined as drive + path + file name).
|
| Item Directory |
$(ItemDir) |
The directory of the current source (defined as drive + path).
|
| Item File Name |
$(ItemFilename) |
The file name of the current source (defined as file name).
|
| Item Extension |
$(ItemExt) |
The file name extension of the current source.
|
| Current Line |
$(CurLine) |
The current line position of the cursor in the editor.
|
| Current Column |
$(CurCol) |
The current column position of the cursor in the editor.
|
| Current Text |
$(CurText) |
The selected text.
|
| Target Path |
$(TargetPath) |
The complete file name of the item to be built, (defined as drive + path + file name).
|
| Target Directory |
$(TargetDir) |
The directory of the item to be built.
|
| Target Name |
$(TargetName) |
The file name of the item to be built.
|
| Target Extension |
$(TargetExt) |
The file name extension of the item to be built.
|
| Project Directory |
$(ProjDir) |
The directory of the current project (defined as drive + path).
|
| Project file name |
$(ProjFileName) |
The file name of the current project (defined as drive + path + file name).
|
| Solution Directory |
$(SolutionDir) |
The directory of the current solution (defined as drive + path).
|
| Solution file name |
$(SolutionFileName) |
The file name of the current solution (defined as drive + path + file name).
|
| Binaries Directory |
$(BinDir) |
The directory that’s the final location of the binary that’s being built (defined as drive + path).
|
|