3 Create a Html Dialog App
This topic shows you how to create a HTML control dialog App called Get Data Point.
Create Folder
To create a folder for the App
- Open Code Builder, right click Apps folder on Workspace tab
- Select New. Untitled folder is created.
- Right click Untitled and choose Rename. Enter Get Data Point as App name.
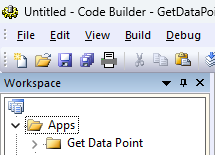
- Right click on Get Data Point and choose Open Folder in File Explorer to see where the folder is in Windows Explorer.
Create Files
This simple App will need 4 files:
- html and cpp files to make the HTML control dialog to get data point.
- LabTalk script file which is called when clicking on the App icon in Apps Gallery window.
- Icon image to show in Apps Gallery.
Create Html page
This step will create a HTML Page GetDataPointDlg.html as the left panel of the dialog
- Open Code Builder, create a new HTML file and save as GetDataPointDlg.html to the folder ...\Apps\Get Data Point.
- Copy the following code and paste it within the GetDataPointDlg.html:
<!doctype html>
<html>
<head>
<meta charset="utf-8">
<meta http-equiv="X-UA-Compatible" content="IE=Edge">
<link type="text/css" rel="stylesheet" href ="http://olab/resource/programfolder/Ohtml/3rdParty/bootstrap/css/bootstrap.css">
<link type="text/css" rel="stylesheet" href ="http://olab/resource/ProgramData/OriginLab/Current/CSS/theme.css">
<script src="http://olab/resource/programfolder/JS/jquery-2.js"></script>
<script src="http://olab/resource/programfolder/JS/olab.js"></script>
<style>
#container{
position:absolute;
top:0; left:0; bottom:0; right:0;
}
#ctrlPanel{
border:1px solid #000;
padding:5px;
position:fixed;}
#ctrlPanel.left{
top:10px; left:10px; bottom:10px;
width:300px;}
#getData{
margin: 10px 10px;
}
.message{
color: #377EB8}
</style>
</head>
<body>
<!-- Elements for a dialog with a left panel and an Origin graph. -->
<div id="container">
<div id="ctrlPanel" class="left">
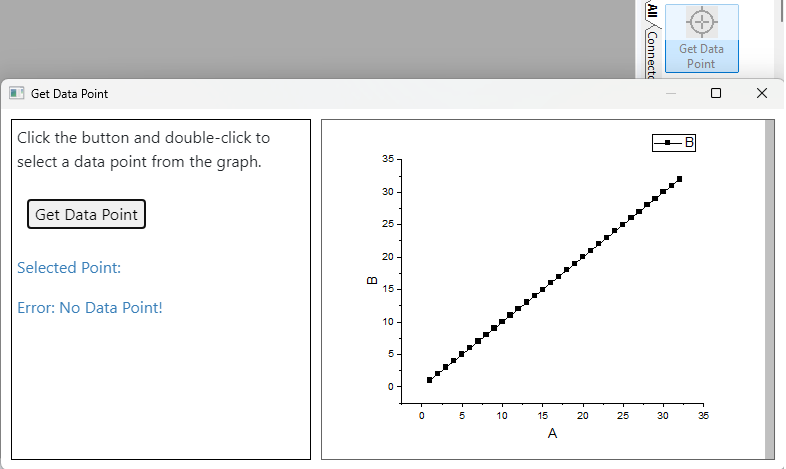
<p>Click the button and double-click to select a data point from the graph.</p>
<button id="getData">Get Data Point</button>
<p></p>
<p class="message">Selected Point:</p>
<p id="msg" class="message">--</p>
</div>
</div>
<script>
$(document).ready(function(){
let msgBox = document.getElementById("msg");
msgBox.innerText = "";
let getData = document.getElementById("getData");
getData.addEventListener("click", function(){
let msg = window.O.GetDataPointFromGraph();
msgBox.innerText = msg;
});
});
// Call this function from your Origin C class that is derived
// from HTMLDlg. The class will then know where to position the
// graph control.
function getGraphRect()
{
let mainDiv = document.getElementById("container"),
mainRect = mainDiv.getBoundingClientRect(),
ctrlDiv = document.getElementById("ctrlPanel"),
ctrlRect = ctrlDiv.getBoundingClientRect();
let rect;
if( ctrlDiv.className == 'left' )
rect = {left:ctrlRect.right + 10, top:ctrlRect.top, right:mainRect.right - 10, bottom:ctrlRect.bottom};
else if( ctrlDiv.className == 'right' )
rect = {left:10, top:ctrlRect.top, right:ctrlRect.left - 10, bottom:ctrlRect.bottom};
else if( ctrlDiv.className == 'top' )
rect = {left:10, top:ctrlRect.bottom + 10, right:ctrlRect.right, bottom:mainRect.bottom - 10};
else if( ctrlDiv.className == 'bottom' )
rect = {left:10, top:10, right:ctrlRect.right, bottom:ctrlRect.top - 10};
window.O.OnGetGraphRect(JSON.stringify(rect));
}
</script>
</body>
</html>
Once you finish this step, you can see the html page by opening the GetDataPointDlg.html with a web browser.
Create OriginC File
Now you are ready to edit the Origin C code to create the HTML dialog.
- In Code Builder, create a new cpp file named GetDataPointDlg.cpp under the folder ...\Apps\Get Data Point.
- Copy the following code and paste it within the GetDataPointDlg.cpp :
#include <Origin.h>
#include <../OriginLab/DialogEx.h>
#include <../OriginLab/CEFHTMLDlg.h>
#include <../OriginLab/GraphPageControl.h>

#define ID_GRAPH_CONTROL 1

class GetDataPointDlg;
static GetDataPointDlg *s_pDlg = NULL;
//----

class GetDataPointDlg:public HTMLDlg
{
protected:

	string GetInitURL() {
		string strFile = __FILE__;
		return GetFilePath(strFile) + "GetDataPointDlg.html";
	}
	string GetDialogTitle() {return "Get Data Point";}
	BOOL OnInitDialog(){
		if( !HTMLDlg::OnInitDialog() )
			return FALSE;
		ModifyStyle(0, WS_MAXIMIZEBOX);
		RECT rect;
		m_gcCntrl.CreateControl(GetSafeHwnd(), &rect, ID_GRAPH_CONTROL, WS_CHILD|WS_VISIBLE|WS_BORDER);
		GraphLayer gl = Project.ActiveLayer();
		GraphPage gp = gl.GetPage();
		DWORD dwAttachOptions = NOCLICK_AXES | NOCLICK_DATA_PLOT | NOCLICK_LAYER | NOCLICK_TICKLABEL | NOCLICK_LAYERICON;
		m_gcCntrl.AttachPage(gp, dwAttachOptions);
		return TRUE
	}
	BOOL OnDestroy() {
		HTMLDlg::OnDestroy();
		return TRUE;
	}
	BOOL GetDlgInitSize(int& width, int& height) {
		width = CheckConvertDlgSizeWithDPI(800, true);
		height = CheckConvertDlgSizeWithDPI(400, false);
		return TRUE;
	}
	BOOL OnDlgResize(int nType, int cx, int cy){
		if( !IsInitReady() )
			return false;
		HTMLDlg::OnDlgResize(nType, cx, cy);

		if( !IsHTMLDocumentCompleted() )
			return FALSE;
		m_dhtml.CallJavaScript("getGraphRect()");
		return TRUE;
	}
public:
	DECLARE_DISPATCH_MAP

	EVENTS_BEGIN_DERIV(HTMLDlg)
		ON_INIT(OnInitDialog)
		ON_DESTROY(OnDestroy)
		ON_SIZE(OnDlgResize)
	EVENTS_END_DERIV

	string GetDataPointFromGraph(){
		GraphPage gp = m_gcCntrl.GetPage();
		if(!gp)
			return "Error: No Graph Page!";
		GraphLayer gl = gp.Layers(0);
		if(!gl)
			return "Error: No Graph Layer!";
		GetGraphPoints ggp;
		int nRet = ggp.SetFollowData(true, 0);
		nRet = ggp.GetPoints(1, gl);
		if(nRet) {
			vector vx, vy;
			vector<int> vnIndices;
			ggp.GetData(vx, vy, vnIndices);
			string strResult;
			strResult = "index = " + vnIndices[0] + ", x = " + vx[0] + ", y = " + vy[0];
			return strResult;
		}
		else
			return "Error: No Data Point!";
	}

private:
	void OnGetGraphRect(string strJsonRect){
		RECT rectGraph;
		JSON.FromString(rectGraph, strJsonRect);
		check_convert_rect_with_DPI(GetWindow(), rectGraph, true);
		m_gcCntrl.SetWindowPos(HWND_TOP, rectGraph.left, rectGraph.top, RECT_WIDTH(rectGraph), RECT_HEIGHT(rectGraph), 0);
	}
	GraphControl m_gcCntrl;
};

BEGIN_DISPATCH_MAP(GetDataPointDlg, HTMLDlg)
	DISP_FUNCTION(GetDataPointDlg, GetDataPointFromGraph, VTS_STR, VTS_VOID)
	DISP_FUNCTION(GetDataPointDlg, OnGetGraphRect, VTS_VOID, VTS_STR)
END_DISPATCH_MAP

//---- LabTalk Access
void DoGetDataPointDlg()
{
	if( s_pDlg == NULL )
	{
		GetDataPointDlg dlg;
		s_pDlg = &dlg;
		DWORD dwOptions = 0;//DLG_NO_LOAD_TOP_LEFT | DLG_NO_LOAD_WIDTH_HEIGHT;
		dlg.DoModalEx(GetWindow(), dwOptions);
		s_pDlg = NULL;
	}
}
Create LabTalk File
When clicking the installed App in Apps Gallery window, we can specify it to run LabTalk file launch.ogs, which in turn runs the X-Function.
This step will create such file:
- Right click Get Data Point folder and choose New File....
- Pick LabTalk Script File, and enter launch as file name and click OK.
- Add a [Main] section with LabTalk Script to open the dialog:
[main]
 if( run.LoadOC("%@AGet Data Point\GetDataPointDlg.cpp", 16) == 0 )
		run -oc DoGetDataPointDlg;
	else
		type "failed to load GetDataPointDlg.cpp";
- Click Save button
Create App Icon
A 32x32 icon png image file is needed to display the App in Apps Gallery. The file can be saved with any color depth and even transparency.
For this tutorial, please save this as AppIcon.png onto local PC.

Add Files to the App folder
4 files are needed for this simple App: GetDataPointDlg.html, GetDataPointDlg.cpp, launch.ogs and AppIcon.png. So far, if you expand Get Data Point folder on Code Builder, only launch.ogs is under it. We need to add other files there as well.
- On Code Builder, right-click on Get Data Point and select Add Files...
- Browse to select GetDataPointDlg.html and GetDataPointDlg.cpp, click OK.
- Right click on Get Data Point and select Add Files.... Find AppIcon.png and click OK.
- Right click on Get Data Point and choose Open Folder in File Explorer. All files are put to the app folder.
Pack App
Apps are usually packed as OPX file for future distribution and installation.
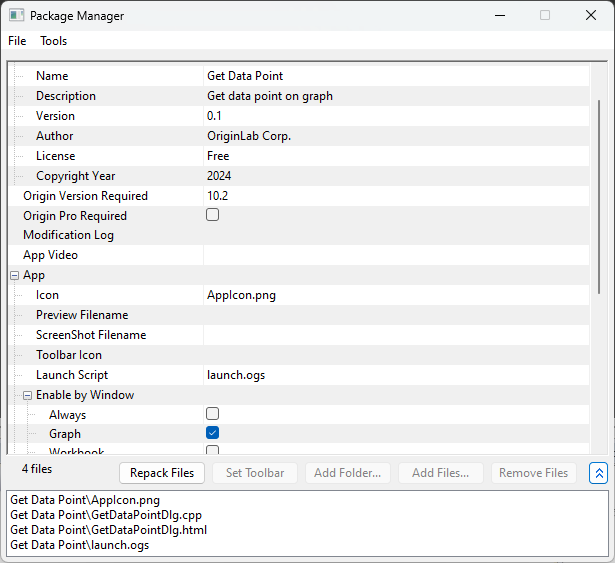
- Right click on Get Data Point and select Generate... to open Package Manager.
- Edit the fields, in image below. Some important fields are:
- Launch Script is the place to specify the code to run when the icon is clicked in the App Gallery. In this case, enter launch.ogs, which will run the [Main] section.
- Icon to specify the image file
- Enable by Window is used to specify when the App will be available. For windows unchecked, the app will be grayed out.
- In the Pack Manager dialog, click File menu and choose Save to save it as Get Data Point.OPX file on someone on the PC. No need to be under the corresponding app folder.
- Then you can drag& drop Get Data Point.opx to install the App.
|