5 Create App with User Defined Toolbar Buttons
This tutorial will guide you through creating an app that launches a user-defined toolbar with two buttons. One button removes masked data cells, while the other removes rows containing masked cells, both using LabTalk Script.
Create Folder
To create a folder for the App:
- Open Code Builder. In the Workspace tab, right-click the Apps folder.
- Select New to create an untitled folder.
- Right-click Untitled, choose Rename, and enter Remove Masked Data as the App name.
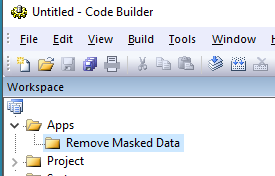
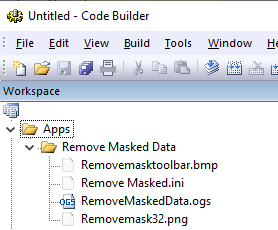
- Right click on Remove Masked Data, then select Open Folder in File Explorer to view the folder in Windows Explorer. The folder path should be similar to: C:\Users\username\AppData\Local\OriginLab\Apps\Remove Masked Data
Required Files
This simple app will require four files, all of which should be added to the Remove Masked Data after creation.
- 32×32 pixel icon image for the Apps Gallery.
- 32x16 pixel bitmap (.bmp) file for the toolbar button, containing two 16×16 pixel images (one for each button).
- LabTalk script Origin Graph Script (.ogs) file for the code behind the two buttons.
- Initialization (.ini) file for the toolbar button settings.
Below are detailed steps to create each file
App Icon Image
- Right-click the image below and select Save Image As... and save it as Removemask32.png in the app’s folder.
- In Code Builder, right click the Remove Masked Data node and select Add Files... and choose RemoveMask32.png to add it.
- Expand the node to confirm that the file has been added.

Toolbar Button Image
- Save the following image as RemoveMaskToolbar.PNG in the app’s folder.
- Open it in Paint or another image editor and save as a 16-color Bitmap file named RemoveMaskToolbar.bmp.
- In Code Builder, right click the Remove Masked Data node and select Add Files... Choose RemoveMaskToolbar.bmp to add it.
- Expand the Remove Masked Data node to confirm that the file has been added.

LabTalk Script
- In Code Builder, right click the Remove Masked Data App node and select New File...
- Choose LabTalk Script File as the file type. Enter the file name as RemoveMaskedData and Click OK.
- Paste the following text into the newly created file:
[ClearMaskedCells]
wreplace find_value:=0/0; //replace all masked cells with missing values
wcellmask mask:=unmask; //set all masked cell status to be unmasked

[RemoveMaskedRows]
wreducerows method:=mask; //Call X-Function wreducerows to remove rows with masked cells
- Click the Save button.
INI file for the toolbar
- In Origin Workspace, choose View: Toolbars...
- Navigate to the Button Groups tab and click New... at the bottom.
- Set Group Name as: Remove Masked
- Set Number of Buttons: 2.
- Click Browse..., navigate to the app's folder, and select RemoveMaskToolbar.bmp
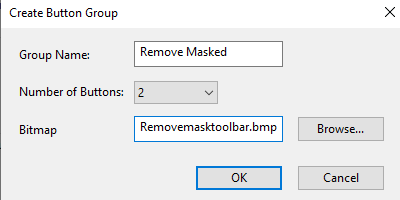
- Click OK.
- When the Save As dialog appears, ensure it is saving in the app’s folder. The File Name should be auto-filled.
- Click OK.
- In the Groups list, select Remove Masked.
- Click on the first button.
- Click Settings... and set:
- File Name: RemoveMaskedData.ogs
- Section Name: ClearMaskedCells
- Tool Tip Text: Clear data on masked cells
- On the right, under Windows, uncheck Matrix, Excel, Graph, Layout (this button should only be active for worksheets).
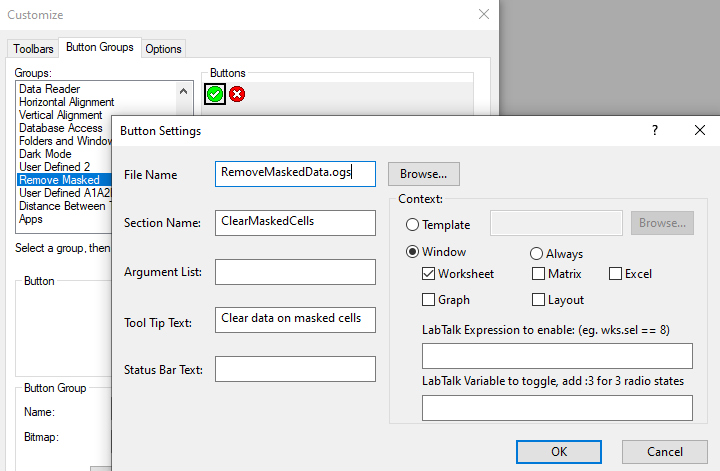
- Click OK.
- Click on second button.
- Click Settings... and set:
- File Name: RemoveMaskedData.ogs
- Section Name: RemoveMaskedRows
- Tool Tip Text: Remove rows with masked cells
- On the right, under Windows, uncheck Matrix, Excel, Graph, Layout.
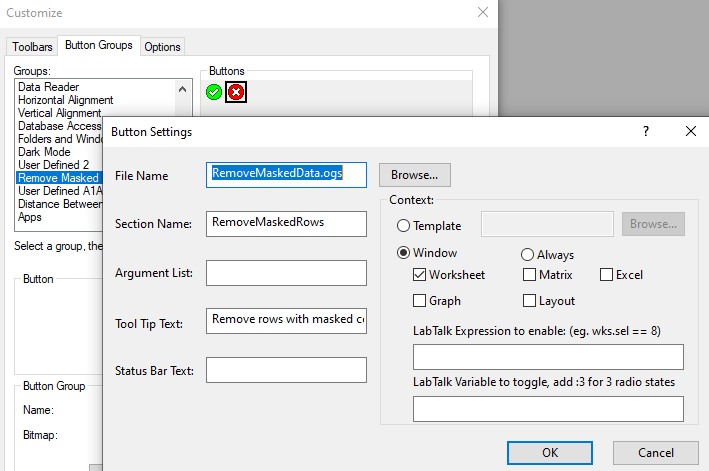
- Click OK.
- Click Close to exit the dialog.
- Go back to Code Builder, right click the Remove Masked Data node and choose Add Files...
- Add Remove Masked.ini to the node.
- Expand the Remove Masked Data node to ensure all four files are listed.
Generate OPX File
- In Code Builder, right click the Remove Masked Data node and select Generate...
- In the Package Manager dialog, edit the Package fields such as set Description to: Remove masked cells or rows.
- Expand the App node, set Icon to: Removemask32.png.
- Set Toolbar Icon to: RemoveMaskToolbar.bmp.
- In theLaunch Script field, enter @@TB. This ensures the toolbar button is launched when the app is opened.
- Expand the Enable by Window node, only check Workbook (so the app is active only when a worksheet is in use).
- Expand the Toolbar node (no need to check it). In the Button Group File field, enter: Remove Masked Data\Remove Masked.ini
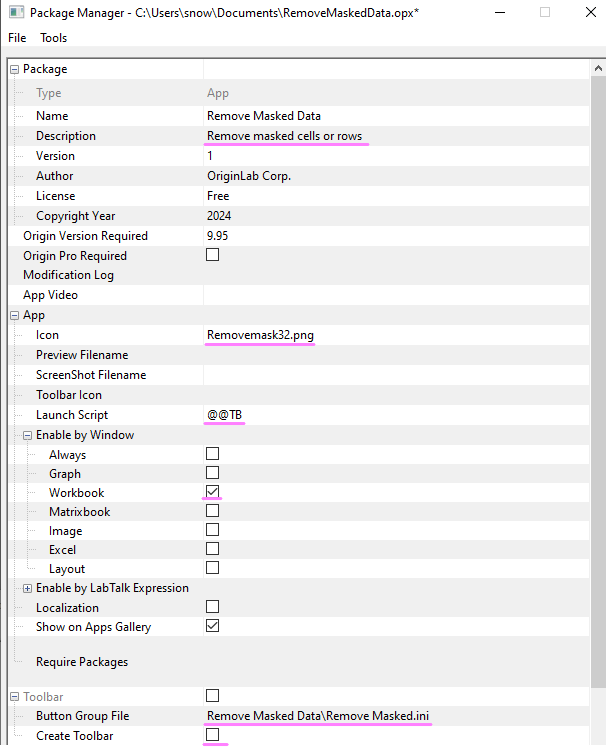
- Click File: Save as... menu inside Package Manager
- Save it as RemoveMaskedData.OPX under the Documents folder.
Install OPX File
Once the OPX file is generated, you can share it with others who have Origin versions higher than the minimum required version set during generation.
- Make sure Origin isn't run as Administrator and no dialog is opened in Origin.
- Drag the OPX file from Windows Explorer into Origin
- If you drag it into Origin that you used to develop the App, you can click Replace All
- Go to Apps Gallery on the right side of Origin workspace. Remove Masked Data app should show there.
Test the App
- Open a new workbook and fill it with some data.
- Ctrl+select some cells in different columns and use the mask toolbar button to mask them.
- Masked cells will turn red and they will be excluded in analysis
- Click the Remove Masked Cell app in the Apps Gallery on the right side of Origin workspace.
- Remove Masked toolbar button will show.
- If you click the 1st button, those masked cells will be cleared with no data.
- If you click the 2nd button, rows with masked cells will be removed.
Note: Toolbar launched by App can't be docked in Origin workspace. It will always be floating. You can close the toolbar every time after usage. Click the App button will show the toolbar.
|