4 Advanced Topics in App Development
Topics discussed on this page assume that you have previously read App Development and Distributing an App. If not, those pages should be read before hand in order to better understand what is discussed below.
Adding a Toolbar to an App
Adding a toolbar to an App so that it displays the toolbar when the App icon is clicked is not difficult.
As a first step, create a bitmap file (*.BMP) for the buttons using an appropriate image editor. Each individual button must occupy 16x16px. So, if there are to be 3 buttons, the total image size must be 16px tall by 48px wide. Save the *.BMP file to the folder for the App. Note: it must be saved as 16 Color (4-bit). Here is an example of a bitmap file:

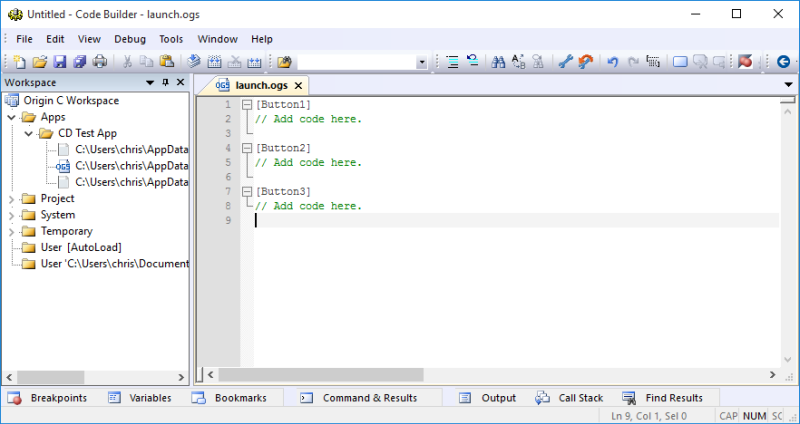
Next, a LabTalk script file (*.OGS) must be created and saved in the folder for the App (perhaps "lauch.ogs" would be a good name). In the file, add one section per button. These sections will contain the code to run when the relevant button is clicked in the toolbar. For example:
The next step is to create a Button Group in Origin. From the View menu, select Toolbars... In the Customize dialog, navigate to the Button Groups tab. At the bottom of the dialog, click the New... button. In the Create Button Group dialog, specify the button Group Name (it is usually a good idea is to name it the same as your toolbar bitmap file), Number of Buttons, and select the toolbar Bitmap file previously created . Then click the OK button.
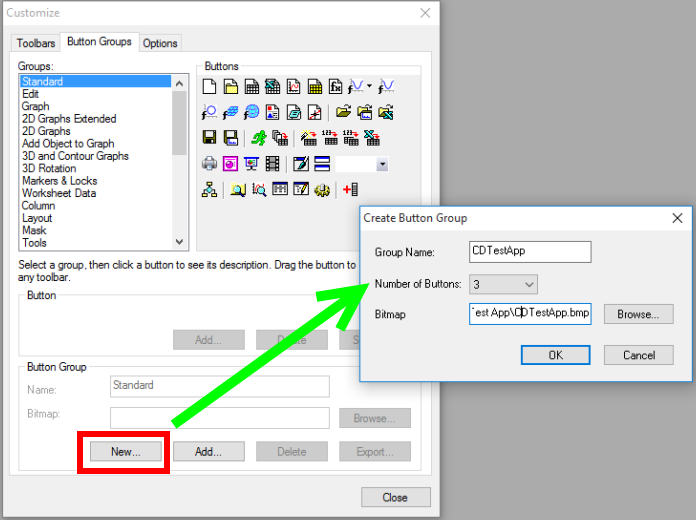
You will then be prompted to save an *.INI file named after your Button Group. This file must be saved to the folder for the App.
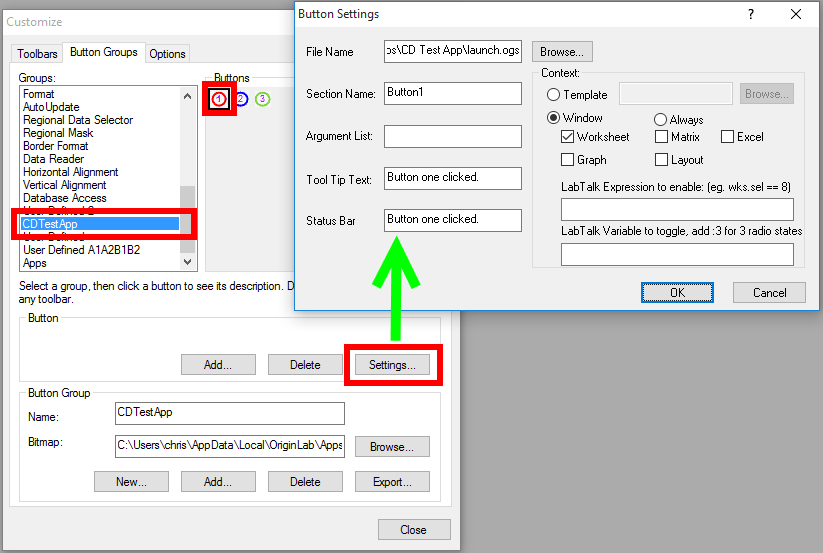
Still in the Button Groups tab of the Customize dialog, scroll down the list of Groups until you get to the one that was just created. Select it and the toolbar bitmap image will be displayed to the right. Click on the first button in the image and then click the Settings... button below. In the Button Settings dialog, specify the File Name by browsing to the *.OGS file previously created. Then specify the Section Name in the file to be called when the relevant button is clicked. Tool Tip Text and Status Bar text can also be specified along with which Window type will enable the relevant toolbar button. The other settings are discussed here.
Simply repeat the above process until all of the buttons have been configured. At this point, the *.INI file will have been automatically updated and you can delete the Button Group by selecting it from the Groups list and clicking the Delete button at the bottom of the dialog. Shut down and restart Origin to completely clear the Button Group from memory. Note: in the future, the App will recreate the Button Group automatically as it is needed.
The Button Group may be edited (including adding and deleting buttons) in the future by simply opening the Customize dialog, navigating to the Button Groups tab, and clicking the Add... button. After selecting the *.INI file for the Button Group from the folder for the App, follow the aforementioned steps to make changes including deleting the Button Group afterwards. Note: you may have to restart Origin to see the changes in the toolbar for the App.
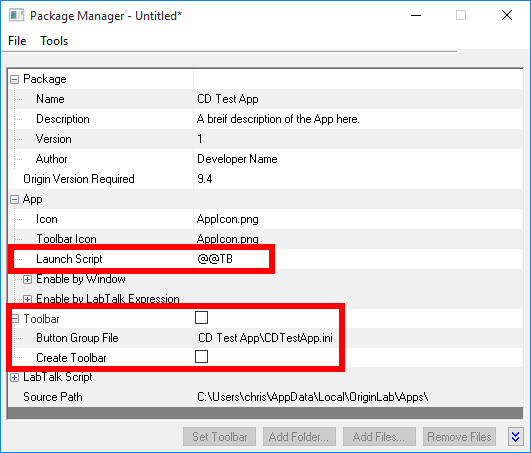
The final step in adding a toolbar to an App takes place in the App packaging stage. Prior to packaging, make sure the files have been have been added to the App folder in the Code Builder Workspace. In the Package Manager, enter @@TB into the Launch Script control. Then uncheck Toolbar and
Create Toolbar controls. Lastly, for Button Group File, enter the path to the *.INI file in the App folder. The path should be relative to the "%LocalAppData%\OriginLab\Apps" folder. For example, if the App is named "CD Test App" and the *.INI file named "CDTestApp.ini", the path would be "CD Test App\CDTestApp.ini". For example:
Including Sample Files with an App
Sample files (projects, data for import, etc) can easily be distributed with an App. To do so, simply create a subfolder named "Samples" (plural) in the folder for the App and place the files in that folder. Prior to packaging the App, make sure the sample files have been added to the App folder in the Code Builder Workspace.
Important: Any sample files you intend to include in your App must NOT be opened in Origin when you are creating the OPX file or they will not be included!
Then after the App is installed, Origin will look for the "Samples" folder and if it is found in the folder for the App, an entry entitled "Show Sample Folder" will be added to the context menu for the App icon. Selecting this entry will open the Samples folder in a Windows File Explorer window.
Calling Python Functions in Apps
Please refer to this page for the basic steps of making an app in Origin.
Starting from Origin 2021, Python function can be called directly from Origin C or from Labtalk Script.
To call Python function from Origin C code in the app, place the origin.py file in the app folder. Then call Python function using the syntax
Python.function_name(arg1, arg2...)
or to return multiple variables
Python.function_name(arg1, arg2..., & ret1, & ret2...)
where function_name is the name of the function defined in origin.py.
If Python function is called from Labtalk script in the app, place a .py file under the app folder. Then call Python function using the syntax
Python.LTwd$=%@ATestApp\;
Python.LTwf$=myfunc.py;
py.function_name(arg1, arg2...)
and to return multiple variables
Python.LTwd$=%@ATestApp\;
Python.LTwf$=myfunc.py;
(ret1, ret2...) = py.function_name(arg1, arg2...)
where myfunc is the .py file name and function_name is the name of the function defined in myfunc.py.
Install Python Packages During App Installation
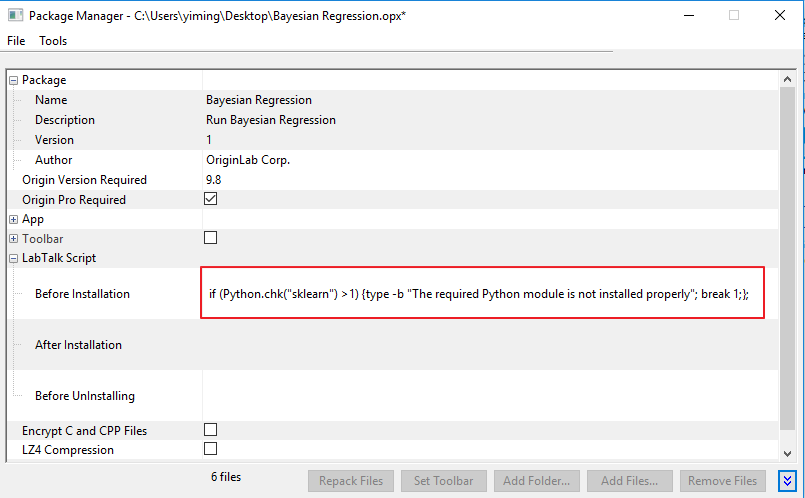
Considering there are cases Python module needs to be imported in the .py file, Origin App should have the ability to check and install necessary modules during its installation. This can be done in the OPX packaging dialog. Add a line of Labtalk Command in Labtalk Script: Before Installation entry so that before the app is installed, it checks and installs the specified module(s).
if (Python.chk("sklearn") >1) {type -b "The required Python module is not installed properly"; break 1;};
Checking for Installation of R
There is a LabTalk method for checking for the R package before App installation. Add the following to the Package Manager Labtalk Script: Before Installation section:
IsApplicationInstalled("R")=;
|