1.18.1.4.1 Simple Hello World DialogHello World DialogDialog Builder
Create Resource DLL in VC
Create by Origin Dialog AppWizardDialog, Resource DLL Created by Origin Dialog AppWizard
- Start Visual C++ 6.0, select File->New to open the New dialog. On the Projects tab, choose Origin Dialog AppWizard, set Project name to "ODialog", choose a Location and click OK.
- Choose a simple dialog, and click Next.
- Keep Origin C selected and click Finish, then click OK. The resource file with one simple dialog and the related source file and header file will be generated.
- Click menu Build->Set Active Configuration to choose Debug or Release.
- Choose menu Build->Builder ODialog.dll to create DLL.
- Go to the file location specified above. Copy the DLL file to outside the Debug or Release folder, to keep the path of the DLL file the same as that of the ODialog.cpp file.
- Open the ODialog.cpp file in Origin C Code Builder, compile, and run the DoMyDialog function to open the dialog.
Dialog, Resource DLL Created by Win32 Dynamic-Link LibraryCreate by Win32 Dynamic-Link Library
This section describes how to create a Resource-only DLL in Visual C++ 6.0.
- Start Visual C++ 6.0, select File->New to open the New dialog. On the Projects tab, choose Win32 Dynamic-Link Library as the project template, set the Project name as ODialog, choose a Location and click OK. In the dialog that appears, select a simple DLL project and click Finish.
- Select Project->Settings to open the Project Settings dialog. On the Resources tab, set the Resource file name, like ODialog.res, and select the Language according to your software settings as English (United States), and click OK.
- Select Insert->Resource to insert resources into the project. For a Dialog and controls on it, set dialog ID to IDD_OC_DIALOG.
- Choose File->Save As to save the Resource Script file as ODialog.rc. Choose Project->Add To Project->Files, then choose the ODialog.rc file to add it to the project.
- If the Language is not English, please do this step. In the Workspace view Resource tab, open the list tree, right click on IDD_OC_DIALOG, choose Properties, and then in the dialog choose Neutral for Language.
- Build the whole project with Debug or Release configuration. The resulting DLL file is generated under the Debug or Release subfolder.
Dialog, Resource DLL Created by Visual Studio 2008Create Resource-only DLL in Visual Studio 2008
This article describes in detail the general process of creating a Resource-only DLL in Visual Studio 2008. The following steps show how to build a Resource-only DLL with VS2008 that is accessible in Origin using Origin C.
- Start Microsoft Visual Studio 2008.
- Select File->New->Project to create a new project.
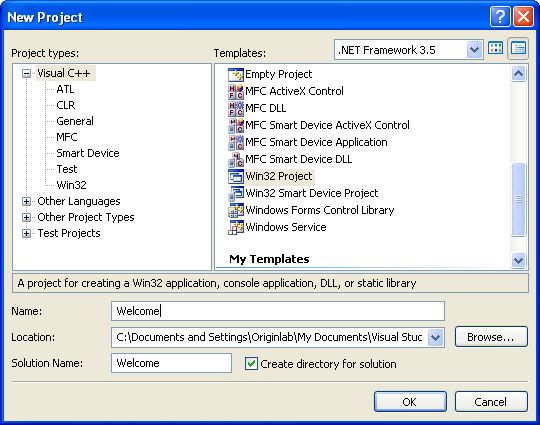
- In the New Project dialog, choose Visual C++ as the programming language and Win32 Project as the template, type in the project name as "Welcome", select its location, like in the following picture, and click OK.
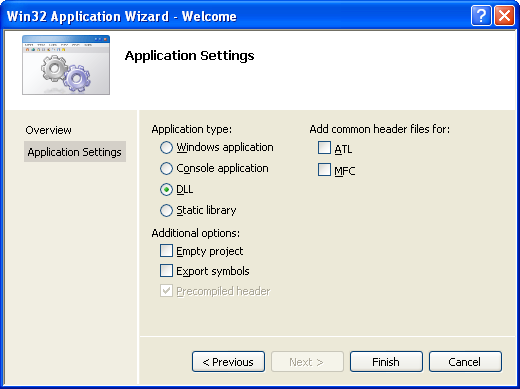
- In the Win32 Application Wizard dialog, set Application type as DLL and click Finish.
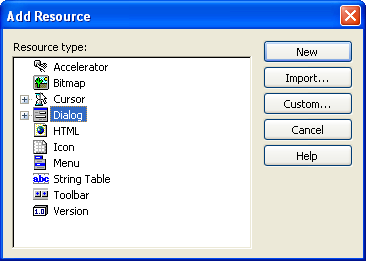
- Switch to the Resource View of the project, right click on the project name to add resources, choose a resource type and click New.
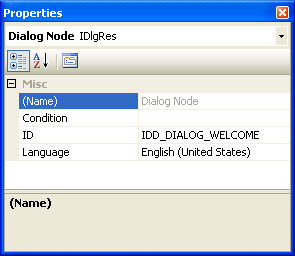
- Remember to set the Language property of the resource according to the environment in which your software will be installed; say English(United States) if your software is in English.
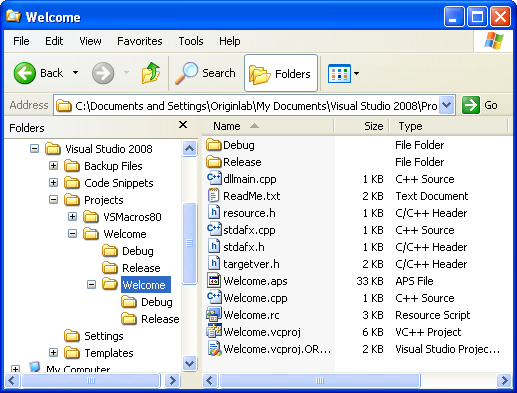
- Add more controls as required, configure the project as Debug or Release, and save the project. Then select Build>Build Solution or Rebuild Solution to build the project. You can now find a folder named "Debug" or "Release" generated under the solution folder, which contains the DLL. Files generated in this solution are as follows:
Use Resource DLL in Origin CDialog, Use Resource DLL in Origin CModal Dialog
This section describes how to use the Resource-only DLL created in the section above.
- Copy the DLL file to outside the Debug or Release folder, to keep the path of the DLL file the same as that of the resource.h file.
- Start Origin and open Code Builder.
- Create a new Origin C file named testODialog.c under the path of the DLL file. Add it to the current Workspace, and write testing code like the following. Run the OpenDlg function to open the dialog.
#include <Dialog.h>
#include <..\Originlab\Resource.h> //ODialog resource header

class MyDialog : public Dialog
{
public:
	// Construct dialog with dialog ID and DLL name.
	// "ODialog" is the DLL file name.
	// Not specify path, means the DLL file under the same path of this
	// Origin C file.
	// If the DLL located at other place, should provide the full path
	// of the DLL file.
	MyDialog() : Dialog(IDD_OC_DIALOG, "ODialog")
	{
	}

};

void OpenDlg()
{
	MyDialog odlg;
	odlg.DoModal();
}
|