3 Working with FilesWorking-With-Files
You can open the following types of files in the Code Builder MDI. Each of these file types can also be added to your
workspace. In addition, preprocessed source files of type *.OP can be added to the workspace (but not opened in Code
Builder).
- Source Files: Source files contain Origin C functions that, once compiled, can be called from Origin. Source files have either .c or .cpp extension.
- Header Files: Header files contain Origin C function prototypes and macro definitions. Header files have .h extension.
- LabTalk Script Files: LabTalk script files are text files containing sections of LabTalk script. LabTalk script files can be run from Origin. Additionally, LabTalk script files can call Origin C functions. LabTalk script files have an .ogs extension.
- OCZ Files: OCZ file (*.ocz) is encrypted Origin C source file which contains Origin C functions that, can be called from Origin once compiled. It generally works the same as common source files (*.c, *.cpp) but supports extra encryption protection.
- Text Files: Text files can be used to document programming notes. They can also be used for LabTalk script and initialization files. Text files have a .txt extension. There are two special types of text files:
- Configuration files can define LabTalk variables, macros, and functions, as well as new menu commands.Configuration files have a .cnf extension. If you create a new configuration file in Code Builder, the default extension will be .txt. After creating the file, you can change the extension to .cnf from Windows Explorer.
- Initialization files can preset a number of Origin options. (For an example, review the Origin.ini file located in your Origin folder.) Initialization files have a .ini extension. If you create a new initialization file in Code Builder, the default extension will be .txt. After creating the file, you can change the extension to .ini from Windows Explorer.
Creating a New File and Adding it to the Workspace
To create a new source, header, LabTalk script, encrypted source or text file, click the New button  on the Standard toolbar or select File:New... to open the New File dialog box. Then choose the file type on the top left panel, input a file name and click OK to create the file. on the Standard toolbar or select File:New... to open the New File dialog box. Then choose the file type on the top left panel, input a file name and click OK to create the file.
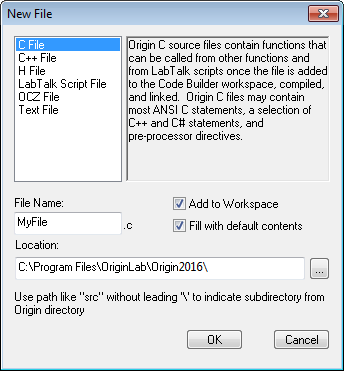
When creating a new source file, you have the option to add the file to your current workspace. You also have the option
to create the new source file with default contents.
- Only source files that have been added to the workspace can be compiled.
- If you select the Fill with Default Contents check box, the new source file is created with the following text:
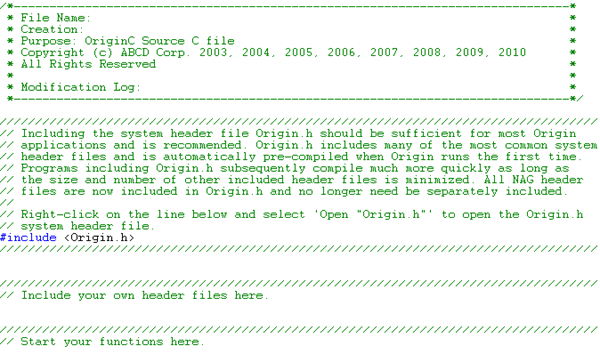
The Origin.h header file contains #include directives for many of the most commonly used Origin C system header files
including all the NAG header files. Origin.h is a precompiled header file and consequently loads and links quickly.
Including Origin.h is probably sufficient for most applications and is recommended. To be certain you are including the
necessary header files for the Origin C functions you plan to call, open the Origin C Language Reference section of this
help file and search for the function(s). For each function, the help topic lists the header file in which the function is
prototyped.
| Note: To open origin.h in the MDI, right-click on the line #include "origin.h" in the source file and then select Open "origin.h" from the shortcut menu. You can open any included header file using this procedure.
|
If you are creating a new header, LabTalk script, or text file, you do not have the option of automatically adding the file to the workspace. However, after the new file opens in the MDI, you can add the file to the workspace by selecting File:Add to Workspace.
When creating a new source, header or encrypted OCZ file, the default folder is the \OriginC subfolder. The default folder for a LabTalk
script or text file is the Origin folder. When creating your file, you can specify the default folder or a custom folder. This
choice is organizational as you can always specify a path when referencing these files in your code.
Customizing the Source File Template
When you create a new source file, the New File dialog box provides a Fill with Default Contents check box. If you select
this, the new source file includes starting comments and a #include directive for origin.h. The new source file is created
by the default.c template located in the \OriginC subfolder. You can open, edit and save this template file to customize
the default contents of new source files.
Encrypting the Source File
To encrypt a source file, you can either directly create an encrypted OCZ file or save an existing *.c or *.cpp file as encrypted *.ocz file type. The encrypted *.ocz files can be safely shared with others, other users simply need to drag and drop OCZ file into Origin to install.
To Create an Encrypted Source File
Click the New button on the Standard toolbar or select File:New... to open the New File dialog box. Select OCZ File and input a filename in File Name: edit box.
Input new password and confirm the password in appeared Password dialog box:
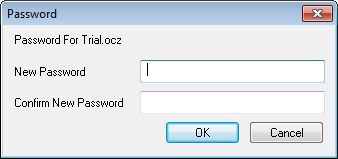
 | Users should always make a backup of their code before/after encryption since the encrypted file cannot be recovered once the password is forgotten.
|
If you open the encrypted OCZ file in a new Origin session, you will be asked to provide the password:
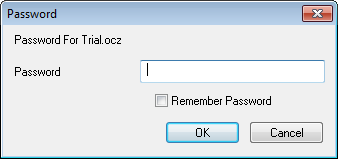
You can check Remember Password checkbox to remember the password for 30 days.
To Encrypt an Existing Source File
Select menu File: Save As Encrypted and input a file name to create an encrypted copy of your source code.
 | You can also save an opening encrypted OCZ file as not encrypted source file by menu File:Save As.
|
To Change the Password of Existing Encrypted File
To change the password of existing *.ocz file, open the file in Code Builder and then go to File: Save As... to open Save As dialog. Navigate to select original file and click Save button to replace it. In the appeared prompt, click Yes to close it so the Password dialog will open up to allow you setup a new password.
Opening an Existing File and Adding it to the Workspace
To open a source, header, LabTalk script, encrypted OCZ file or text file and add the file to the workspace:
either:
- Click the Open button
 on the Standard toolbar or select the File:Open menu item. on the Standard toolbar or select the File:Open menu item.
- Check the Add to Workspace checkbox at the bottom of the Open dialog box.
- Select your file.
- Click Open. If it is an encrypted OCZ file, you have to input password and click OK to open it.
or:
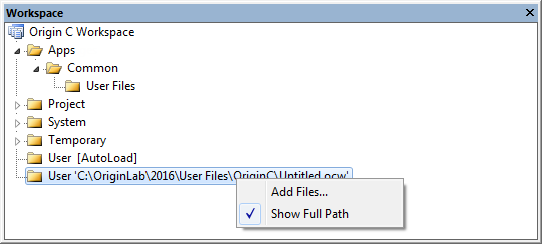
- Right-click on the Common or User Files subfolder under Apps, Project, System, User [AutoLoad] or User folder icons in the Workspace window and select Add Files from the shortcut menu.
- Check the Open Files checkbox at the bottom of the Add Files to Workspace dialog box to open the file in the MDI.
- Select your file.
- Click Open. If it is an encrypted OCZ file, and it's your first time open it in the current Origin session, you have to input password and click OK to open it.
Adding files to the workspace provides the following programming advantages:
- Files that are added to the workspace display as icons in the folders of the Workspace window. Thus you can easily locate files and display them in the MDI.
- Only source files that have been added to the workspace can be compiled.
- In addition to loading and building workspaces from Code Builder, Origin provides a method to programmatically load and build a workspace. If you have functions that are coded in separate source files, but the source files are part of the same workspace file, you can programmatically load and build the workspace file and call the functions.
Opening an Existing File without Adding it to the Workspace
To open an existing source, header, LabTalk script, encrypted OCZ file or text file without adding it to the workspace:
- Click the Open button on the Standard toolbar or select File:Open.
- Clear the Add to Workspace check box at the bottom of the Open dialog box.
- Select your file and click Open. If it is an encrypted OCZ file, you have to input password and click OK to open it.
You can also right-click on a #include preprocessor directive line in a source file opened in the MDI and select Open "FileName" from the shortcut menu. For example, to open Origin.h in the MDI, right-click on the line #include <Origin.h> in the source file and then select Open "Origin.h" from the shortcut menu.
| Note: Only source files that have been added to the workspace can be compiled.
|
Adding Open Files to the Workspace
To add a file that is already open in the MDI to the Code Builder workspace:
- Make the file active in the MDI. (You can CTRL+TAB through the open files, select the file from the Window menu, or click on the file in the MDI.)
- Once the file is active, select the File:Add to Workspace menu item or simultaneously press the CTRL+W keyboard keys.
Specifying Workspace Files as Packages Project System Temporary User[AutoLoad] or User Files
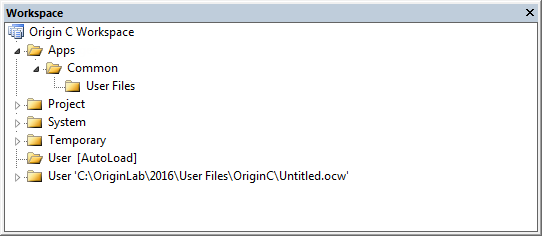
Files added to the Code Builder workspace can be specified as Apps, Project, System, Temporary, User [AutoLoad] or User files by moving them into their correspondingly named workspace folders. Each of the six predefined folders contain files added to the workspace by different means. Files in all six folders can be moved by dragging them into any other folder, however, files can not be dragged into the Temporary folder. Files can also be removed from the workspace by right-clicking on them in the tree and then selecting Remove from the shortcut menu.
Files added to the Apps folder are usually managed in its sub-package folders so that the main Apps folder only contains folders. Apps folder is used to manage the *.opx packages and each of its sub-folders represents a disk folder in User Files Folder. A special folder named 'Common is used for holding files that are shared between all packages. Each package folder contains a sub-folder named User Files, which contains files that are in the User Files Folder.
Files added to the Project folder are automatically included inside the open Origin project file and are built whenever the Origin project file containing them is opened by Origin. Source files in the Project folder are always available to be executed as long as the Origin project file containing them is opened. Files in the Project folder remain in the Project folder until a new Origin project file (*.OPJ) is opened. Files in the Project folder stay remained even when a new Code Builder workspace is created or opened.
Files added to the System folder are automatically re-added to the workspace as system files when Origin or Code Builder starts and each time a new workspace is created or an existing workspace file is opened. Source files in the System folder are always included in the workspace and Origin C functions in system files are always available to be executed once the workspace has been built.
Files added to the Temporary folder are removed from the workspace when you close Origin or Code Builder and when you open a new or existing workspace file. Files can not be dragged or moved into the Temporary folder using the Code Builder interface; Files can only be added to the Temporary folder by calling the LabTalk method run.LoadOC or the Origin C method Project.FindFunction which dynamically add them to the workspace.
Files added to User [AutoLoad] folder is similar to the User folder described below, except that the files in User [AutoLoad] folder will be compiled and linked automatically upon starting Origin, and then the functions defined in the files under this folder are available, and there is no need to compile and link manually.
Files added to the workspace using the Code Builder interface are always added to the User folder. When a newly created source file is added to the Code Builder workspace, when an existing source file is opened and added to the workspace,and when an opened file is added to the workspace, the file is automatically added to the User folder. Files can only be manually removed from the User folder by dragging them into the System or Project folders or by right-clicking on them and selecting Remove from the shortcut menu.
For more information on the Apps, Project, System, Temporary, User [AutoLoad] or User workspace folders, see Navigating in the Workspace Using the Workspace Tree. For more information on when and how files in the Code Builder workspace are built, see Four Methods
of Building the Code Builder Workspace.
| From Origin2025, Code Builder support undo and redo when drag file(s) between Workspace Folders.
|
Locating Files that Contain a Specified Character String
To find files that contain a specified character string, select Edit:Find in Files or click the Find in Files button  on the Standard toolbar. on the Standard toolbar.
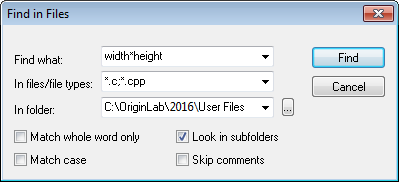
Type the desired search string in the Find What combo box. Code Builder retains your search string for future use. To
access previous search strings, click the down arrow to open the Find What combo box.
- To limit your search to instances of the string that are whole words, select the Match Whole Word Only. A whole word is a string that is surrounded by white space or punctuation, unless the string occurs at the start or end of a line. If Match Whole Word Only is cleared, the search finds all matches of the string.
- To perform a case sensitive search, select Match Case.
- To include subfolders in your search, select Look in Subfolders.
- To omit comments from the search, select Skip Comments.
After you click Find, the search results are output to the Output window. If occurrences of the string were found, you can
double-click on the line in the Output window to open the file. The line containing the search string will be marked.
Navigating in Files Using the Workspace Tree
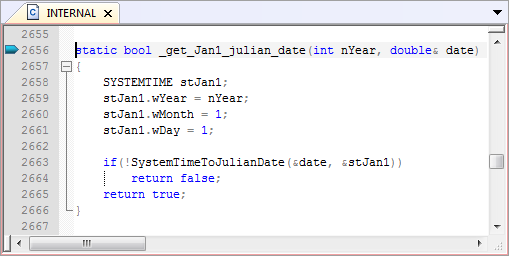
After you compile the functions in a source file, you can display the function definitions, function declarations, classes,structures, and type definitions encountered during compilation in the workspace tree. To activate this display, right-click on a source file’s icon in the workspace window (use CTRL or SHIFT for multiple selection) and select Show:Type from the shortcut menu.
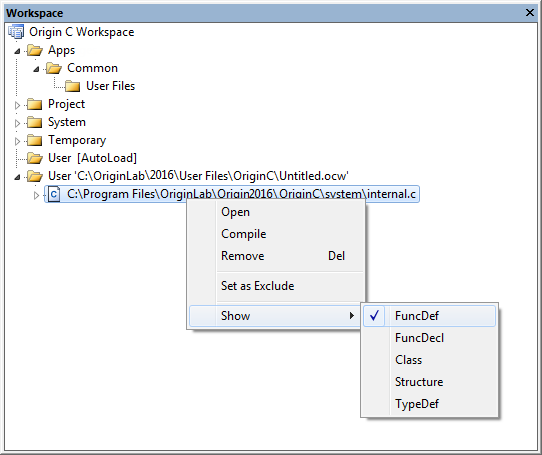
You can then expand the tree node on the workspace for the function definition, function declaration, class, structure, or type definition to open the source file.
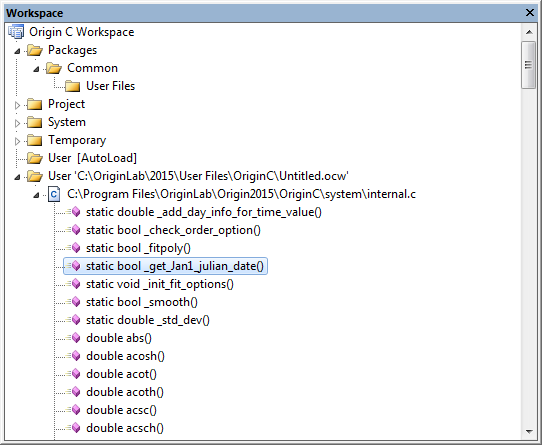
The source file is opened in the MDI and the cursor is positioned at the associated line of code.
Activating Files in the MDI from the Workspace Window
Files that have been added to the workspace have associated icons in the Workspace window. To open a file in the MDI, double-click on the associated icon in the workspace tree or right-click and select Open from the shortcut menu.
| Note: The MDI is Code Builder's interface for viewing and editing source, header, LabTalk script, and text files. Files can be viewed in the MDI whether or not they are part of the workspace. Similarly, you can close a file in the MDI and its workspace status is not affected.
|
Removing Files from the Workspace
To remove a file from the workspace, select the source file icon in the workspace window (use CTRL or SHIFT for multiple selection) and press DEL or right-click and select Remove from the shortcut menu.
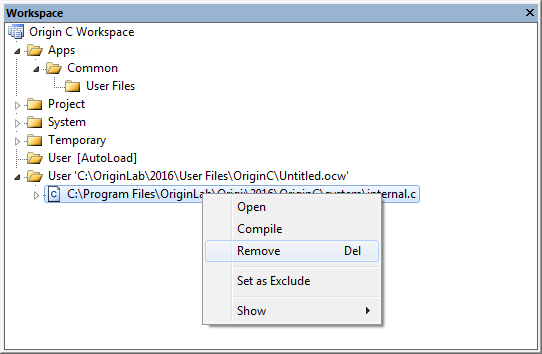
| Note: When you remove a file from the workspace, the file still exists (for example, the .C source file).
|
| From Origin2025, Code Builder support undo and redo when remove (delete) file(s) from workspace.
|
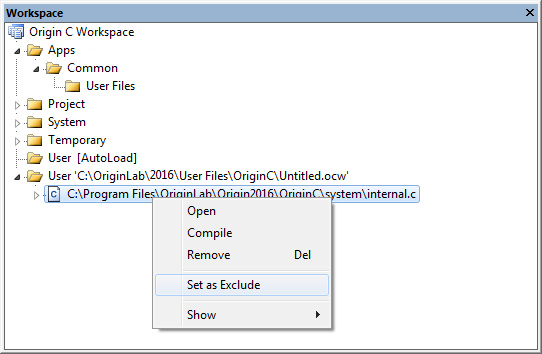
Excluding Files from the Workspace
To keep a file part of the workspace but to exclude it from the build process, select the source file icon in the workspace window (use CTRL or SHIFT for multiple selection) and then right-click and select Set as Exclude from the shortcut menu.
|