1.4.2 Compiling, Linking and Loading
Before you can access your Origin C functions, you will need to compile and link them (a process known as building) using Code Builder.
Once your functions compile and link without error, they are loaded automatically, and you will be able to access them from the current Origin session. To access your functions in future sessions of Origin you will need to ensure that they are reloaded and linked; a process that is fast and can be automated.
This chapter covers the manual and automated build process for Origin C source files and preprocessed files.
Compiling and LinkingCompile and Link Source Files
In order to make the functions defined in an Origin C source file or preprocessed file executable for the first time, the following steps are necessary:
- Add the file to the Code Builder workspace
- Compile the file
- Link the file to all dependents, compiling dependents where necessary, and load the object files that are created.
The act of compiling and linking all the files is referred to as building.
Add the File to the WorkspaceWorkspace, Load Files
Before a source file or preprocessed file can be compiled and linked, the file must be added to one of the Code Builder workspace folders: Project, User, System, or Temporary. Note that all source files are initially created or loaded into the User folder.
Compile the File
After adding the file to the workspace, it needs to be compiled (by clicking the Compile  button) to generate the object file, which will have the same name as the source/preprocessed file, but with the OCB file extension. In Origin versions 8.1 and later, the object file will be saved in the Application Data folder. In older versions the file was saved to the User Files\OCTemp folder. button) to generate the object file, which will have the same name as the source/preprocessed file, but with the OCB file extension. In Origin versions 8.1 and later, the object file will be saved in the Application Data folder. In older versions the file was saved to the User Files\OCTemp folder.
Build the Workspace
To build the active file and all its dependents, select the Build  button, or select the Rebuild All button, or select the Rebuild All  button to build all files in the workspace. The object file that is created will be automatically loaded into memory and linked so that the functions defined in the file are executable within Origin. button to build all files in the workspace. The object file that is created will be automatically loaded into memory and linked so that the functions defined in the file are executable within Origin.
Once the object file is generated, subsequent build processes will be much faster. If there are no changes to the built source/preprocessed file, Code Builder will load and link the object file directly, but not rebuild the file.
Build vs. Build All
Build: All of the files in a given folder are compiled and linked when that folder is the active window in the Code Builder (or a dependent of the active window) and the Build toolbar button  is clicked. is clicked.
Build All: files in all Code Builder folders are compiled and linked when the Code Builder Rebuild All toolbar button  is clicked. is clicked.
Automated Building
Initially, all Origin C source or preprocessed files are created or opened in the User folder, and the discussion above gives details for manually building Origin C source files. Many times, however, it is advantageous to automate the build process. This can be done by making use of Code Builder's folder structure, each with slightly different functionality, or by utilizing the Build on Startup option:
Add files to the Project FolderBuilding Origin C File with Project
When you add files to Code Builder's Project folder, they will be built automatically each time the associated Origin project is opened.
You can add files to the Project folder using the following methods:
- Right-click on the Project folder and choose Add files.
- Drag a file from another Workspace folder and drop it on the Project folder.
Add files to the User [AutoLoad] FolderBuilding Origin C Files under Workspace System Folder
Formerly, you could right-click on the System folder in Code Builder and Add Files. Since Origin 2015, you are prevented from adding user files to this folder. When you want your files to be compiled and linked automatically on Origin startup, you should add these files to the User [Autoload] folder.
You can add files to the User [AutoLoad] folder using the following methods:
- Right-click on the User [AutoLoad] folder (in Code Builder) and choose Add files.
- Drag a file from another Workspace folder and drop it on the User [AutoLoad] folder.
- Using the run.LoadOC() object.
Note: When you add files to the User [AutoLoad] folder, a section called [OriginCAuto] is added to the Origin.ini file in your User Files Folder. To simultaneously remove files from User [AutoLoad] and remove the added [OriginCAuto] from your Origin.ini, run this LabTalk command:
run -cra // does not affect System folder files
|
Build Workspace on Origin StartupBuilding on Startup
The Build on Startup option will build the most recently opened Code Builder workspace upon Origin startup.
When Origin starts it will examine the contents of the Origin C Workspace System folder and if it finds any changed files then it will try to compile and link them. You also can have this procedure done to the files in the User folder by enabling the Build on Startup option.
- Run Code Builder
- If the Workspace view is not visible then choose Workspace on the View menu.
- Right-click on Origin C Workspace.
- If the Build on Startup item is not checked then click it.
The next time you start Origin it will check the files in the User folder and try to compile and link any changed files.
Build Individual Source File on Origin Startup
The following steps show how to modify the Origin.ini to load and compile Origin C source files on startup.
- Make sure Origin is not running. Open the Origin.ini file in your User Files Folder(type "%Y="<Enter> in the Script or Command window to locate your User File Folder).
- In the [Config] section, uncomment (remove the leading ";") in the line under the [Config] section, so that it is as below:
Ogs1 = OEvents
; Ogs2 = OEvents
; Origin can trigger multiple system events
; Uncomment this line and implement event handlers in OEvents.ogs
Save and close this file.
- Open OEvents.ogs under the Origin installation folder. Find the [AfterCompileSystem] section and add the following line as a new line
run.LoadOC(Originlab\AscImpOptions, 16); Save OEvents.ogs to your User Files Folder (same location as the Origin.ini file that you edited) and close your editor.
- Restart Origin and open Code Builder. In the Temporary folder, there are 3 files. AscImpOptions depends on fu_utils.c and Import_utils.c, so the compiler compiles AscImp, along with the two files. For more details please search run.LoadOC in your Labtalk documentation.
Alternately, use the User [AutoLoad] folder in your Workspace. Files added in the folder will be automatically loaded on Origin startup (see above).
Building by ScriptBuilding with Dependent Files
Origin C source file must be compiled and linked before calling its functions in LabTalk script. If you don't want to add the source file into Code Builder do compile and linke, use the LabTalk command Run.LoadOC to compile and link it. For example:
- Choose File->New Workspace... to create a new workspace. The Temporary folder should be empty now.
- Run the following script in the Command Window... the dragNdrop.c file together with its dependent files all are loaded into the Temporary folder and compiled.
if(run.LoadOC(OriginLab\dragNdrop.c, 16) != 0)
{
        type "Failed to load dragNdrop.c!";
        return 0;
}
Identifying ErrorsBuilding, Handle Compiling and Linking Error
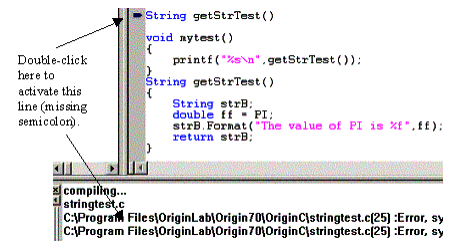
When you compile and link source files in Code Builder, the compiling and linking results are displayed in the Code Builder Output window.
If the compiling and linking was successful, the Output window lists the source files that were compiled. The Done! line indicates success.
If errors were encountered during the compiling and linking process, the Output window lists the file name, line number, and the error encountered. You can double-click on the error line in the Output window to activate the source file and position the cursor on the line of code containing the error.
|