1.1.5 Creating Image GetN DialogGetN, Image Dialog
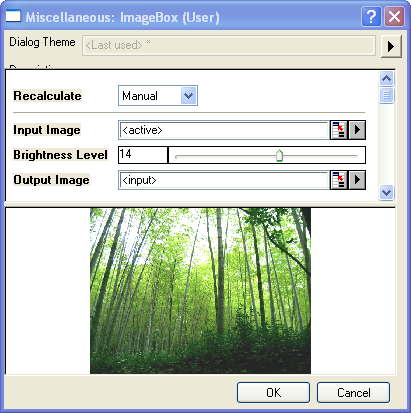
This section shows how to create an X-Function GetN dialog with a matrix image data preview as in the following dialog, including how to initialize an image preview and dialog controls, and how to update the image preview or dialog controls on any control change in the dialog performed by the user.
Create an Empty GetN Image Preview Dialog
- Press F10 to Open X-Function Builder.
- Type "ImageBox" into the X-Function EditBox for X-Function name.
- Add more variables by right-clicking on the Variables list and choosing "Add variable". Change the variable names, labels, and other values to match the settings in the dialog below.
- Click the Tree View button
 on X-Function Builder, open the branch Usage Context -> Menu, set Auto GetN Dialog to GetNImageBox, then click the Save button to save this X-Function. on X-Function Builder, open the branch Usage Context -> Menu, set Auto GetN Dialog to GetNImageBox, then click the Save button to save this X-Function.
- Close X-Function Builder, open a new matrix window, choose menu File -> Import -> Image, select an image file, and click Open to import the image into a matrix window.
- Keep the matrix window active, and run "ImageBox -d" in the Command window. An image preview GetN dialog will show.
X-Function, Coding in Code BuilderCoding X-Function in Code Builder
- Open Origin Code Builder, in the menu choose File -> Open, locate the X-Function saved above, make sure the Add to Workspace check box is checked in the Open dialog, and click OK. ImageBox.XFC is added to the User folder in Origin C Workspace view and shows the function body in Edit view.
- Add the additional header file after the line //put additional include files here as in the following.
//put additional include files here
#include <image_utils.h>
#include <..\Originlab\matdata_utils.h>
- Add a static function, like the following, under the line //put your own support static functions here.
//put your own support static functions here
static bool _adjust_image_brightness_ex(BITMAPHANDLE* pPreviewBitmap, TreeNode&
trGetN, bool& bOKEnable, string& strErrMsg)
{
	int nRet = adjust_image_brightness(pPreviewBitmap, trGetN.level.nVal);

	if( SUCCESS != nRet)
	{
		bOKEnable = false; // disable OK button if adjust image failed
		strErrMsg = "Fail to adjust image brightness"; // error message string
		return false;
	}
	return true;
}
X-Function, Image Dialog Init Event FunctionGetNImageBox_OnInit Event Function
This event function is called when the GetN image preview dialog is open. It can be used to initialize an image preview, initialize dialog controls and enable/disable the OK button. For this example, add the following code into the GetNImageBox_OnInit function to adjust the image brightness according to the value of the Level control.
// Get bitmap handle pointer from image preview control
pBITMAPHANDLE pPreviewBitmap = pimgCntrl->GetBitmapHandlePtr();

// call internal function to adjust image
_adjust_image_brightness_ex(pPreviewBitmap, trGetN, bOKEnable, strErrMsg);
X-Function, Image Dialog OnChange Event FunctionGetNImageBox_OnChange Event Function
This event function is called whenever any controls in the grid are modified by the user. It can be used to update the image preview on a dialog control change, update a dialog control on another control change, or update the OK button's enable/disable status. Add the following code into the GetNImageBox_OnChange function.
// call internal function to adjust image, return true to update image preview.
bUpdatePreview = _adjust_image_brightness_ex(pPreviewBitmap, trGetN,
                 bOKEnable, strErrMsg);
Main Function
The main function has the same name as its corresponding X-Function. Add the following code into the main function and click the Compile button.
// Copy bitmap handle pointer from the input image to the output image
bool bCopy = true;
oimg.SetLBmp(iimg.GetLBmp(), bCopy);

// Get bitmap handle pointer from the output image
pBITMAPHANDLE phBmp = oimg.GetLBmp();

// adjust
adjust_image_brightness(phBmp, level);
Using X-Function X-Function, Execution
- Run "ImageBox -d" in the Command window to open this X-Function dialog. Change the value of the Level control, and the brightness of the image preview will be changed.
- Click the
 button to open the theme context menu, choose Save As, type "mylevel" into the Theme Name box, then click OK to save the theme file. Click Cancel to close the X-Function dialog. button to open the theme context menu, choose Save As, type "mylevel" into the Theme Name box, then click OK to save the theme file. Click Cancel to close the X-Function dialog.
- Run "ImageBox -d -t mylevel" in the Command window to open the X-Function dialog with the specified theme.
|