9.3.1 Import Data from a DatabaseImpData-from-DB
Summary
 | The database used in this tutorial has been set up on Microsoft Azure.
|
This tutorial shows how to build the connection to a SQL server and extract desired data from specified tables using Origin's SQL Editor, define LabTalk variable in SQL script for easy modification, and save connect or connection & query for future use.
The procedure is based on Origin 2023b.
What you will learn
This tutorial will show you how to:
- Import data from database.
- Reimport data.
- LabTalk support in the SQL Editor.
Steps
Import data using SQL Editor
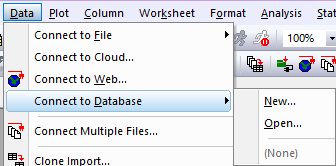
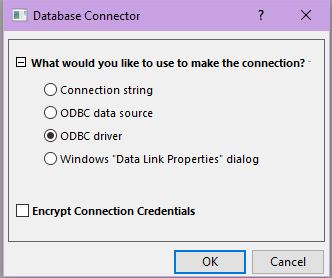
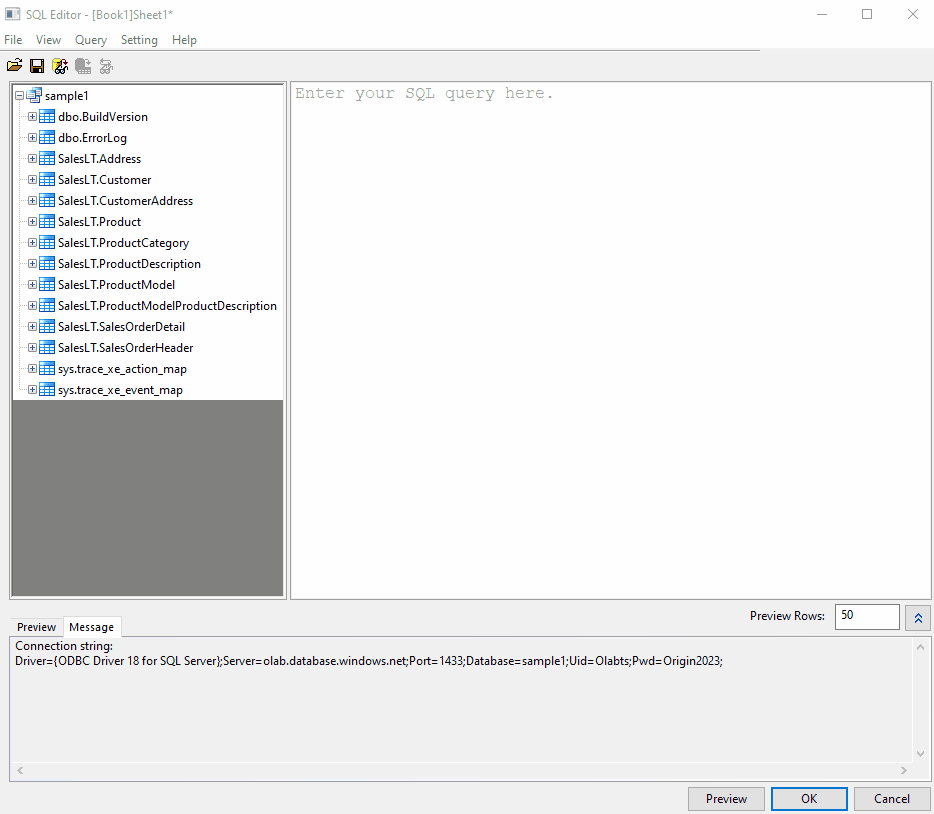
- Start a new worksheet. Select from menu Data: Connect to Database: New.... In the Database Connector dialog, select ODBC driver and click OK.
- Create the connection to a sample database. Specify the server information, including the log-in user name and password with the settings below:
Server Driver=ODBC Driver 18 FOR SQL Server;
Server=olab.DATABASE.windows.net;
Port=1433;
USER Name=Olabts;
Password=Origin@2024;
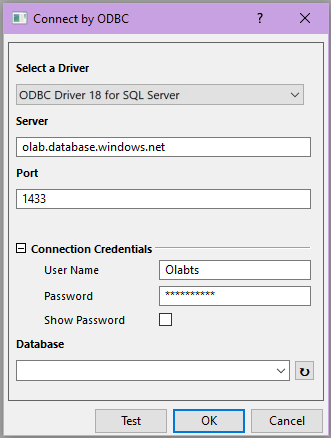
Click the Test button to make sure the connection is successful.
| If it fails to connect to the database, go to this page to download and install the latest ODBC SQL driver.
|
- Click the
 button to the right of the Database entry and make sure database sample1 shows. button to the right of the Database entry and make sure database sample1 shows.
Click the OK button to open the SQL Editor dialog.
- All tables in the database are listed in the left panel.
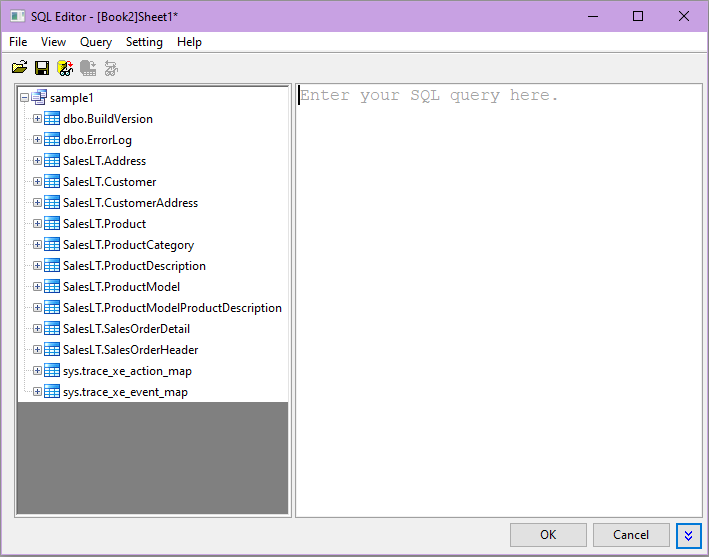
Select menu File: Show Connection String, the connection string will show at the Message panel below. Alternatively, you can use this connection string in step 2 to create the connection.
Driver={ODBC Driver 18 FOR SQL Server};Server=olab.DATABASE.windows.net;Port=1433;DATABASE=sample1;Uid=olabts;Pwd=Origin@2024;
- Select File: Save Connection As... to save the data source file as MyDataSource.ods.
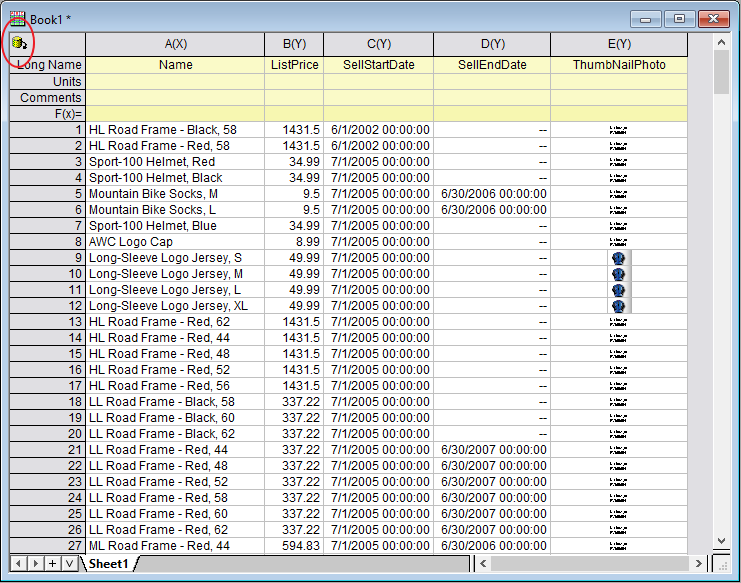
- Now we are going to extract data from the Product table to construct the product list. You can write SQL script from scratch. Double click node on left panel will help you add the table and field name in the editor. Create the query following the video below or copy the following SQL script in the right panel.
SELECT Name ,ListPrice ,SellStartDate ,SellEndDate ,ThumbNailPhoto FROM SalesLT.Product
- Click the Preview the result data button
 to preview the data. Select File: Save Connection and Query As... from menu to save the connection and query as MyQuery.odq. In the future, you can load the connection settings and the query script from menu Data: Connect to database: MyQuery.odq. to preview the data. Select File: Save Connection and Query As... from menu to save the connection and query as MyQuery.odq. In the future, you can load the connection settings and the query script from menu Data: Connect to database: MyQuery.odq. .
- Click the OK button to import the data. Once imported, the worksheet is connected to the database, and a yellow icon will appear at the top-left of the worksheet.
Reimport from Database
After the data is imported, the connection and the query are automatically saved in the data connector. You can click the Database Connector  and select Import to import the data from the database again. Try the following steps. and select Import to import the data from the database again. Try the following steps.
- Click , and select Unlock Imported Data.
- Delete or make change to some data in the worksheet.
- Click and select Import. The data should be back.
- To modify the query, with the worksheet active, click and choose SQL Editor.
- To setup a new SQL Query for same database, do one of the following
- Duplicate the workbook (Window: Duplicate menu). In new book, click and choose SQL Editor to edit the query.
- Start a new workbook. Choose Data: Connect to DataBase menu. All saved and ODS and ODQ files are listed here.
- Choose MyQuery.ODQ. The DataBase Editor dialog will open with the saved SQL query. Click OK button to import.
 | By default, the imported data are not saved with the project (OPJU file) since big database can make OPJU file huge. If you do want to save the data with the project, click and uncheck Exclude Imported When Saving. Then save the project.
|
LabTalk Support in SQL Editor
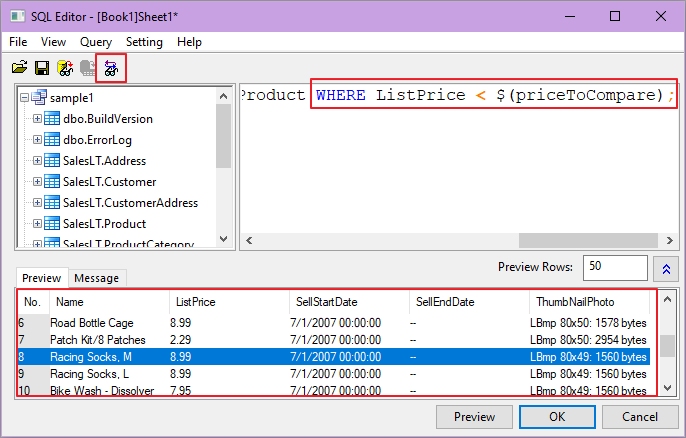
Now let's make changes to the SQL query to only retrieve the products with a unit price of less than $10. This section will show you how to define a Labtalk numeric variable of the price in the condition so it's easier to change the query in the future.
- Click and choose SQL Editor
- To add a Labtalk numeric variable, select Query: LabTalk... to open the LabTalk Support Setting dialog.
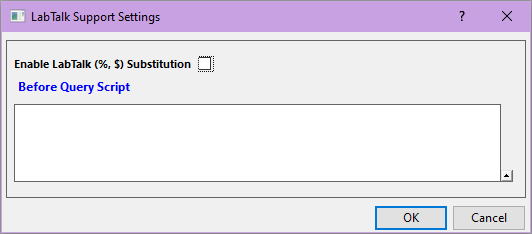
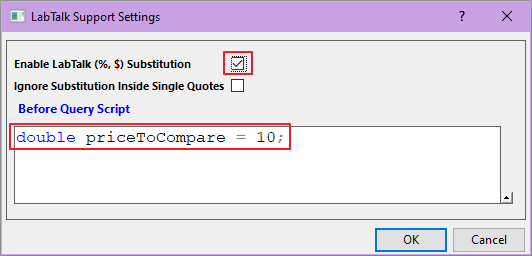
- Check the Enable LabTalk (%,$) substitution checkbox.
- Type the script below to define a LabTalk numeric variable priceToCompare.
double priceToCompare = 10; in the Before Query Script box. Click OK.
- At the end of SQL Script on the right panel, add
WHERE ListPrice < $(priceToCompare)
- Click the
 button to preview the SQL query string with LabTalk variable substituted in the SQL Editor box. button to preview the SQL query string with LabTalk variable substituted in the SQL Editor box.
- Click OK to import these data.
- From now on, you only need to change the priceToCompare value in LabTalk Support Settings dialog. No need to change the SQL Query.
|