11.3.1 Command Window and X-FunctionsCommand-Window
Summary
Many of Origin's analysis tools and other data processing tools have been implemented using X-Functions. The Command Window provides a convenient way to run these functions.
Another important use for the Command Window is to send LabTalk script commands to Origin. Script commands can range from simple math and data operations, to user-created X-Functions or Origin C functions.
Minimum Origin Version Required: Origin 8.0 SR6
What you will learn
This tutorial will introduce you to the Command Window and show you how to:
- Perform simple calculation
- Access worksheet cells/columns
- Access X-Functions
Command Window
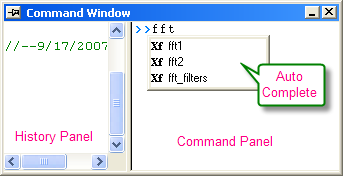
The Command Window consists of two panels: the Command Panel and History Panel:
The Command Window is normally located at the bottom right corner of the screen, but if it is not visible, you can access it by pressing Alt+3 or by selecting View: Command Window.
When typing in the Command Panel, the Auto Complete support allows you to choose among X-Function script commands and OGS files in the current working folder. The command and OGS file name will be respectively preceded by Xf and LT. You can move up and down the list using the arrow keys; pressing Enter selects the item. After your selection, press the space bar and the Auto Complete now shows you the available options for the command.
Examples
Perform Calculations
The Command Window can be used as a calculator or to access any of Origin's mathematical functions. See the examples below.
Single Line
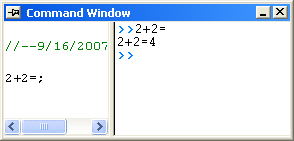
One of the more basic uses for the Command Window is as an interface to perform simple calculations. For example, type the following:
2+2=
Press ENTER. Origin returns
2+2=4
Multiple Lines
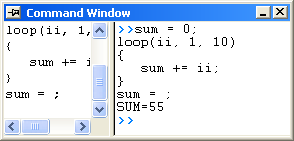
If you are typing multiple lines of scripts, first edit it in Code Builder (View:Code Builder) or any text editor, such as Windows Notepad, ending each line with a semi-colon, and then Copy + Paste the script in the Command Window, and press ENTER to execute. For example, paste the following script in the Command Window and ENTER:
sum = 0;
loop(ii, 1, 10)
{
   sum += ii;
}
sum = ;
Origin returns:
SUM=55
Functions
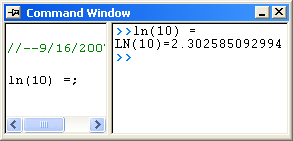
Any mathematical function, built-in as well as user-created, can be executed from the Command Window. For example, type:
ln(10) =
Origin returns natural logarithm value of 10.
Access Worksheet Values
You can also use the Script Window to read and write worksheet values, or to perform math operations on datasets.
- Enter the following data into a fresh worksheet:
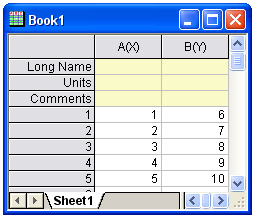
- To return the value in the first cell of the second column, type the following:
cell(1,2)=
- Press ENTER. Origin returns:
CELL(1,2)=6
You can also use the column name and row number to reference cell values.
- Type the following:
col(B)[1]=
- Press ENTER. Origin returns:
COL(B)[1]=6
| Notes: In addition to using the column name, you can also use the dataset name. In LabTalk, the syntax for naming datasets is worksheetName_columnName. So, For example, Book1_A[1]= would return the first element of column A in worksheet Data1. Also, if the worksheet that you are referencing is the active window, you can use the LabTalk string variable %H, in place of the worksheet name. For example, %H_A[1].
|
To subtract the value in row 1 of column A, from all the values in column B…
- Type the following:
col(B)=col(B)-col(A)[1]
- Press ENTER. Your worksheet now reads:

Let's use what we have learned about executing multiple lines of script in the Script window. We will multiply every value in a column of data by some constant b.
- Type the following:
b=3;
- Press CTRL+ENTER. Recall that this gives us a carriage return without executing the command.
- Now type:
col(A)=col(A)*b;
- Again, Press CTRL+ENTER.
- Choose Edit from the Script window's menu bar. Script Execution should have a check mark next to it; if not, single-click on the menu item to place a check mark there.
- Now, select the two lines of script that you just entered into the Script window and press ENTER.
Your worksheet now reads:

| Notes: The following C notation is also supported:
b=3;
col(A)*=b;
|
You can also use linear interpolation or extrapolation on a specified X dataset to find the corresponding interpolated or extrapolated value in a Y dataset. This requires using a new notation with parentheses ( ) instead of brackets [ ].
In this example, book1_b is a Y dataset and (4) is a value in an X dataset (book1_a) for which you want to find a corresponding, interpolated Y value.
- Type the following:
book1_b(4) =
- Press ENTER. Origin returns:
BOOK1_B(4)=5.333333
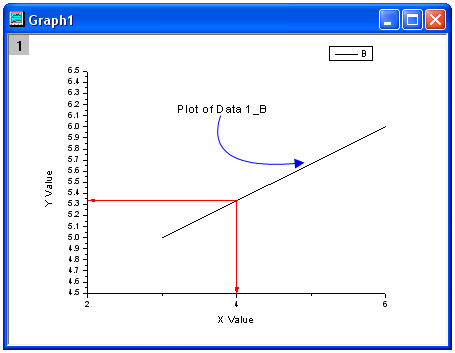
This is a line plot of our simple worksheet data. You can see that our interpolated Y value – the one corresponding to X = 4 – is 5.333333.
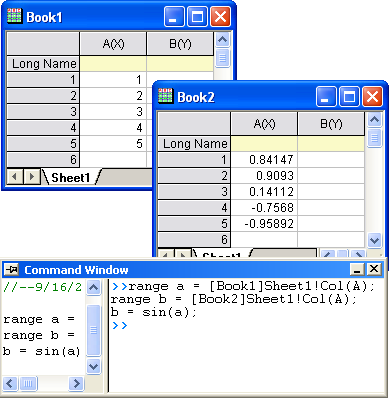
- If the columns you work with are in different worksheet/workbook, you should use the range variables to represent the worksheet columns. For example, this script calculates the sine value on Book1 column A, and puts the result in Book2 column A (You must have Book2 before hitting Enter):
range a = [Book1]Sheet1!Col(A);
range b = [Book2]Sheet1!Col(A);
b = sin(a);
Access X-Functions
Origin 8 provides a large collection of X-Functions for performing a wide variety of data processing tasks. Of this collection, many of the X-Functions are accessible from LabTalk script. The functions accessible from script provide a powerful environment for users to create custom script code for their routine tasks.
X-Functions that are accessible from script can be listed in the Command Window, and you can also obtain help on the command syntax as well as make use of auto completion of commands for such functions.
X-Functions accept data range string or range variable for specifying source and destination data for the operation. For example, the smooth X-Function under signal processing can be accessed from the Command Window as follows:
- Import the file \Samples\Signal Processing\Signal with Shot Noise.dat.
- In the Command Window, type the following:
smooth iy:=Col(2) method:=1 npts:=200 When you press ENTER, the result will append to the source worksheet.
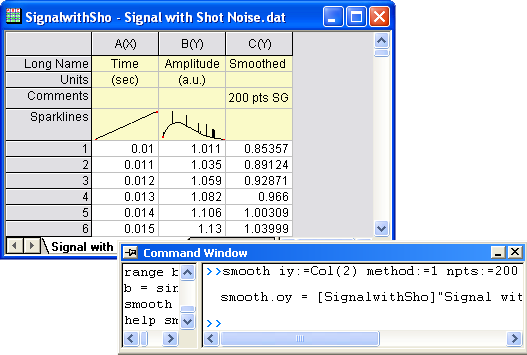
- For help in using this smooth X-Function, you can type
help smooth to open the corresponding Help.
|