2.5.1.15 From a Toolbar ButtonFrom-a-Toolbar-Button
Run Script from Toolbar Buttonsscript, from a toolbar button
LabTalk script files can also be run from buttons on the Origin toolbar. In Getting Started with LabTalk chapter, we have introduced how to run Custom Routine from a toolbar button, here we will introduce more details. Three files enable this to happen:
- A bitmap file that defines the appearance of the button. Use one of the set of buttons provided in Origin or create your own.
- A LabTalk script file that will be executed when the user clicks the button.
- An INI file that stores information about the button or button group. Origin creates the INI file for you, when you follow the procedure below.
We will assume for now that you have a bitmap image file (BMP) that will define the button itself (if you are interested in creating one, example steps are given below).
First, use CodeBuilder (select  on the Origin Standard Toolbar to open) or other text editor, to develop your LabTalk script (OGS) file. Save the file with the OGS extension. You may divide a single script file into several sections, and associate each section with a different toolbar button. on the Origin Standard Toolbar to open) or other text editor, to develop your LabTalk script (OGS) file. Save the file with the OGS extension. You may divide a single script file into several sections, and associate each section with a different toolbar button.
Putting a Button on an Origin Toolbar
To put the button on an Origin toolbar, use this procedure:
- In Origin, select View:Toolbars to open the Customize Toolbar dialog.
- Make the Button Groups Tab active.
- Click the New button in the Button Group to open the Create Button Group dialog.
- Enter a new Group Name.
- Enter the Number of Buttons for this new Group.
- Click the Browse button to locate your bitmap file. This file should be in your User directory.
- Click OK.
- The Save As dialog will open. Enter the same name as that of your bitmap file. Click OK to save the INI file. You will now see that your group has been added to the Groups list and your button(s) is now visible.
When creating a custom button group for export to an OPX file, consider saving your button group's initialization file, bitmap file(s), script file(s), and any other support files to a user-created subfolder in your User Files folder. When another Origin user installs your OPX file, your custom subfolder will automatically be created in the user's User Files folder, and this subfolder will contain the files for the custom button group. This allows you to keep your custom files separate from other Origin files.
Match the Button with a LabTalk Script (OGS) File
- Click on the button to select it.
- Click the Settings button, to open the Button Settings dialog.
- Click the Browse button to locate your OGS file.
- Enter the Section Name of the OGS file and any arguments in the Argument List.
- Enter something descriptive in the Tool Tip Text text box.
- Enter a status bar message in the Status Bar text box.
- Click OK.
- Repeat these steps for each of the buttons in your Button Group.
- Drag the first button out onto your Origin workspace. A toolbar is created. You can now drag all other buttons onto this toolbar.
Custom Buttons Available in Origin
The following dialog can be accessed from the View: Toolbars menu option in Origin. On the Button Groups tab, scroll down to select the User Defined group:
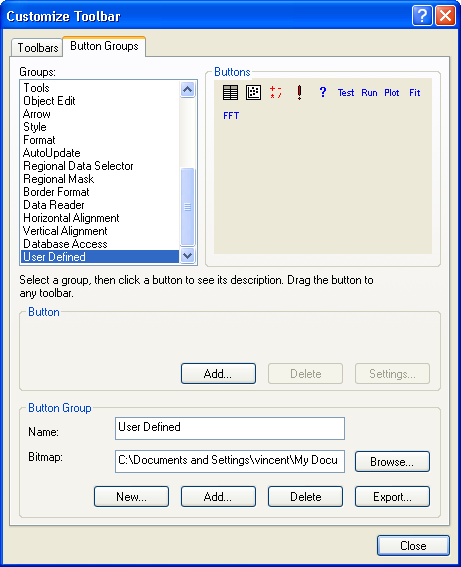
Drag any of these buttons onto the Origin toolbar to begin using them. Use the procedure outlined above to associate a script with a given button.
Creating a Bitmap File for a New Button
To create a bitmap file, using any program that allows you to edit and save a bitmap image (BMP) such as Window's Paint. The following steps will help you get started:
- Using the bitmap for the built-in user defined toolbar is a good place to begin. In Windows Paint, select File:Open, browse to your User Files folder and select Userdef.bmp.
- Set the image size. Select Image:Attributes. The height needs to remain at 16 and should not be changed. Each button is 16 pixels high by 16 pixels wide. If your toolbar will be only 2 buttons then change the width to 32. The width is always 16 times the number of buttons, with a maximum of 10 buttons or a width of 160.
- Select View:Zoom:Custom:800%. The image is now large enough to work with.
- Select View:Zoom:Show Grid. You can now color each pixel. The fun begins - create a look for each button.
- Select File:Save As, enter a new File name but leave the Save as type to 16 Color Bitmap.
|