9 Install or deploy Origin to the user's computers or a file serverMulti-userDeployment
This page provides Origin deployment documentation for both the Concurrent Network and the Multi-seat Node Locked packages.
Things to consider before getting started
OriginLab offers two types of installers:
- InstallShield Setup - Available on the DVD, trial download, and by a download link in an email after purchase. (Note: For multi-user deployment purpose, please choose to download the zip format, not the exe format.)
- MSI Installer - Download here
Advantages of InstallShield Setup
- The advantage of the InstallShield Setup is that it checks if required Microsoft (MS) DLLs are present on the computer, and if not, the InstallShield Setup automatically runs the required MS installers to install the DLLs.
- This differs from the MSI - the Origin MSI installers are not able to automatically run the MS installers. So if you deploy Origin from an MSI, you may want to include the MS installers and a batch file to install them.
Advantages of MSI Installer
- To deploy Origin with Group Policy(GPO) you can only choose MSI Installer and not InstallShield Setup.
- The MSI installer allows you to prepare a script so users can install Origin silently. A .ini file is used to pre-set the serial number, install folder, User Files Folder (users are asked to select this at first start-up), etc. For concurrent packages, you can also preset the FLEXnet server.
- Although InstallShield setup can use a .ini file, MSI installer is a preferred type for multiple-user deployment. It allows administrators to use another "Transform" (MST file) to pre-set more configuration or replace data in the MSI installation database. More information about Transforms can be found here.
The following instructions apply to both InstallShield Setup and MSI Installer.
Prepare your customized settings with the installer
Customize Installation Settings with Config.ini
What is Config.ini and what can it do
Config.ini file is a configuration file to preset/customize installation settings. It is available from Origin 2019. For InstallShield Setup, it's shipped with Origin setup file (the zip format installer). For MSI Installer, it can be downloaded separately.
What's in Config.ini?
It is optional to configure the following settings in Config.ini file. You can open it in a notepad editor to view and modify it. Detailed comments are included to help you understand each setting.
Installation Settings
Preset all installation data in [Setup] section:
- - preset Serial Number, User Name and Company information, installation path, whether to install embedded Python and SPSS import module.
- - determine whether to install Origin silently (Note: This only applies to InstallShield Setup. To install MSI silently, you can run the command line with the /quiet switch.)
Note:
If you set QuietMode = 1 to install Origin in silent mode, you must preset the following items.
AcceptOriginLabLicenceAgreement=1
SN=
UserName=
Company=
Other items will use the following default values if not specified
InstallPath=C:\Program Files\OriginLab\Origin####
EmbeddedPython=1
SPSSImport=0
AllUsers=1
ProgramFolder=C:\ProgramData\Microsoft\Windows\Start Menu\Programs\OriginLab Origin ####
Origin Folder Path
-
- - preset User Files Folder in [Locations] section
- - determine whether to show the User Files folder dialog with preset path when launching Origin the first time
- - UFF in OneDrive will lead to problems so it is highly recommanded to prevent UFF setting in OneDrive.
- AutoSave, Backup and Unsaved Project Folders
- - preset the root folder for AutoSave, Backup and Unsaved project folders in [Locations] section
- - preset Apps folder in [Apps] section
Note: If Config.ini has preset folder paths (for example User Files or AutoSave folder), they will be used instead of inheriting the old settings from previous version.
License Management
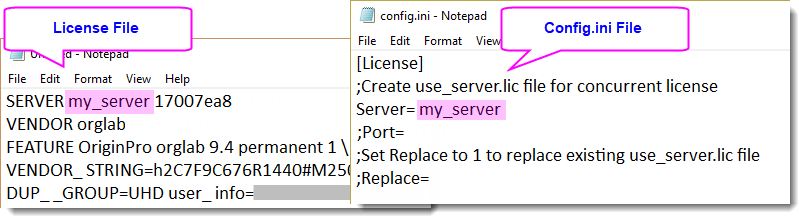
- For Concurrent Network package, enter the concurrent license server and port number (if any) into the [License] section of config.ini.
For example, if your server name is my_server, you can edit the [License] section as follow:
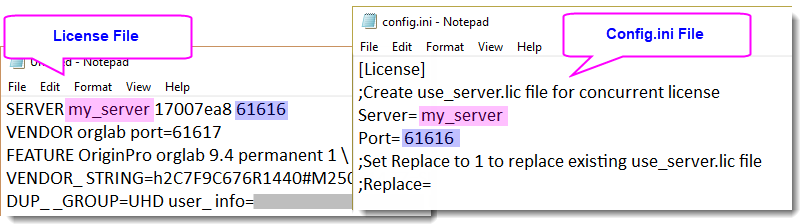
If you have set the SERVER port number as 61616, you can edit the [License] section as follow:
If Origin has been installed before, you can also decide whether to update the current server information or not by setting the Replace option. (Note: The Replace option is only available with the InstallShield Setup config.ini file, but not the MSI installer.)
- If you need to increase the maximum time Origin waits for a response back from the concurrent license server, for example, if you have an unstable or slow network connection, you can preset system environment variable
FLEXLM_TIMEOUT (in microsecond) into the [License] section of config.ini. For example, to set FLEXLM_TIMEOUT to 5 seconds,
[License]
FLEXLM_TIMEOUT = 5000000
The default value of FLEXLM_TIMEOUT is 3000000 (3 sec). If a larger value already exists, no update occurs unless you force it by setting
FLEXLM_TIMEOUT_FORCE=1
Optional Steps
- If you have a Multiple-User Node-Locked license and you want to preset product keys for the end users so their Origin can get activated automatically, you can request a Group Product Key, and save it to a pk.txt file in the folder where the installer files locate.
- If you want to pre-customize end users' Origin like menus and buttons, graph templates, fitting functions, etc., you can create a UpdateUserFiles folder in the folder where the installer files locate, and put the customized files (OMC, XML, ogwu, fdf, etc.) to the UpdateUserFiles folder. They will be copied to each user's User Files folder when they start Origin for the first time.
- If you want to pre-install apps, you can
- Create a folder named Auto Install in the Origin setup folder (with Setup.exe or MSI)
- Download the apps files (*.opx) and save them in the Auto Install folder
- When the end users install Origin from the Origin setup folder, the Auto Install folder will be copied to the end users' Origin Program Folder. When Origin runs, contained apps (*.opx) are auto-installed.
- Open Config.ini in the Origin setup folder (with Setup.exe or MSI) with notepad. Locate [SysVar] section and add system variables you want to preset here. When Origin is installed, the specified system variables will be set.
Distribute your Origin installation package
- Copy the Origin Setup files into a folder on computer "A". Note: Computer "A" must be on a network to which all potential Origin users can connect.
- Make sure the modified Config.ini, pk.txt file and UpdateUserFiles folder (if have) are in the Origin Setup folder where setup.exe is located.
- Share this folder with FULL READ/WRITE privileges and note its UNC share name. (e.g. \\A\Origin\)
- Email to all users to ask them to run the setup.exe/msi file. Users must be logged into their computers with a log in account that has administrative privileges and they must be on the network and they have access to \\A\<Origin Setup folder>.
Note:
- This installation method only installs Origin onto the target computers.
- For Concurrent Network packages, registration is optional. If user wants to register Origin, he/she can select menu Help: Register on-line to open the Registration dialog to register himself/herself.
MSI Installation
For detailed information about how to setup an installation package with MSI installer, please refer to this page.
Post Installation Updates by Group Folder
The group folder is an optional feature Origin provides to distribute files. It can be used by any site/organization that has multiple Origin users managed by any license type. Even though the group leader and group members have different license types, sharing files between them by using Group Folder is available.
The Group Folder feature involves setting up one or more group leaders. For example, group leaders could be established at the department level of an organization. All or any number of Origin and OriginPro users in the organization can share the same group leader or leaders. Leader(s) can serve as a source for distributing custom Origin files and patches to members of the group.
Once you set up a group leader, you can set up the Origin in your organization so that it is predefined to receive updates from the group leader.
Set up Group Leader(s) and Group Members
The first step is to set the Group Folder for the group leader machine.
Next, you can set the Group Folder for the member machines.
Use the Group Folder Manager to Publish Files
Group leader uses the Group Folder Manager to add, update, or remove files to group folder and then publish them to members of the group. Please refer to the Group Folder Manager document for detailed steps of how to use this tool.
After the group member specifies the group folder, and upon subsequent Origin start-ups, if newer files exist in the group folder, the group member will see a message telling them that files are updated (only for support files, not patches), or an update is now available and a re-start of Origin is required to receive the updates (for patches).
The supported files from the shared group folder are copied to the group member's \GroupShared\ folder located in their User Files Folder.
The files then become available in various Origin dialogs such as Theme Organizer, Fitting Function Organizer etc. The files will have a prepend tag of (Group) to identify them as originating from the group folder.
Types of Files that can be Published
- Supported Origin files, such as project, templates and fitting functions:
Use the Group Folder Manager to publish the file in the User Files folder on the group leader machine
- Apps:
- Create a folder named Auto Install in the User Files folder on the group leader machine
- Download the apps files (*.opx) and save them in the Auto Install folder
- Use Group Folder Manager to distribute the apps files (*.opx)
- Now when the Origin group member starts their Origin, they will see the apps installed on their Origin
- Publish Origin Service Releases.
Within a version, OriginLab typically releases one or more service releases to fix problems found in the release version. Typically, the service release is provided as a patch.
- You must first patch the group leader machine. Once done, re-start the group leader machine.
- Use Group Folder Manager to publish the patch file that you applied to the group leader.
- Now when the Origin group member starts their Origin, they will see a message that a patch is available from the group leader. They can choose to apply the patch, close Origin, and the patch program will start running.
- Move the FLEXnet Server and updating members of the new location (Concurrent Network packages)
If a FLEXnet service is moved to a different machine, the Group Folder feature can be used to update the members of the Concurrent Network package with this new location.
- After you set up the replacement FLEXnet server and have the service running successfully, you can edit the USE_SERVER.lic file located in the group leader's hidden License folder. Located:
C:\ProgramData\OriginLab\License
This file will typically have the following text, assuming the FLEXnet server is <FLEXnet server>
SERVER <FLEXnet server> ANY
USE_SERVER
A 3-Server Redundant FLEXnet server is also supported, for example if we have three servers <one>, <two>, <three>, and ports 12345, 23456, 34567, the USE_SERVER.lic file looks like:
SERVER <one> ANY 12345
SERVER <two> ANY 23456
SERVER <three> ANY 34567
USE_SERVER
- Once this change is made and the Origin group leader can connect to the new server successfully, you can put the USE_SERVER.lic file to the Group Folder to publish it. The Origin group members will be notified of the change of FLEXnet server with a message "Concurrent license server settings are updated. Click OK to restart".
|