2 Working with WorkspacesWorking-With-Workspaces
When you firstly open Code Builder, a default workspace named Untitled.ocw loads.
To begin developing your program,you can add new  or open existing or open existing  source files, header files, LabTalk script files, and text files. You can save your changes as Untitled.ocw or you can save to a new workspace file name. source files, header files, LabTalk script files, and text files. You can save your changes as Untitled.ocw or you can save to a new workspace file name.
The Code Builder workspace is the main organizational tool for developing your programs, and it serves two primary functions:
- Only source files added to the workspace can be compiled and linked. To better understand this aspect of the Code Builder workspace, see Compiling Origin C files.
You can create different workspaces for each of your programs, or develop all your programs in the same workspace. Like an Origin project file, only one workspace can be opened in Code Builder at a time.
Creating a New Workspaces
To create a new workspace, select File:New Workspace. If a previous workspace is open, you will be asked if you want to save changes to that workspace. The new workspace that opens is named as Untitled.ocw and is saved in the \OriginC subfolder.
Opening an Existing Workspace
To open an existing workspace, select File:Open Workspace. If you have made changes to your
current workspace, you will be asked if you want to save the changes.
Navigating in the Workspace Using the Workspace Tree
The Code Builder Workspace window is similar to Windows™ Explorer which has a tree-like design so that it can help you organize and find files added to the Code Builder workspace. The Code Builder
Workspace window is opened by selecting the View:Workspace menu item in Code Builder. Each time
a file is added to the Code Builder workspace an icon representing the file is added to one of four
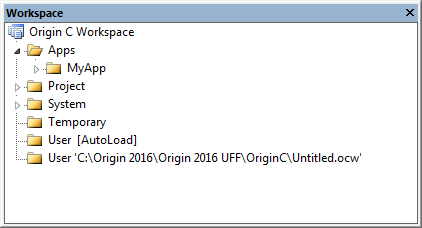
folders in the workspace tree. The six predefined workspace folders are named Apps, Project, System, Temporary, User [AutoLoad] and User and are described in details below. The workspace tree can be used to organize
and navigate between the source, header, LabTalk script, and text files added to your workspace. For
example, if you double-click on a file icon in the workspace tree it will open and activate the file in the
Code Builder Multiple Document Interface (MDI).
To view the icons of files added to folders in the Code Builder Workspace window, click the  button
next to the App, Project, System, Temporary, User [AutoLoad] and User folders in the workspace tree. To collapse a branch
of the workspace tree click the button
next to the App, Project, System, Temporary, User [AutoLoad] and User folders in the workspace tree. To collapse a branch
of the workspace tree click the  button. button.
Each of the six predefined folders (Apps, Project, System, Temporary, User [AutoLoad] and User) contains files added to the
workspace by different means. Files in Apps, Project, System, User [AutoLoad], User folders can be moved by dragging them into any other folder, however, files cannot be dragged (moved) into the Temporary folder. Files can also be
removed from the workspace by right-clicking on them in the tree and then selecting Remove from the shortcut menu.
Files added to the Apps Folder
This folder is used to manage the *.opx packages for Apps and it usually contains only folders.
Each of the sub-folders in Apps folder represents a disk folder in Application Data Folder (C:\Users\<user>\AppData\Local\OriginLab\93\Apps\).
To add an existing folder to Apps folder, make sure it is an intermediate subfolder of the Apps folder, then you can right click on the Apps folder icon and select Add Existing Folder... from the context menu to browse the specified folder. To create a new folder under Apps node, select New from the context menu instead.
To add files to an app package folder, right click on it to select Add Files... from the context menu.
The package folder context menu also allows you to Rename, Remove or Duplicate current folder. When you select Generate from the context menu, it will launch Package Manager and add the files in current folder to package manager to further create an App package.
Files added to the Project Folder
Files added to the Project folder are automatically included inside the open Origin project file and are built whenever the Origin project file containing them is opened by Origin. Files in the Project folder are always available to be executed as long as the Origin project file containing them is opened. Files in the Project folder remain in the Project folder until they are dragged out into either the System or User folders, until they are removed using the Remove shortcut menu item, or until a new Origin project file (*.OPJ) is opened. Files in the Project folder remain even when a new Code Builder workspace is created or opened.
Files added to the System Folder
Files added to the System folder are automatically re-added to the workspace as system files when Origin or Code Builder starts and each time a new workspace is created or an existing workspace file is opened. Files in the System folder are always included in the workspace and any Origin C functions in system files are always available to be executed once the workspace has been built.
By default, the System folder contains several OriginLab source files including one named sys_utils.c. These files contain Origin C functions used by Origin itself and in general should not be removed from the System folder (in fact, sys_utils.c can physically not be removed). Users can specify their own source files as system files by dragging them from the Project, Temporary, or User folders into the System folder. Once added to the System folder, a file will remain in the System folder until the user drags (moves) the file out of the System folder or removes the file from the workspace using the Remove shortcut menu item. Files can also be designated as system files in the Origin.ini file but it is recommend that users add files into the System folder using the Code Builder interface.
Files added to the Temporary Folder
Files cannot be dragged or moved into the Temporary folder using the Code Builder interface; Files can only be added to the Temporary folder by calling the LabTalk method run.LoadOC or the Origin C method Project.FindFunction. The Temporary folder contains only those source files dynamically added to the workspace by the these two methods and is emptied whenever a new workspace file is opened. Files added to the Temporary folder are removed from the workspace when you close Origin or Code Builder and when you open a new or existing workspace file. Files can also be removed from the Temporary folder by dragging the file out of the Temporary folder or by removing the file from the workspace using the Remove shortcut menu item. You can choose to manually update the file list in Temporary folder by right clicking on the folder icon and select Refresh to refresh the file list.
Files added to the User[AutoLoad] Folder
Files added to this folder is similar to the User folder described below, except that the files in User [AutoLoad] folder will be compiled and linked automatically upon starting Origin, and then the functions defined in the files under this folder are available, and there is no need to compile and link manually.
Files added to the User Folder
Files added to the workspace using the Code Builder interface are added to the User folder when:
A newly created source file is added to the Code Builder workspace (see Creating a New File and Adding it to the Workspace).
An existing source file is opened and added to the workspace (see Opening an Existing File and Adding it to the Workspace).
An opened file is added to the workspace (see Adding Open Files to the Workspace).
Users can also drag or move files into the User folder from the Project, Temporary, and System folders.
Files added to the User folder are removed from the workspace when you:
- Open a new or existing workspace file.
- Manually remove them using the Remove shortcut menu item.
- Drag or move them into the System or Project folders.
A list of the files in the User folder can be saved to a workspace file (of type *.OCW) by saving the Code Builder workspace. The next time the saved workspace file is opened by Code Builder, all files listed in the workspace file are added and will appear in the User folder of the workspace. The path and file name of the workspace file currently open in Code Builder is always displayed just to the right of the User folder name. Also, when Code Builder is opened it always loads the last opened workspace file from the previous session of Code Builder.
See Saving a Workspace and Opening an Existing Workspace for more information on saving and opening a workspace.
For more information on when and how files in the Code Builder workspace are built, see Four Methods
of Building the Code Builder Workspace.
Building a Workspace
Code Builder provides a build and rebuild option for building your workspace. Furthermore, you can
exclude selected files from the build process.
To learn more, see Compiling Origin C files.
Saving a Workspace
To save the workspace, select File:Save Workspace As to specify a file name and path, or select
File:Save if you have saved the workspace prior to your current changes. Workspace files have
a .OCW extension. Only files added to User folder of the Code Builder workspace are saved in
workspace files.
| Note: The files that were opened in the MDI when you save and close a workspace will be open in the MDI when you re-open the workspace, assuming they are still located in the same path/file name.
|
Sharing a Workspace with Another Origin User
To share a workspace file including all the source, header, LabTalk script, and text files that have been added to the workspace, you cannot simply send your colleague the .OCW workspace file. This file contains links to your added files, not the actual files. Thus, to share a workspace you would need to send the workspace file and the individual files, and your colleague would then need to save the individual files using the same relative path to the workspace file. However, an easier method is to pack your workspace file and the added source, header, script, and text files into an Origin Pack file (*.OPX). Origin provides a dialog box (Tools:Package Manager) similar to the WinZip interface for selecting and packing files. Your colleague can then drag this single file onto their Origin program to "install" the workspace and related files.
|