5.1 Get Started with LabTalkTutorial-Get-Started
Summary
LabTalk is a scripting language in Origin to perform importing, data analysis and graphing and publication. The LabTalk script can be executed in independently in script/command window, or put behind menu, toolbar, graphic object(button, text, line, arrow, rectangle, etc.), or inside dialog to work together with it.
A LabTalk script is a single block of code that is received by the LabTalk interpreter. A LabTalk script is composed of single or multiple statements, each performing an action.
The statements can be written from several elements, which are: system variables, commands, functions, macros, objects and X-Functions.
- Statements are separated by semicolon ; .
- The script is case insensitive.
What You Will Learn
In this tutorial, you will learn basic statements with different elements and different ways to run LabTalk script in Origin:
Steps
Run Script From Script Window
The Script Window is a text editor with the additional feature of carrying out LabTalk script execution. It is most useful for executing single line or short scripts. The Script Window is not a child window and therefore not saved as part of a project.
- Select Window:Script Window menu (or press Shift + Alt + 3) to open the Script Window.
- Click the Edit menu on the top of the Script window. Make sure Script Execution is checked.
- Copy the following command in Script window and press Enter to run it
type "Hello World"
The command prints string in Script window. So Hello World is printed to next line. ; is added at the end to indicate the execution.
- To run it again, put cursor anywhere before ; and press Enter key.
Note: If put cursor after ; and press Enter key. The script will not be executed. Origin will just start a new line. The cursor will just go to new line below it.
- Copy and paste the following multi-line script into the Script Window.
- Highlight all 3 lines and press Enter to execute them. The script creates a new workbook, set number of columns to 4 and print the workbook name(stored in a reserved string register %H) and number of columns (stored in a substitution notation $(wks.ncols)) in an Attention box with OK button:
newbook; //X-Function
wks.ncols=4; //wks object's ncols property

//type command with -b switch option to output to a message box with OK button
//%H is string register for window name
type -b "In %H, there are $(wks.ncols) columns.";
Note: If you want to manually type multi-line script in Script window, remember to add ; at the end of the script and press Enter key so that it doesn't execute the script.
Sometimes a statement may be clearer if written in multi-lines, in such case there is no ; at the end yet. To start a new line without execution of the incomplete statement, hold the Ctrl key and then press Enter key to start a new line without execution, therefore no ; added at the end. E.g. it's better to write the for loop below in multiple lines:
- Type the following 4 line script one by one. Press Ctrl+Enter at the end of each line to start new line
for(ii=1; ii<=wks.ncols; ii++) //for loop
{
   wcol(ii)=data(ii, ii+10); //wcol() function, data() function
}
- Now highlight all lines and press Enter key to execute the script
 | Script window isn't a good place to write long script. But in case you want to pause any execution and write and edit script, select Edit menu inside Script window and uncheck Script Execution. The Script window will be a pure editor. After editing, make sure check 'Edit: Script Execution menu again so that you can highlight all lines and press Enter key to execute the script.
|
Run Script From Command Window
The Command Window is another place to run script. Script window is purely a text editor with running capabilities while Command window has
- a >> prompt and will execute all code entered at the prompt, including multi-line script
- auto completion of command and functions to help write script.
- coloring of keywords such as command, function, variables, strings etc.
- Up/Down key to bring up the previous command and next command and execute.
- history tab to see running history. User can also run script on history tab.
- Close and reopen Command window will keep history. The right side will be kept in the same Origin session only.
Command window may not be user-friendly to edit multi-line script. E.g. Even if the cursor is after ;, pressing Enter key will still execute the line. Always hold Ctrl key and press Enter to start new line in Command window. It's impossible after running line by line script, clean the output and save the script as ogs file
User should choose which window to use based on his/her own needs.
Try the same script as in Script window part.
- Select Window:Command Window (or press Alt + 3) to open the command window.
- After >> prompt, enter t, a dropdown list will show all LabTalk command and x-functions starting with t
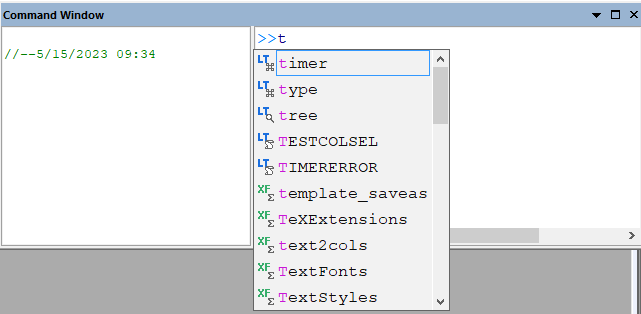
- Press down key to type in the list and press Enter to select the command. Or double click type to select it. Since type is a LabTalk command, it's colored.
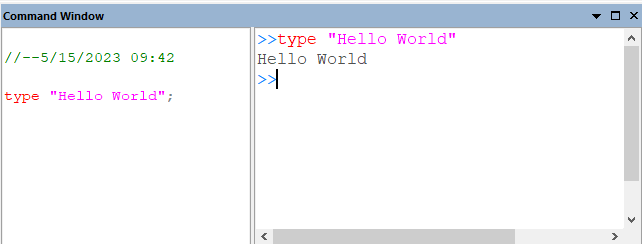
- Continue the typing so the line is type "Hello World". String is also colored.
- Press Enter key to execute it. "Hello World will be printed in next line. No ; added at the end. the command is dumped the left history tab.
- With cursor after the new >>, press UP key will load type "Hello World" again. Press Enter key to execute it.
- Put cursor anywhere on type "Hello World" line in history tab and press Enter key will execute it as well.
- Put cursor anywhere on the already excuted >> line and press Enter key will execute it as well.
- Copy the multi-line script in Script window section and paste with cursor after >> in Command window.
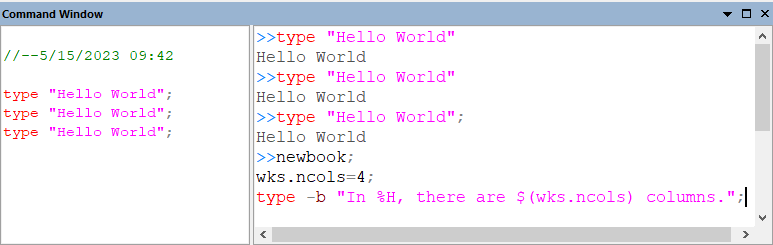
- Press Enter key with no need to highlight any part of the script. A new workbook with 4 columns is created with a popup message of bookname and number of columns.
Save Script as an OGS File and Run it
Origin's LabTalk Script can be saved as .ogs file for future execution.
The ogs file is built into blocks called sections, with [sectionname] at the beginning of each section. There can be script without section name at the beginning of ogs file as well.
User can run script in ogs files by two methods of the Run LabTalk object
Note:
- The script will terminate when it encounters a new [sectionname] (or a return statement).
- The .ogs can be skipped in script.
- If the .ogs file is not saved under the User Files Folder, full file path should be written in script.
Try the following example of save ogs file and execute it.
- Paste the following script into an empty Script Window:
type -b "HELLO WORLD";

[Section1]
type -a "Hello";

[Section2]
type -a "World";
- Click File(Text):Save As... from the top menu of Script Window and save the script as Test.ogs in your User Files Folder.
- Start a new in in Script window, type the following text and click Enter:
run.file(Test) //or run.file(Test.ogs)
- Click OK to close the attention box displaying "HELLO WORLD", and type the following in new line and click Enter:
run.section(Test, Section1) //or run.section(Test.ogs, Section1)
| It's much easier to write ogs file by Origin's built-in 'Code Builder'. Choose View: Code Builder menu or click Code Builder button on Standard toolbar to open it. Then choose File: New menu in Code Builder and choose LabTalk Script File to create ogs file.
|
Run Script From Buttons
From Custom Routine Toolbar Button
By default Origin reserves one toolbar button  on Standard toolbar to run script in Custom.ogs file so that user can easily put some script in the file and without need to go through the process of adding a toolbar button. on Standard toolbar to run script in Custom.ogs file so that user can easily put some script in the file and without need to go through the process of adding a toolbar button.
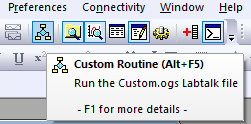
- Click the Custom Routine button, it gives info. how this toolbar button works.
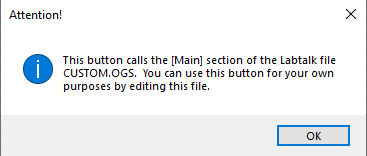
- Click OK to close it.
- Hold down Ctrl + Shift keys and click on the Custom Routine button will open the Custom.ogs file in Code Builder (Note: you can set system variable @KCK to change the default behavior for Ctrl + Shift keys).
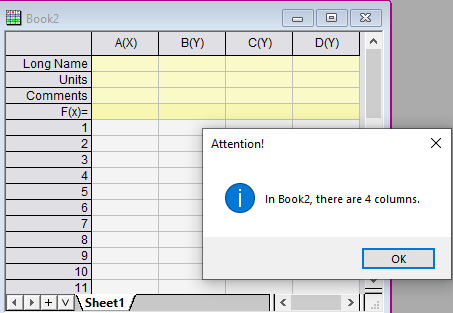
- Delete the script inside [Main] and replace it with
newbook;
wks.ncols=4;
type -b "In %H, there are $(wks.ncols) columns.";
- Click Save button.
- Close Code Builder or minimize it to return to Origin main workspace.
- Click the toolbar button.
New workbook will be created with 4 columns and an message box shows with book name and number of columns information.
From A User-Defined Toolbar Button
This section will show an example of creating a user-defined toolbar button to run LabTalk script.
- Make sure you have the Test.ogs file saved in User Files Folder from the Save script as an OGS file and Run it section.
- Close Script window and Command window.
- Select View:Toolbars... menu to open the Customize dialog for toolbars.
- Go to the Button Groups tab and select User Defined under the Groups section. This is a preshipped button group with 10 buttons.
- You can pick any button you like. E.g. click on the 7th Run button to select it.
- Click the Settings... button to open the Button Settings dialog.
- Click the Browse button right to the File Name box and select the Test.ogs file you created under User Files Folder.
- Type Section1 for Section Name.
- Enter "type hello" for Tool Tip Text.
- There are many other settings such as in which window the button will be enabled, argument list for sections that requires argument, etc. For now, we don't need to worry about them.
- Click OK to apply the settings and close the Button Settings dialog.
- Drag the button onto the Origin workspace (out of the Customize dialog) or you can even drag it to a place you want in current toolbar. Then close the Customize dialog.
- The Run button will be floating in the Origin interface.
- Mouse over the button. Tooltip shows run type hello.
- Click on it will run the section1 of test.ogs file.
The Script Window is opened and text "Hello" is typed since type command with -a switch will force the string to output to the Script window.
- You can drag the Run button to dock it on an existing toolbar.
From A User-Defined Button on Graph Window
- Click the
 button to create an empty graph. button to create an empty graph.
- Right click on the blank area on the graph and choose Add Text from context menu, type Run2 as the label text.
- Select the text object, right click and choose Properties... to open the Text Object dialog.
- Go to Programming tab.
- Choose Button Up for Script, Run After, and type the following script to the script edit box:
run.section(Test, Section2);
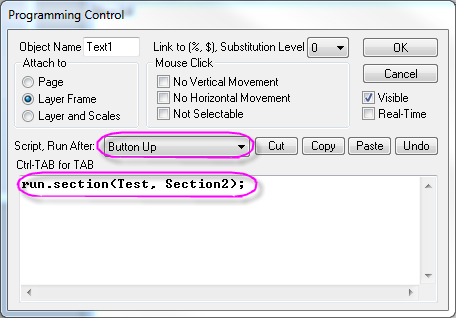
- Click OK and the text label becomes a button. Click on the Run2 button to execute the script.
Text World is output to Script window.
- You may notice that you can't right click on button to see the context menu to modify the properties again.
- To modify the the script for the button, hold down Alt key and double click on the button to go to Programming tab directly.
- Toolbar buttons can only run script from ogs file, while button here can run multi-line script. Let's put the following script in the dialog.
type "current window is %H";
type "current folder is %@F";
type "current project is %G";
- Go to Text tab, modify Run2 as Info
Click OK.
- The button is renamed to Info. Click it.
The info. of current window, folder and project will be output to Script window.
| Besides Alt+double click trick to open Text Object dialog of a button, you can also choose Edit: Edit Mode menu to Set every object (button, label, graphic object) into Edit Mode. This applies to all windows in current and future sessions. Now you can right click the text and choose Properties. Please remember to choose Edit: Edit Mode menu again to quit the Edit Mode. Otherwise the all graphs in Origin will look something like
Note: Edit Mode is called Button Edit Mode in versions prior to Origin 2017.
|
Run Script from User-defined Menu
Origin allows user to create custom menus to run LabTalk Script.
- Select Preferences: Custom Menu Organizer...
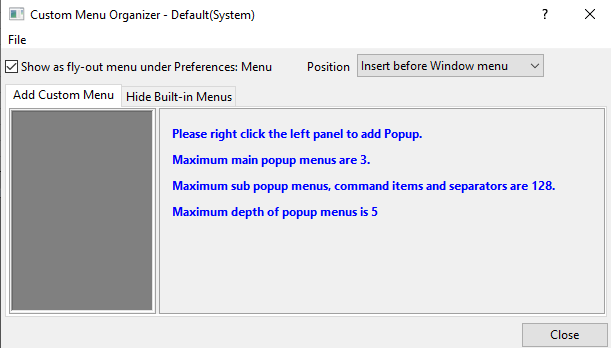
- On Add Custom Menu tab, right click on left panel and choose Add Main Popup.
- Rename the Popup Text as MyTools, this will be the menu show before Window menu in Origin workspace.
- Right click on MyTools on the left and choose Add Item.
- Rename the Item Text to New Sheet with Data
- Put the following LabTalk Script
newsheet; //add a new sheet
col(A)=data(1,100);//fill column A with 1, 2, ...100
col(B)=normal(100)*2+5; //cill column B with 100 random numbers with a mean = 5 and a sd = 2
- Click Close button.
- Save changes to file: Default? is prompted. Choose Yes button.
MyTools menu is added before Window menu.
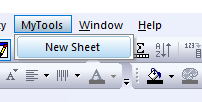
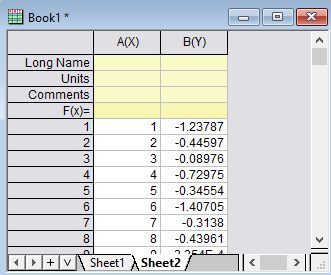
- With a workbook window active, click on MyTools:New Sheet menu
- New sheet will be added with column A and B filled with data.
| You can choose File: Delete menu inside Custom Menu Organizer to delete the modified default menu. Or after creating menu menus, choose File: Save as to save it with a different name than default. Then use Preferences: Menu: to pick your customized menu.
|
|